
Clearing Paper Jam in the Multi-drawer Paper Deck-D and Relevant Paper Feed Sections (Optional)
This section describes how to clear a paper jam which occurs in the Multi-drawer Paper Deck-D and relevant paper feed sections. The locations of the Multi-drawer Paper Deck-D and relevant paper feed sections are indicated in the following illustration.

|
The following illustration indicates the location of the paper jam. Please refer to it to remove the jammed paper. 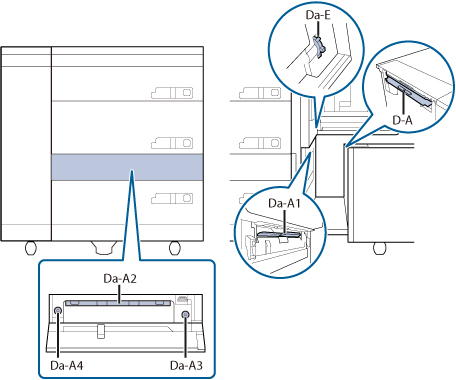 Da-A2, Da-A3 and Da-A4 indicate positions for the Paper Deck Path Kit-A, which are optional products of the Multi-drawer Paper Deck-D. |
Follow the procedure described below, while referring to the location of the paper jam and the directions that appear on the touch panel display, to remove the jammed paper.
Paper Jam in the Paper Deck
1
Open the paper deck.
 | Push the open button of the paper deck indicated on the touch panel display. |
 | Grip the handle, and pull out the paper deck until it stops. |
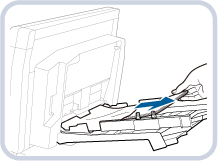
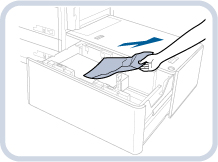
 | Remove any jammed paper. 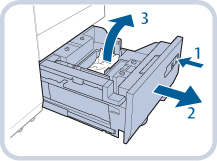 |

If the machine is in the Sleep mode (the touch panel is not displayed, and only  is lit), you may be unable to open the paper deck unit. In this case, press to reactivate the machine, and then press the open button on the paper deck unit.
is lit), you may be unable to open the paper deck unit. In this case, press to reactivate the machine, and then press the open button on the paper deck unit.Do not pull out the paper deck by force.
Make sure you loaded paper properly into the stack area when opening the paper deck. If the paper is loaded improperly or paper remains in the stack area, load the paper properly again. It may cause paper to be folded or paper jams to occur.
2
Gently push the paper deck back into the machine until it clicks into place in the closed position.

When closing the paper deck, be careful not to get your fingers caught, as this may result in personal injury.

Do not give a strong shock to the paper deck when opening/closing the paper deck, as this may result in a malfunction, damage to the machine or the image misalignment.
3
Follow the instructions on the screen.
The screen indicating the directions on how to clear the paper jam is displayed repeatedly until the paper am is cleared.
Paper Jam in the Stack Bypass-C
1
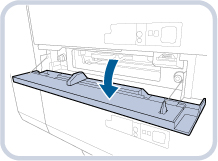
Close the cover that is open.
When closing the cover, be careful not to get your fingers caught, as this may result in personal injury.
2
Remove the paper that is not jammed from the Stack Bypass-C.
3
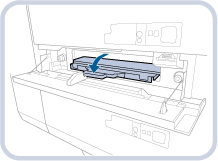
Open the Stack Bypass-C.

4
Remove any jammed paper.
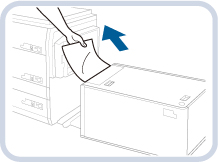
| Remove any jammed paper from the outside of the Stack Bypass-C. |
| Remove any jammed paper from the inside of the Stack Bypass-C. 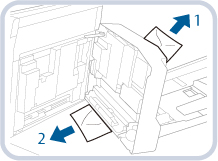 |
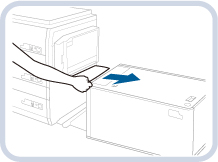
Paper can also be jammed in the feeding slot on the side of the Multi-drawer Paper Deck-D. Remove any jammed paper from the feeding slot.
5
Remove any paper jammed in the side of the Multi-drawer Paper Deck-D.
| Turn the dial (Da-E). |
| Remove any jammed paper. 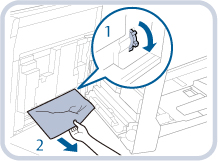 |
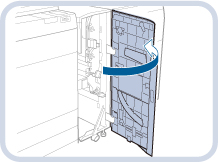
6
Open the front cover of the Multi-drawer Paper Deck-D.
7
Remove paper from the escape tray.
* This step is unnecessary unless the Paper Deck Double Feeding Detection Kit-B is connected.
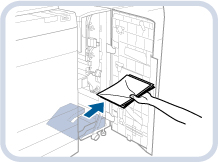
If paper is not removed from the escape tray when the front cover is opened or closed, paper-full notification for the escape tray will not function properly.
8
Remove any jammed paper from the guide (Da-C1).
| Open the guide (Da-C1). |
| Turn the paper output dial (Da-C2). |
| Remove any jammed paper. 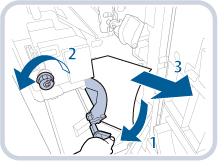 |
9
Close the guide (Da-C1).
When closing the guide, be careful not to get your fingers caught, as this may result in personal injury.
10
Close the front cover of the Multi-drawer Paper Deck-D.
When closing the cover, be careful not to get your fingers caught, as this may result in personal injury.
11
Open the through path cover.
12
Open the guide (Da-A2).
13
Remove any jammed paper.
| Turn the dial (Da-A3/A4) until it feels light. |
| Remove the jammed paper, and close the guide (Da-A2). 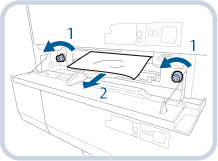 |
14
Close the through path cover.
When closing the cover, be careful not to get your fingers caught, as this may result in personal injury.
15
Follow the instructions on the screen.
The screen indicating the directions on how to clear the paper jam is displayed repeatedly until the paper jam is cleared.
Paper Jam in the POD Deck Lite XL-A
1
Close any open cover.
When closing the cover, be careful not to get your fingers caught, as this may result in personal injury.
2
Move the POD Deck Lite XL-A away from the Multi-drawer Paper Deck-D.
| Press the release lever. |
| Move the POD Deck Lite XL-A away from the Multi-drawer Paper Deck-D. 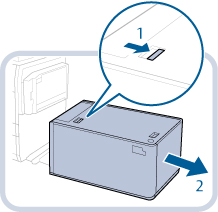 |
3
Remove any paper jammed in the side of the POD Deck Lite XL-A.
Paper can also be jammed in the feeding slot on the side of the Multi-drawer Paper Deck-D. Remove any jammed paper from the feeding slot.
4
Remove any paper jammed in the side of the Multi-drawer Paper Deck-D.
5
Reconnect the POD Deck Lite XL-A to the Multi-drawer Paper Deck-D.
If the paper jam message is no longer displayed when you reconnect the POD Deck Lite XL-A, proceed to step 8.
When reconnecting the POD Deck Lite XL-A to Multi-drawer Paper Deck-D, be careful not to get your fingers caught, as this may result in personal injury.
When reconnecting the POD Deck Lite XL-A to the Multi-drawer Paper Deck-D, confirm that the front cover of the Multi-drawer Paper Deck-D is closed properly.
6
Open the paper deck.
| Press the open button. |
| Open the paper deck. The inside lifter automatically descends to the paper loading position. 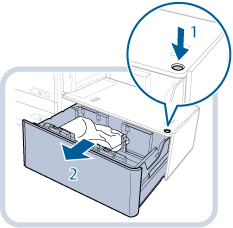 |
If the machine is in the Sleep mode (the touch panel is not displayed, and only is lit), you may be unable to open the paper deck. In this case, press to reactivate the machine, and then press the open button on the paper deck.
is lit), you may be unable to open the paper deck. In this case, press to reactivate the machine, and then press the open button on the paper deck.7
Remove any jammed paper.
Look carefully, as jammed paper may be difficult to see.
8
Close the paper deck.
When closing the paper deck, be careful not to get your fingers caught, as this may result in personal injury.
When closing the paper deck, confirm the followings:
Paper is loaded properly.
The size change plates and rear edge retainer are set in the proper position.
9
Open the front cover of the Multi-drawer Paper Deck-D.
10
Remove paper from the escape tray.
* This step is unnecessary unless the Paper Deck Double Feeding Detection Kit-B is connected.
If paper is not removed from the escape tray when the front cover is opened or closed, paper-full notification for the escape tray will not function properly.
11
Remove any jammed paper from the guide (Da-C1).
| Open the guide (Da-C1). |
| Turn the paper output dial (Da-C2). |
| Remove any jammed paper. |
12
Close the guide (Da-C1).
When closing the guide, be careful not to get your fingers caught, as this may result in personal injury.
13
Close the front cover of the Multi-drawer Paper Deck-D.
When closing the cover, be careful not to get your fingers caught, as this may result in personal injury.
14
Open the through path cover.
15
Open the guide (Da-A2).
16
Remove any jammed paper.
| Turn the dial (Da-A3/A4) until it feels light. |
| Remove the jammed paper, and close the guide (Da-A2). |
17
Close the through path cover.
When closing the cover, be careful not to get your fingers caught, as this may result in personal injury.
18
Follow the instructions on the screen.
The screen indicating the directions on how to clear the paper jam is displayed repeatedly until the paper jam is cleared.