Setting Binding Margins
 | You can make binding margins for stapling or punching holes. You can set binding margins on the front side and back side of pages individually. |
 |
When the margin is set, images are shifted by the margin width and copied. An original whose image extends all the way to the edges of the sheet may be partially cut off on the copy. |
1
Place the original. Placing Originals
2
Press <Copy>. <Home> Screen
3
Press <Options> on the Copy Basic Features screen. Copy Basic Features Screen
4
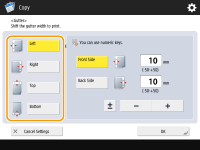
Press <Gutter>.
5
Select the margin position.
If <Gutter> is set with <N on 1> (Copying Multiple Originals onto One Sheet (N on 1)), the margin specified for the front side is applied to both sides. The margin specified for the back side is not applied.
6
Enter the margin width.
Press <Front Side> or <Back Side> and enter each margin width.
If you enter a number smaller than 0, the margin is set on the opposite side of the position specified in step 4. Use this if you want to narrow the margin width when copying an original that already has margins.
If you press <±>, the value switches between <-> and <+>.
7
Press <OK>  <Close>.
8
Press  (Start).
(Start).Copying starts.
 |
If you are using <Gutter> and <2-Sided> together follow the instructions below: If there is a gutter: 1-Sided  2-Sided: Set the Gutter mode for the back side only. 2-Sided: Set the Gutter mode for the back side only.2-Sided 2-Sided: You do not need to set the Gutter mode. 2-Sided 1-Sided: Set the Gutter mode for the back side only.If there is no gutter: 1-Sided 2-Sided: Set the Gutter mode for both the front side and back side.2-Sided 2-Sided: Set the Gutter mode for both the front side and back side.2-Sided 1-Sided: Set the Gutter mode for both the front side and back side. |