Copying Files to a Folder for Printing (Hot Folder)
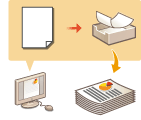
 | Files can be printed simply by copying them to a hot folder created in the shared folder of the Advanced Box. Print settings do not need to be specified from the printer driver because they can be specified for each folder. |
 |
When using a hot folder, it is necessary to change the following Advanced Box settings in advance. For details, see Setting Advanced Space to Public. <Advanced Space>  <Open to Public> <Open to Public>  <By SMB> or <By WebDAV> <By SMB> or <By WebDAV><Advanced Space>  <Prohibit Writing from External> <Prohibit Writing from External>  <Off> <Off> |
Adding a Hot Folder
1
Start the Remote UI. Starting the Remote UI
2
Click [Settings/Registration] on the portal page. Remote UI Screen
3
Click [Printer]  [Hot Folder Management].
 [Hot Folder Management].
4
Click [Add Folder].
5
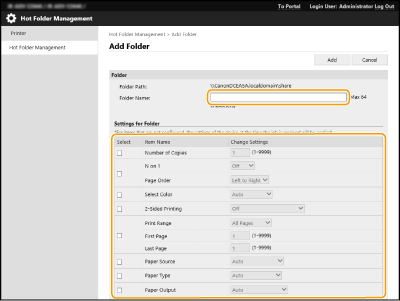
Enter the folder name of the hot folder, and specify the required settings.

 |
Multiple folders with the same folder name cannot be registered. A folder with the same name as an existing folder in the shared folder cannot be registered. A maximum of 20 hot folders can be registered. |
6
Click [Add].
The path to the generated hot folder is displayed.
 |
Hot folders are generated directly below the shared folder of the Advanced Space. The specifications of added folders are the same as the Advanced Space. For details on the specifications of the Advanced Space, see Storage Space Functions. The generated hot folder can be renamed and deleted from the Advanced Box. It still functions as a hot folder after being renamed. This setting can only be specified by a user with Administrator privileges. This setting can be imported/exported with models that support batch importing of this setting. When performing batch exporting, this setting is included in [Settings/Registration Basic Information]. Hot folders may not operate correctly when the Advanced Space is backed up or restored. When the Advanced Space is backed up or restored, check the settings on the [Hot Folder Management] screen and change them as required. |
Storing Files to a Hot Folder for Printing
 |
Files stored in the hot folder are deleted after printing. When storing files in a folder, store a copy rather than the original files. |
When Disclosed via SMB
1
Display Windows Explorer.
2
Enter the address of the Advanced Space in the address entry field, and press the [ENTER] key on the keyboard.
Enter the folder path used when adding the hot folder.
The content of the Advanced Space is displayed.
 |
When using an IPv6 address, enter the IP address enclosed in square brackets ([ ]). |
3
Store the files for printing to the hot folder.
Printing starts.
When Disclosed via WebDAV
1
Display Windows Explorer, and click [This PC].
2
Click [Map network drive] on the [Computer] tab.
3
Select the drive from the [Drive] drop-down list.
4
Enter the address in the [Folder] text box, and click [Finish].
Enter the folder path used when adding the hot folder.
The content of the Advanced Box is displayed.
 |
When using an IPv6 address, enter the IP address enclosed in square brackets ([ ]). When TLS is enabled, enter "https" instead of "http" when entering the address. |
5
Store the files for printing to the hot folder.
Printing starts.
 |
Files in the PDF, TIFF, or JPEG format can be printed with a hot folder. Files cannot be printed when the following security settings are enabled. Remote UI [Hot Folder Management] will also no longer appear. [Use ACCESS MANAGEMENT SYSTEM] <Restrict Job from Remote Device without User Auth.> |