Making Booklets (Booklet Copying)
 | You can set the print layout so that the printouts turn into a booklet when they are folded in half. Using options enables you to automatically process operations such as folding in half and stapling in the crease (Saddle Stitch). Optional Equipment Checking the Options Installed on This Machine |
 |
PaperThere are restrictions for paper that can be used with this function. Take note of the following. For information on restrictions on paper for each option, see Hardware Specifications. Depending on paper size and type, booklet copying may not be available. The number of sheets to be printed using saddle stitch is limited. Paper that can be used for the content and cover pages is limited. |
1
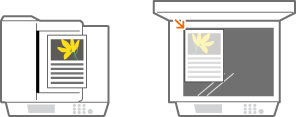
Place the original. Placing Originals
When copying a vertically long original, place the original in portrait orientation.
2
Press <Copy>. <Home> Screen
3
Press <Options> on the Copy Basic Features screen. Copy Basic Features Screen
4
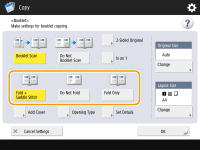
Press <Booklet>.
5
Press <Booklet Scan>.
When you perform booklet copying with 2-sided originals, press <2-Sided Original> and select <Book Type> or <Calendar Type> as necessary.

When you copy an original that is already in booklet format, such as one printed from the machine using booklet copying, press <Do Not Booklet Scan>.
If the <N on 1> setting appears
This allows you to place multiple pages from the original onto a single page in the booklet. Press <N on 1> and specify the number of pages to place on the single page and the page order.
Even after you set <N on 1>, you still can set <Page Numbering> in <Options> to print page numbers. However, page numbers cannot be printed on all pages of the original document. Page numbers are printed on each page of the booklet.
6
Select how to bind the booklet.
7
Set the original size and the output size.
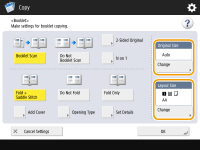
Press <Change> in <Original Size> and select the size of original. If you select <Auto>, the booklet size is automatically selected according to the size of original.
Press <Change> in <Layout Size> and select the paper size for the booklet.
To make the booklet in the same print size as the original print size, select the output size of the facing pages. If you specify the same size in <Original Size> and <Layout Size>, the print size on the booklet is automatically reduced.
8
<Add Cover>  Specify the cover settings and press <OK>.
Select whether to copy the original onto the cover and the back cover.
Press <Change> in <Paper Size> and select the paper size of the cover and the paper source.
Make sure to use the same size paper for the cover and content pages.
If you use heavy paper for the cover, you may be unable to print even if you select <Print>, depending on the thickness of the paper. For more information, see Available Paper.
9
<Opening Type> Select the opening type and press <OK>.
10
Press <Set Details> and specify detailed settings as necessary.
 When the number of pages is large
When the number of pages is large and the booklet cannot be stapled together, you can divide it into volumes so that they can be stapled.
1 | Press <Divided Booklet>. |
2 | Enter the number of pages per volume. |
3 | <OK> |
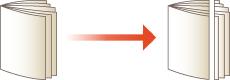
When the inner pages protrude after being folded in half
If a stack of paper is folded in half, the inner pages protrude as the number of pages increases. You can correct this paper shift. Optional products are required to use this function.
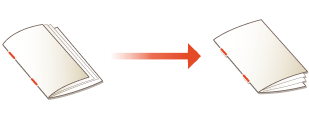
Without correction | With correction | |
 |  | |
The red sections are shifting | The red sections are aligned |
1 | Press <Creep Correction>. |
2 | Press <Auto> or <Manual>. If you select <Manual>, enter the value for correction with  / / . . |
3 | <OK> |
If <Trim> is displayed, you can trim the protruding part to align the edge of the booklet.
If you can select <Adjust Trim Width>, you can adjust the trimming position.
Adjusting the saddle stitch position
You can shift the folding position and stapling position at the same time.
1 | Press <Change Fold/Stitch Position>. |
2 | Select the paper for copying and enter the saddle stitch position. |
3 | Press <OK> |
Adjusting the folding position of the paper
When you selected <Fold Only> in step 6, you can shift the folding position from the center.

1 | Press <Adjust Fold Position>. |
2 | Select the paper for copying and enter the folding position of the paper. |
3 | Press <OK> |
11
Press <OK> <Close>.
12
Press  (Start).
(Start).Copying starts.
 |
When configuring settings in <Access Stored Files>The booklet mode can be used only when you are printing a PDF/XPS file or a file stored in the Mail Box. You cannot set <2-Sided Original>, <2-Sided Original>, and <Original Size> for a file stored in the Mail Box. When a PDF/XPS file is selected, you can only set the Fold mode and the Saddle Stitch mode. |