
Switching the Machines to Synchronize
This section describes the procedure for switching the machines to synchronize after starting synchronization of custom settings.
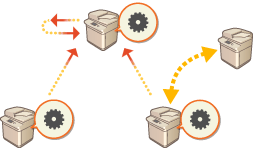
Changing the Server Machine (Server/Client Machine)
Changing a Synchronized Client Machine to the Server Machine
Follow this procedure to change a client machine to the server machine.
Server Machine (Server/Client Machine) | ||
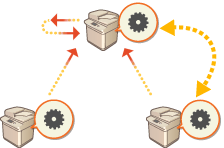 | ||
Client Machine | Client Machine |
1
Stop synchronization in [Synchronize Custom Settings] in the Remote UI of each client machine. Starting Setting Synchronization
2
Create backup data in [Synchronize Custom Settings (Server)]  [Back Up] [Network] in the Remote UI of the server machine (server/client machine). Specifying Detailed Synchronization Settings (Server Machine or Server/Client Machine)
3
Stop synchronization in [Synchronize Custom Settings] in the Remote UI of the server machine (server/client machine). Starting Setting Synchronization
4
Start synchronization in [Synchronize Custom Settings] in the Remote UI of the new server machine (server/client machine). Starting Setting Synchronization
5
Restore the backup data from step 2 in [Synchronize Custom Settings (Server)] in the Remote UI of the new server machine (server/client machine). Specifying Detailed Synchronization Settings (Server Machine or Server/Client Machine)
6
Change the address of the destination server in [Synchronize Custom Settings] in the Remote UI of each client machine, and start synchronization of custom settings. Specifying Detailed Synchronization Settings (Server Machine or Server/Client Machine)
The client machines must be restarted after configuring synchronization.
Changing an Unsynchronized Client Machine to the Server Machine
Follow this procedure to change a new machine to the server machine.
Server Machine (Server/Client Machine) | ||
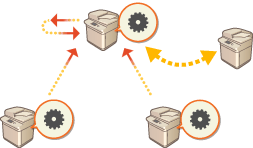 | ||
Client Machine | Client Machine |
|
If the machine is used as a server/client machine, it is recommended that you stop [Synchronize Custom Settings (Client)] in advance. |
1
Create backup data in [Synchronize Custom Settings (Server)] [Back Up] [Network] in the Remote UI of the server machine (server/client machine). Specifying Detailed Synchronization Settings (Server Machine or Server/Client Machine)
If you cannot access [Synchronize Custom Settings (Server)], use past backup data.
2
Start synchronization in [Synchronize Custom Settings] in the Remote UI of the new server machine (server/client machine). Starting Setting Synchronization
3
Restore the backup data from step 1 in [Synchronize Custom Settings (Server)] in the Remote UI of the new server machine (server/client machine). Specifying Detailed Synchronization Settings (Server Machine or Server/Client Machine)
When changing to a new server machine (server/client machine), it is recommended that you use the same network settings (such as IP address and host name) as the old server machine.
If the network settings (IP address and host name) of the new server machine (server/client machine) differ from the settings of the previous server machine (server/client machine), it is necessary to set the destination server machine (server/client machine) from the client machine again.
Changing the Server Machine (Server/Client Machine) (When Replication Is Set)
When Restoring the Replication Data to a New Server Machine
Follow this procedure to restore a server that has had its storage device replaced, etc.
Server Machine (Server/Client Machine) | ||
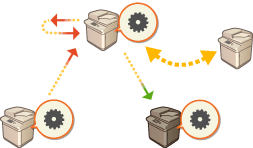 | ||
Client Machine | Replication Destination |
1
From the Remote UI of the server machine (server/client machine), click [Synchronize Custom Settings (Server)] [Replication] [Stopped] to stop replication.
If synchronization cannot be stopped because the server machine is not working, etc., this step is not necessary.
2
From the Remote UI of the new server machine (server/client machine), click [Synchronize Custom Settings (Server)] [Recovery Using Replicated Data] specify the machine to use as the replication destination restore the replication data.
If the IP address and host name of the server machine have not changed, the subsequent steps are not required.
3
Stop synchronization in [Synchronize Custom Settings] in the Remote UI of each client machine. Starting Setting Synchronization
4
Change the address of the destination server in [Synchronize Custom Settings] in the Remote UI of each client machine, and start synchronization of custom settings. Specifying Detailed Synchronization Settings (Server Machine or Server/Client Machine)
The client machines must be restarted after configuring synchronization.
When Using the Machine Set as the Replication Destination as a New Server Machine
Follow this procedure to use the Canon multifunction printer set as the replication destination as a server machine.
Server Machine (Server/Client Machine) | ||
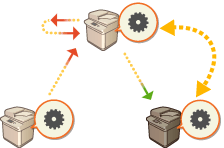 | ||
Client Machine | Replication Destination |
1
From the Remote UI of the server machine (server/client machine), click [Synchronize Custom Settings (Server)] [Replication] [Stopped] to stop replication.
If synchronization cannot be stopped because the server machine is not working, etc., this step is not necessary.
2
Start synchronization in [Synchronize Custom Settings] in the Remote UI of the machine set as the replication destination (the new server machine). Starting Setting Synchronization
3
Stop synchronization in [Synchronize Custom Settings] in the Remote UI of each client machine. Starting Setting Synchronization
4
Change the address of the destination server in [Synchronize Custom Settings] in the Remote UI of each client machine, and start synchronization of custom settings. Specifying Detailed Synchronization Settings (Server Machine or Server/Client Machine)
The client machines must be restarted after configuring synchronization.
 |
When Replication Cannot Be Stopped on the Server MachineIf replication could not be stopped from the server machine because the server machine is not working, etc., the machine that was set as the replication destination cannot be set as the replication destination by another server machine. Start synchronization as the server machine in [Synchronize Custom Settings] in the Remote UI for the replication destination machine, then stop synchronization from [Synchronize Custom Settings (Server)]. Starting Setting Synchronization |
Changing a Client Machine
Follow this procedure to change a client machine to a new machine.
Server Machine (Server/Client Machine) | ||
 | ||
Client Machine | Client Machine |
1
Stop synchronization from [Synchronize Custom Settings] in the Remote UI of the target client machine. Starting Setting Synchronization
If the client machine cannot be operated, delete the target client machine in [Synchronize Custom Settings (Server)] [Confirm Device Information] in the Remote UI of the server machine (server/client machine).
2
Configuring Synchronization on a New Client Machine. Starting Setting Synchronization
If synchronization was not correctly stopped on a client machine or if the client machine was not deleted in [Synchronize Custom Settings (Server)] [Confirm Device Information] in the Remote UI of the server machine (server/client machine), that client machine will be counted as still in use.