Printing Documents Retained in the Machine (Forced Hold Printing)
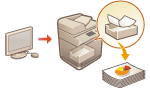 | To avoid leaving printed material, accidental information leakage, misprinting, etc., the administrator sets to store the document before printing. To print the stored document, see the followings. |
 |
The Forced Hold mode needs to be set in advance. <Forced Hold> Up to 200 users can use this mode. If a document which is shared with several people is retained in the machine, only the user who sends the job is counted. You can store up to 2,000 jobs. At least 4 GB is guaranteed for storing retained documents. The maximum size of a retained document that can be stored is 2 GB. The documents retained in the machine are saved even if the machine is turned OFF. Note that documents are automatically deleted after a specified period of time passes. Please consult your administrator regarding the length of this time period. |
1
Press <Print>. <Home> Screen
2
Select a document.
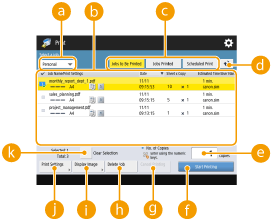
 <Personal>/<Shared>/<Group>
<Personal>: Displays the documents sent by the user who is logged in.
<Shared>: Documents held based on specific conditions according to forced hold settings are displayed. All users can display/print these documents.
<Group>: Displays documents that have the same group information as the user who is logged in. Uses Department IDs to identify groups.
 Document list
Documents which match the document type selected in the drop-down list and their related information are displayed in a list format.
and their related information are displayed in a list format.When a document is selected,  which indicates "selected" is displayed. When multiple documents are selected, the numbers in the center of are displayed as 1, 2, 3 ... in the order selected. When you press a selected document, the selection is canceled.
Press <Date/Time> to sort the documents by date/time, in ascending ( ) or descending (
 ) order.
) or descending () order.If you log in with personal authentication management, the last sorting condition is retained. List of Items That Can Be Personalized
Secured print or encrypted secured print documents display  next to the number of sheets x number of copies on the job list.
If <Display Warning on Job List Screen> is set to <On> in <Held Jobs Warning Settings>,  is displayed on the job list for documents that match the specified conditions. If <Display Warning on Job List Screen> is set to <On> in <Held Jobs Warning Settings>, a warning pop-up is displayed when printing, for documents that match the specified conditions. <Held Jobs Warning Settings>

You can print from here if the printer driver output method is set to [Secured Print].
 <Jobs to Be Printed>/<Jobs Printed>/<Scheduled Print>
When selecting an unprinted document, confirm that <Jobs to Be Printed> is selected.
 Update button
Updates the document list.
 <No. of Copies>
To change the number of sets to be printed, enter the number of sets to change.
 <Start Printing>
Executes printing.
 <Cancel Printing>
Cancels printing.
 <Delete Job>
Deletes documents.
 <Display Image>
Enables you to check the contents of the document as well as select and delete pages.
You cannot restore a page that has been deleted.
You cannot delete a page from <Display Image> if it is the only page there.
Previews may not be available with <Display Image>, depending on the settings of the printer driver.
For information on the page description languages that enable previewing and the file formats for direct printing, see Printer Functions.
<Delete Page> from <Display Image> of the PrintRelease function of Canon PRINT Business is not supported.
If the message <Failed to delete the page.> is displayed when deleting a page, press <Delete Page> in <Preview> again.
 <Print Settings>/<Print Set. for Selected Jobs>
You can edit the printing settings such as number of copy. You can also change the print settings when multiple documents are selected.
You can print a sample set with the settings specified in Print Settings by pressing <Print Sample>.
Depending on changed settings, the document may not be printed correctly.
If you change the settings on <Print Settings>/<Print Set. for Selected Jobs>, the document in which the new settings are applied is displayed in <Printed>.
If you select general print jobs, secured print jobs, and encrypted secured print jobs at the same time, you cannot change the print settings of them at once.
The settings may not be able to be changed in <Print Settings>, depending on the settings of the printer driver.
For information on the page description languages that enable the configuration of print settings and the file formats for direct printing, see Printer Functions.
You cannot change the print settings of multiple jobs at once when using the PrintRelease function of Canon PRINT Business.
 <Select All (Max 100 jobs)>/<Clear Selection>
If a document is not selected in , <Select All (Max 100)> is displayed, which enables you to select all the documents in the document list. When documents are selected, <Clear Selection> is displayed enabling you to cancel the entire selection.
, <Select All (Max 100)> is displayed, which enables you to select all the documents in the document list. When documents are selected, <Clear Selection> is displayed enabling you to cancel the entire selection.The messages <Some jobs could not be stored after being received.> and <Some jobs have been deleted.> may be displayed if an error occurs when receiving a document or a document is automatically deleted because its retention period has elapsed, etc. In this case, press  to cancel the message.
3
Press <Start Printing>.
Printing starts.
To cancel printing, select the job to cancel in <Jobs Printed>, and select <Cancel Printing>. You can also press  (Stop) on the control panel and select the job to cancel from <Print Jobs>. For information on canceling jobs with the Stop key, see Canceling Send/Print Jobs.
(Stop) on the control panel and select the job to cancel from <Print Jobs>. For information on canceling jobs with the Stop key, see Canceling Send/Print Jobs.Automatically Printing Forced Hold Print Jobs after Logging In
You can set to automatically print jobs when a user logs in. When the administrator has set <Enable Auto Print Function When Logging In> to <On>, users that are logged in with personal authentication management can set whether automatic printing is performed or not. Set <Auto Print User Jobs When Logging In> to <On> to perform automatic printing. The setting is retained for each user. List of Items That Can Be Personalized
 |
The following jobs are not automatically printed even if this setting is enabled. <Personal> jobs of other users, <Shared> jobs, and <Group> jobs Printed jobs Encrypted secure printing jobs Secure printing jobs (when <Require PIN for Printing/Displaying User Jobs> is set to <On> in <PIN Settings for Secure Print Jobs>) |
 |
When multiple jobs are held, they are printed in the display order of <Date>. A maximum of 100 jobs can be printed with a single login operation. If jobs are already held, this setting is enabled by logging in again after setting <Auto Print User Jobs When Logging In> to <On>. |
Printing More Safely with Encrypted Secure Print
By using Encrypted Secure Printing, you can send encrypted printing data to a machine from your computer. This enables you to reduce the risk of information leaks when sending printed data, and to print more safely. Use this especially when printing highly confidential documents.
|
The document with Encrypted Secure Printing is displayed along with To print the encrypted document, you must enter the password. The password must be the same as the password you set on the printer driver. For information on setting items, see "Help" by clicking [Help] on the printer driver setting screen (Windows only). Encrypted Secure Print cannot be used with Mac OS. To use encrypted secure printing, display the printer folder |