Saving Received Documents in the Machine (Memory Reception)
 | You can have incoming documents saved in the storage location (Memory RX Inbox) of the machine without printing. By printing just what you need and deleting unnecessary documents such as direct mails from the Memory RX Inbox, you can save paper. |
Saving in the Memory RX Inbox
To use this function, you need to activate the memory reception function first (<Use Fax Memory Lock> and <Use I-Fax Memory Lock>), and then follow the procedure below to specify the settings so that incoming documents can be received in memory.
1
Press <Fax/I-Fax Inbox>. <Home> Screen
2
Press <Memory RX Inbox>.
If the password is set for the Memory RX Inbox, the screen appears prompting you to enter the password (<Memory RX Inbox PIN>). Enter the password and press <OK>.
3
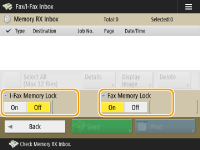
Select <Memory RX Inbox> and set <Fax Memory Lock> to <On>.
To receive I-faxes in memory, set <I-Fax Memory Lock> to <On>.
Printing Documents in the Memory RX Inbox
When the Processing/Data indicator on the control panel maintains a steady green, follow the following procedures to check/print saved documents.
1
Press <Fax/I-Fax Inbox>. <Home> Screen
2
Press <Memory RX Inbox>.
 |
Divided Data RX InboxPressing <Divided Data RX Inbox> enables you to check the receive status of an I-fax that has been divided into several parts before being sent, and the remaining capacity of the Divide Data RX Inbox. The following can be performed using <Divided Data RX Inbox>. Pressing <Divided Data List> enables you to check the document list. Pressing <Delete> enables you to delete a document that was divided and sent. Selecting <Print When Deleted> enables you to set the machine to print the divided received data document when it is deleted. |
3
Select <Memory RX Inbox>.
A list of saved documents is displayed.
4
Select a document to print and press <Print>.

Pressing <Details> enables you to check information about the document, including senders' names and the number of pages received. Pressing <Display Image> enables you to check the contents of the document as well as select and delete pages.
Pressing <Delete>  <Yes> deletes the document. You cannot delete multiple documents simultaneously. To delete multiple documents, select and delete one document at a time.
Pressing <Send> enables you to specify destinations to send the document. To delete the document from the Fax/I-Fax Inbox after sending, press <Delete File After Sending> before sending.
Pressing <Select All (Max 32 files)> enables you to select the documents at once. When a document is selected, <Clear Selection> is displayed enabling you to clear all selections.

To print all the documents in memory, press <Off> for <Fax Memory Lock> or <I-Fax Memory Lock>. You can skip step 5.
You cannot print multiple documents simultaneously. To print multiple documents, select and print one document at a time.
5
Press <Start Printing>.
Once a document is printed, it is automatically deleted from memory.
 |
You can specify a day of the week or the time such as on weekends or night time during which received documents are saved in memory. <Memory Lock Start Time> and <Memory Lock End Time> Registering an arbitrary level of the Memory RX Inbox to the <Personal>/<Shared> button enables operations to be executed quickly and efficiently. |