Settings Screens for Using Other Machines/Servers/Memory Media
The following screens are displayed when scanning originals from <Scan and Store> and printing files from <Access Stored Files>.
Scan Settings Screen in <Scan and Store>
This screen is for configuring the scan settings when scanning from <Scan and Store>.

You can register the current settings as favorite settings or default settings, or register them to the <Home> screen as Shared buttons or Personal buttons.
Registering Personal Buttons/Shared ButtonsMessage Display Area (Top)
A message indicating the current state is displayed.
The remaining number of pages that can be scanned is also displayed if a page limit is set with Department ID Management.
<Favorite Settings>
Change the scan settings to the registered settings.
Scan Settings
The buttons for changing the scan settings and the current settings are displayed.
<Select Color>
Specify the color.
<Resolution>
Increase the resolution to scan the originals more clearly.
Decrease the resolution to reduce the file size.
<Scan Size>
Specify the size of the originals to save.
<File Format>
Select the format of the files to save.
If <Divide into Pages> is specified, a three digit page number is appended to the end of the file name.
*Optional products may be required, depending on the file format.
File Formats and the Need for Optional Products <Original Type>
Select the scanning mode and scanning priority for text/photos according to the type of originals, such as originals containing only text or originals including photos.
Original Content Orientation
<Original Content Orientation>
Set this mode to fix the orientation for scanning to horizontal or vertical.
<2-Sided Original>
Set this mode to scan both the front and back sides of the original.
Select <Book Type> if the front and back sides of the original have the same top-bottom orientation.
Select <Calendar Type> if the front and back sides of the original have the opposite top-bottom orientation.
<File Name>
Specify the file name of the files to save.
\ / : , * ? " < > | cannot be used.
You cannot use a period (.) or space for the first or last character of the file name.
<Options>
Configure the settings for scanning the originals more clearly.
Options Screen in <Scan and Store> <Restore Default Set.>
Change the scan settings to the registered settings.
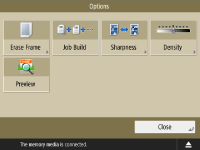
Options Screen in <Scan and Store>
This screen is displayed by pressing <Options> on the scan settings screen in <Scan and Store>. It enables you to configure the settings for scanning the originals more clearly.
<Erase Frame>
Set this mode to eliminate border lines, shadows, or binding holes, etc.
<Job Build>
Set this mode to scan originals in sequence and store the result as one file, when it is impossible to scan them all at once.
<Sharpness>
Set this mode to scan blurry text and diagrams clearly or reduce the moiré effect and smoothen photos.
<Density>
Adjust the density according to the original.
Faint text written in pencil can be made easier to read by increasing the density.
<Preview>
Set this mode to display a preview screen to check the file content after scanning originals.
*You can delete, move, or switch pages on the preview screen.
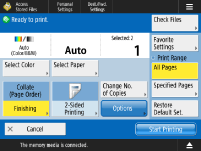
Print Settings Screen in <Access Stored Files>
This screen is for configuring print settings when printing from <Access Stored Files>.
When printing multiple files in a different format together, you can set the following print settings.
<Select Color>
<Select Paper>
<Change No. of Copies>
<2-Sided Printing>
You can register the current settings as favorite settings or default settings, or register them to the <Home> screen as Shared buttons or Personal buttons.
Registering Personal Buttons/Shared ButtonsMessage Display Area (Top)
A message indicating the current state is displayed.
The remaining number of pages that can be printed is also displayed if a page limit is set with Department ID Management.
<Check Files>
You can check the information and content of the selected file.
Print Settings
The buttons for changing the print settings and the current settings are displayed.
<Select Color>
Specify the color.
<Select Paper>
Select the paper to print on.
When printing a PDF file to both sides of the paper, it is necessary to select the paper size to print on in <Select Paper> if the front and back pages are of a different size.
<Change No. of Copies>
This mode is available only when multiple files are selected. Press this button when changing the number of copies.
Finishing (Collate/Group)
<Finishing>
Set this mode to configure the finishing settings when printing PDF/XPS files.
<2-Sided Printing>
Specify the opening type when printing on both sides of the paper.
When printing a PDF file to both sides of the paper, it is necessary to select the paper size to print on in <Select Paper> if the front and back pages are of a different size.
<Options>
Configure the settings for printing the scanned documents more clearly and efficiently.
Options Screen in <Access Stored Files> <Favorite Settings>
Change the print settings to the registered settings.
Print Range
When printing a file with two pages or more, specify the pages to print.
<Restore Default Set.>
Change the print settings to the registered settings.
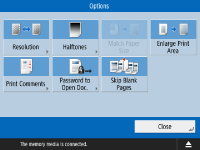
Options Screen in <Access Stored Files>
This screen is displayed by pressing <Options> on the print settings screen in <Access Stored Files>. It enables you to configure the settings for printing the documents more clearly. The available settings may differ, depending on the format of the file to print.
Printing PDF files | | Printing image files |
<Resolution>
Set <Superfine (1200 dpi)> to print more clearly.
<Halftones>
Select the halftone printing mode to match the file you want to print.
<Resolution>: Set this mode to enable fine printing so that the outlines of text data, etc. are clearer. This mode is optimal for printing data containing a lot of text or fine lines.
<Gradation>: Set this mode to enable printing with both smooth gradations and suitable outlines. You can adjust this setting to smoothly print shapes and graphs using gradation.
<Error Diffusion>: Suitable for sharply printing the contours of CAD data, and data that includes text and fine lines, etc.
<Match Paper Size>
Set this mode to automatically enlarge/reduce when printing PDF/XPS files.
<Enlarge Print Area>
Set this mode to narrow the blank borders at each side of the page and enlarge the print area.
<Print Comments>
Set this mode to add comments when printing PDF files.
<Password to Open Doc.>
Enter the password required for printing the PDF file.
*You cannot print multiple PDF files with different passwords simultaneously.
<Encryption Password>: When printing a PDF file with a password set, enter that password.
<Policy Password>: When printing a PDF file with a server security policy applied, enter the password set in the policy.
<Skip Blank Pages>
Set this mode to automatically detect blank pages included in files and not print them.
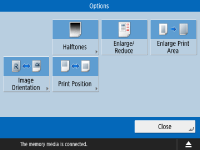
<Enlarge/Reduce>
Set this mode to automatically enlarge/reduce the image size according to the paper size when printing image files.
<Image Orientation>
Set this mode to automatically detect the aspect ratio of the image file and print it vertically or horizontally as required. You can also manually specify to print vertically or horizontally.
<Print Position>
You can set the print area to the center or the top left when printing an image file.