
Making SMB Settings
This section describes setup steps to share files and printers among multiple devices on the network utilizing the SMB protocol.
Setting the SMB Server
Enabling the SMB server functions makes it possible for the Advanced Space to be used as a SMB file server.
1
Press  (Settings/Registration).
(Settings/Registration).2
Press <Preferences>  <Network> <TCP/IP Settings> <SMB Server Settings>.
3
Select <On> in <Use SMB Server> and carry out the necessary setup.
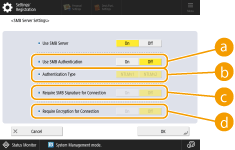
 <Use SMB Authentication>
User authentication is conducted by using user information in the Advanced Space. To conduct user authentication, press <On>.
 <Authentication Type>
Select the version of the authentication protocol. Select <NTLMv1> or <NTLMv2>, according to your operating system. You can also select both.
 <Require SMB Signature for Connection>
To set so that an SMB packet signature is requested when connecting to the SMB server, press <On>.
 <Require Encryption for Connection>
To request a connection with SMB v3.0 encrypted communication when connecting to an SMB server, press <On>.
4
Press <OK>.
5
Press <Specify SMB Server Version>, and select the version of SMB to use with the SMB server.
6
Press <OK>.
7
Press (Settings/Registration) <Yes>.
(Settings/Registration) |
Use the same version of SMB with the SMB server and SMB client. SMB cannot be used if the versions differ. |
 |
If you set <Require Encryption for Connection> to <On>, you will become unable to connect to the machine from client operating systems that do not support SMB v3.0 encrypted communication. |
Setting the SMB Client
This section describes how to specify the settings to use when the machine connects to a network as an SMB client.
1
Press (Settings/Registration).
(Settings/Registration).2
Press <Preferences> <Network> <TCP/IP Settings> <SMB Client Settings>.
3
Specify the required settings.
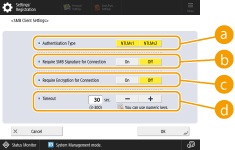 <Authentication Type>
Select the authentication protocol version. Select either <NTLMv1> or <NTLMv2>, according to the destination SMB server. You can also select both.
<Require SMB Signature for Connection>To request an SMB packet signature when connecting to an SMB server, press <On>.
<Require Encryption for Connection>To request a connection with SMB v3.0 encrypted communication when connecting to an SMB server, press <On>.
<Timeout>Set the time until the SMB connection destination responds.
When sending to an SMB server, the network connection was lost or the response on the server side was slow, causing a wait time timeout on the machine side before the data could be sent or forwarding could be completed. If this happens, you may be able to avoid a timeout by increasing the wait time.
4
Press <OK>.
5
Press <Specify SMB Client Version>, and select the SMB version used by the SMB client.
6
Press <OK>.
7
Press (Settings/Registration) <Yes>.
(Settings/Registration) |
When <Require Encryption for Connection> is set to <On>, the machine can only connect to SMB servers that support SMB v3.0 encrypted communication. When <1.0> and <2.0> are set to <On> for <Specify SMB Client Version> but <3.0> is not set to <On>, the machine cannot connect to SMB servers that do not support SMB v3.0 encrypted communication. Use the same version of SMB with the SMB server and SMB client. SMB cannot be used if the versions differ. |
|
Depending on the network settings, an error may be displayed when sending to the SMB server. In this case, adjust the time in <Timeout>. |