Problems with Printing Results
The printed image is displaced or skewed.
 Are the paper guides misaligned?
Match the paper guides with the paper loaded in the paper source.
Images are uneven or faint.
Is the paper damp?
Replace the paper with paper that is not damp.
Are the gradation and density set appropriately?
Perform gradation adjustment.
Adjusting Gradation
Adjusting Gradation
Has condensation occurred?
If the temperature in the environment where the machine is installed changes rapidly, the images and texts may become light or blurred due to water droplets forming inside the machine (condensation). In this case, set <Control Recognized Condensation> to <On>.
<Control Recognized Condensation>
<Control Recognized Condensation>
Printouts appear dirty or smudged.
The Pressure Roller for Fixing is dirty.
Press  (Settings/Registration)
  <Adjustment/Maintenance> <Maintenance> <Clean Pressure Roller for Fixing> to clean the Pressure Roller for Fixing.
(Settings/Registration) Black streaks appear.
Is the document feed scanning area dirty?
Clean the document feed scanning area.
Cleaning the Feeder
Cleaning the Feeder
White streaks appear.
The dust-proof glass may be dirty.
Clean the dust-proof glass.
Regular Cleaning
Regular Cleaning
Is the document feed scanning area dirty?
Clean the document feed scanning area.
Cleaning the Feeder
Cleaning the Feeder
Bleedthrough occurs.
Is the density of backgrounds set appropriately?
If bleed-through is observed with the print result, adjusting the density of background can improve the problem, giving a fine print.
Basic Copy Operations
Basic Operations for Sending Faxes
Adjusting Density
Basic Copy Operations
Basic Operations for Sending Faxes
Adjusting Density
Images are not printed on the intended side of the paper.
Is the orientation of the loaded paper correct?
Check the orientation and side of the paper that is facing up. Load the paper again if it is incorrectly orientated.
Loading Paper
Loading Paper
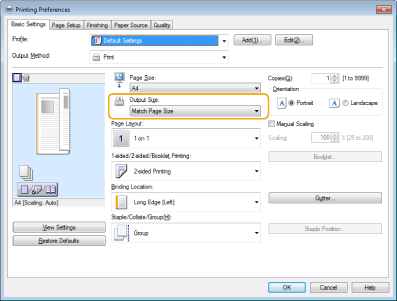
Images are not printed in the intended size.
Do the original size and size of the paper that is loaded match?
Replace the paper that is loaded with paper of the size you want to print on.
Match [Output Size] in the printer driver with the size of paper to print on.
The orientation does not match on both sides of the paper when using two-sided printing.
Are the settings for two-sided printing correct?
Follow the procedure below to check the print settings.
1 | Select the orientation of the original on the print settings screen of the application. |
2 | On the [Basic Settings] screen of the driver, set [Orientation] to the same orientation you set in step 1. 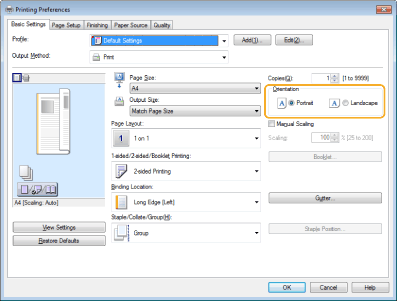 |
3 | While checking the print preview, set [Page Layout] 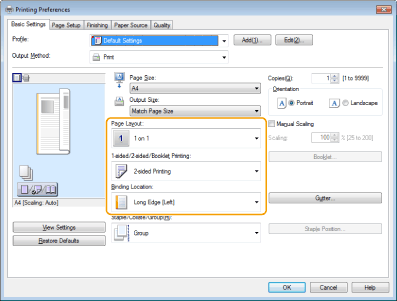 |
 |
[Page Order] is displayed when [Page Layout] is set to [2 on 1] or higher. |
Afterimages such as those in the sample image occur.
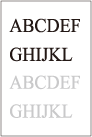
The temperature of the fixing unit may be inappropriate.
The print result may be able to be improved by adjusting the temperature of the fixing unit using <Adjust Fixing Temperature>.
<Adjust Fixing Temperature>
<Adjust Fixing Temperature>
Some parts of images/texts are left white (white patch).
Are the shaded parts of images/texts not printed and left white?
Set <Correct Fill Area Void> to <On>.
Correct Fill Area Void
Correct Fill Area Void
Toner splatters/white patches/streaks appear.
Are you printing in a low temperature environment?
Set <Waterdrop Pattern Prevention Mode> to <On>.
Setting the Waterdrop Pattern Prevention Mode
Setting the Waterdrop Pattern Prevention Mode
Image problems occur when using special paper.
Are you using heavy paper with low smoothness?
The print result may be able to be improved by enabling <Heavy Paper Fill Area Image Adjustment Mode>.
Setting the Heavy Paper Fill Area Image Adjustment Mode
Setting the Heavy Paper Fill Area Image Adjustment Mode
Are you using plain paper with high smoothness?
The print result may be able to be improved by enabling <Plain Paper Fill Area Image Adjustment Mode>.
Setting the Plain Paper Fill Area Image Adjustment Mode
Setting the Plain Paper Fill Area Image Adjustment Mode
Paper curls.
Is the paper stored appropriately?
Using paper that is not stored appropriately may cause curls. Check whether the paper is stored appropriately. Paper handling and storage
|
Setting <Curl Prevention Mode> may reduce curls. Setting the Curl Prevention Mode |