Configuring the Visual Message Function
The Visual Message function enables you to display simple content and messages on the touch panel display.
Displaying messages from the administrator or event notifications, etc. on the touch panel display enables the machine to be used as an information sharing tool in the office.
Displaying messages from the administrator or event notifications, etc. on the touch panel display enables the machine to be used as an information sharing tool in the office.
 |
When the Visual Message function is set, content can be checked from <Visual Message> on the Home, regardless of the timing. The last content displayed is displayed. Set a file saved on a file server or in an Advanced Box on the same network as the content to display. Using as a Simple File Server You can also set a website on the internet as the content via a proxy server. The proxy settings used for this function are the same as the settings in <Proxy Settings>. If a proxy is set, the specified content may not appear. When this occurs, set an exception address so that the proxy server is not used. Setting Exception Addresses Where a Proxy Server Is Not Used The content is displayed when printing starts if the forced hold print function is enabled and the [Display When Print Job Starts] check box is selected. |
1
Start the Remote UI. Starting the Remote UI
2
Click [Settings/Registration] on the portal page. Remote UI Screen
3
Click [License/Other]  [Visual Message Settings]
  [Display Settings].
 [Visual Message Settings]
  [Display Settings].
4
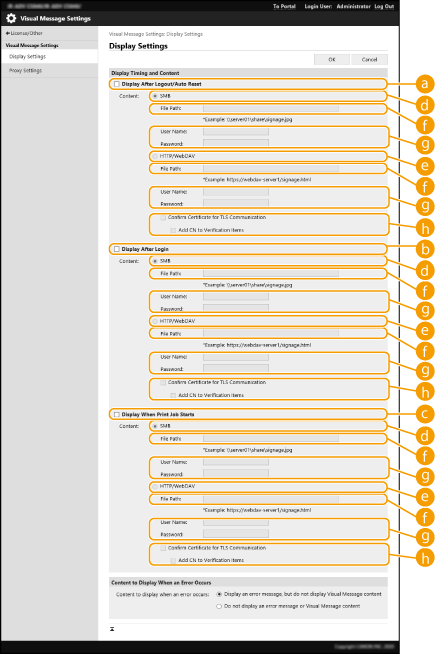
Set the display timing and content.

 Setting the Display Timing
 [Display After Logout/Auto Reset]
Select this check box to display the content after logging out or after the auto reset mode activates.
The setting to display the content after logging out is enabled when <Login Screen Display Settings> is set to <Display When Device Operation Starts>. To display the content after the auto reset mode activates, set <Auto Reset Time> to 1 minute or longer.
The setting to display the content after logging out is enabled when <Login Screen Display Settings> is set to <Display When Device Operation Starts>. To display the content after the auto reset mode activates, set <Auto Reset Time> to 1 minute or longer.
 [Display After Login]
Select this check box.to display the content after logging in. This is enabled when <Login Screen Display Settings> is set to <Display When Device Operation Starts>.
 [Display When Print Job Starts]
Select this check box to display the content when printing starts. This is enabled when forced hold printing is set.
 Setting the Content for Each Display Timing
 [SMB]
[SMB]Select the check box to access the content to display via [SMB].
 [HTTP/WebDAV]
Select the check box to access the content to display via [HTTP/WebDAV].
 [File Path:]
Enter the path to the content to display.
Example:
[SMB]: \\server01\share\signage.jpg
[HTTP/WebDAV]: https://webdav-server1/signage.html
 [User Name:]/[Password:]
Enter the user name and password necessary for logging into the Advanced Box or file server.
 [Confirm Certificate for TLS Communication]/[Add CN to Verification Items]
Set whether to verify the TLS server certificate sent when connecting and its CN (Common Name).
5
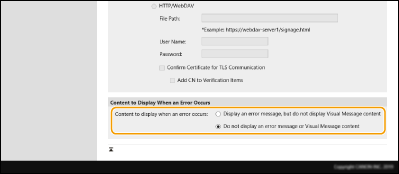
Set the screen display for errors.
If content does not appear for some reason, select whether to display an error message screen.

6
Click [OK].
 |
To display the content after the Auto Reset mode initiates, set <Auto Reset Time> to one minute or longer. For information on the file formats and data sizes that can be displayed, see Management Functions. This setting can only be specified by a user with Administrator privileges. This setting is not included in Device Information Distribution. Distributing the Device Information to Other Canon Multifunction Printers This setting can be imported/exported. The same setting can be imported to multiple devices (only Canon devices that support the Visual Message function) to display the same notice or information on multiple devices.Importing/Exporting the Setting Data [File Path:] is imported/exported with this setting. If a file in the Advanced Box is specified and displayed on the exporting machine, perform one of the following operations: Manually copy the file in the Advanced Box of the exporting machine to the Advanced Box of the importing machine. Change [File Path:] to the path where the file exists. If you are going to perform login operations, perform them after closing the Visual Message screen. Logging into the Machine If the Copy Card Reader is attached, the content is not displayed. |
Setting Exception Addresses Where a Proxy Server Is Not Used
Specify the proxy settings in the Visual Message function to match the settings in <Proxy Settings>. If a proxy is set, the specified content may not appear. When this occurs, set an exception address so that the proxy server is not used.
1
Start the Remote UI. Starting the Remote UI
2
Click [Settings/Registration] on the portal page. Remote UI Screen
3
Click [License/Other]  [Visual Message Settings]
  [Proxy Settings].
 [Visual Message Settings]
  [Proxy Settings].
4
In[Address Without Using Proxy], enter the addresses for which a proxy server will not be used.
You can specify multiple addresses separated by a comma (,).
You can specify up to 255 characters (ASCII code only).
5
Click [OK].
Using the Visual Message Function for Greater Convenience
You can post login information (user name and domain name) to the server for users who display content. You can also collect that information and print out linked PDF files in the content for checking.
1
Start the Remote UI. Starting the Remote UI
2
Click [Settings/Registration] on the portal page. Remote UI Screen
3
Click [License/Other]  [Visual Message Settings]
  [Security Settings].
 [Visual Message Settings]
  [Security Settings].
4
You can print the Visual Message displayed on the touch panel display or provide notifications of login information.

 [Notify Server of Login Information When Content Is Displayed]
Select this check box to post the user information (user name and domain name) to the Web server when the user displays the Visual Message, and enter the Web server path.
 [Allow Printing from Content]
Select this check box to specify the function that prints PDF content included in the HTML displayed in the Visual Message.
5
Click [OK].