
Configuring the Automatic Adjustment Settings
The image position and color settings can be adjusted automatically during the printing process or in various intervals.
Automatic adjustment of the image position
This function allows you to print adjustment pages periodically during the printing process or print markers in the margin area and adjust the image position automatically. You can also print a test page to adjust the image position automatically when you start using new paper.
|
In the following cases, you may not be able to adjust the image accurately enough by using the automatic adjustment function. When you use paper sheets that have not been properly cut When you feed paper or switch between paper decks during the printing process The Sensing Unit may not be able to detect markers on colored paper, translucent film, label paper, pre-punched paper, paper that has logos or patterns already printed on it (preprinted paper), or long sheets. The paper sheets in the paper deck may shrink or stretch due to changes in temperature and humidity. If you need to print a job with automatic adjustment of the image position, we recommend doing so as quickly as possible before the conditions for the initial adjustment change. When performing automatic adjustment by printing markers in the margin area, the markers may not be detected if the images are too close. Make sure you leave a gap that is about 1 mm (0.04") wide. |
 |
Before printing a job with automatic adjustment of the image position, we recommend carrying out Periodic automatic adjustment of the image position (initial adjustment). We recommend using a single paper deck for jobs with automatic adjustment. When you perform the procedure for automatic adjustment of the image position with the custom paper type, the adjustment settings are saved after the job is printed. |
Automatic color adjustment
This function allows you to print adjustment pages periodically during the printing process or print patches in the margin area and adjust the colors automatically.
|
The Sensing Unit may not be able to detect patches on colored paper, translucent film, label paper, pre-punched paper, paper that has logos or patterns already printed on it (preprinted paper), or long sheets. You may not be able to adjust the colors with the automatic adjustment function if the label paper, pre-punched paper, paper that has logos or patterns already printed on it (preprinted paper), transparent paper, watermarked paper, long sheets, or any other types of paper sheets are dirty or if they emit large quantities of paper dust. The automatic color adjustment function may not effectively prevent color fluctuations. Use this function for continuous printing operations with the same type of media (same finish, same basis weight, and same size) and with the specified minimum amount of sheets. Adjustment by printing patches in the margin area: 500 sheets or more Adjustment by inserting adjustment pages: 1000 sheets or more When performing automatic adjustment by printing patches in the margin area, the patches may not be detected if the images are too close. Make sure you leave a gap that is about 1 mm (0.04") wide. |
|
Before starting to print with the automatic color adjustment function, we recommend performing automatic gradation adjustment. When performing automatic color adjustment with new paper, we recommend printing a test page before printing the final product. |
Periodic automatic adjustment of the image position (initial adjustment)
You can perform periodic automatic adjustment of the image position at any point during the printing process for the custom paper type.
|
Do not use this function with paper that has logos or patterns already printed on it (preprinted paper) or if the paper sheets are dirty. |
Performing automatic image position adjustment with custom paper type
1
Press  (Settings/Registration).
(Settings/Registration).2
Press [Preferences]  [Paper Settings] [Paper Type Management Settings].

Press  (Status Monitor/Cancel) [Paper] to select the paper deck with the paper you want to adjust. Next, press [Paper Type Management Settings], and the [Paper Type Management Settings] window will appear with the corresponding paper selected.
(Status Monitor/Cancel) 3
Select the paper type you want to edit from the list, and then press [Details/Edit].
4
Press [Change] under [Adjust Image Position].
5
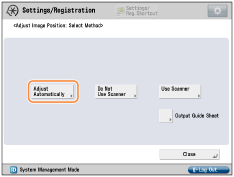
Press [Adjust Automatically].
6
Set the number of test pages you want to print, and then press [Next].
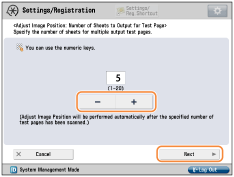
If you want to prioritize accuracy, we recommend setting the number of test pages to 10.
7
Select the location of the paper you want to adjust, and then press [Start Printing].
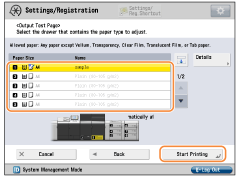
The test pages are printed, and the window shown in step 5 reappears on the screen after the adjustment procedure is completed.
Automatic adjustment of the image position or colors for every Printing process
If you start a job where an adjustment page is output every time a specific number of sheets are printed, automatic adjustment will be carried out with adjustment pages printed in the specified interval. For more information, refer to the manual for your drivers.
|
Do not use this function with paper that has logos or patterns already printed on it (preprinted paper) or if the paper sheets are dirty. You need to add enough paper sheets to the paper deck to print the adjustment pages. If a paper jam occurs during a job with automatic adjustment, the adjustment pages may not be printed. |
|
Automatic adjustment will not be carried out for any jobs you start by interrupting the job in progress. Such jobs may not start in the interruption time intervals you set. Keep in mind that the interval setting is merely an estimate. The interruption correction function reduces the fluctuations within jobs with large numbers of sheets. If you wish to prioritize accuracy by adjusting the interruption intervals, increase the interruption frequency. However, that will also require more adjustment pages and therefore decrease productivity. The adjustment may not be as effective for jobs where multiple types of paper are used simultaneously. When you start a job with automatic color adjustment, a standard test page is printed before the specified interruption interval in order to carry out the adjustment process. |
Configuring the interval for automatic adjustment
1
Press (Settings/Registration).
(Settings/Registration).2
Press [Preferences] [Paper Settings] [Paper Type Management Settings].
Press (Status Monitor/Cancel) [Paper] to select the paper deck with the paper you want to adjust. Next, press [Paper Type Management Settings], and the [Paper Type Management Settings] window will appear with the corresponding paper selected.
(Status Monitor/Cancel) 3
Select the paper type you want to edit from the list, and then press [Details/Edit].
4
Press [Change] under [Adjstmnt Pg Interrupt Intrvl].
5
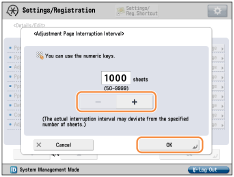
Set a value between 50 and 9999 sheets as the interruption interval for adjustment pages, and then press [OK].
The settings are applied, and the [Details/Edit] window for the corresponding custom paper type reappears on the screen.
Automatic adjustment of the image position and colors during the printing process
If you start a job where adjustment patches or markers are printed in the paper margin area, automatic adjustment will be carried out during the printing process. For more information, refer to the manual for your drivers.
|
Margins (for a bleed) required for printing patches or markers differ depending on the model of your machine. Do not use this function if you cannot leave the required margins. Margin required for automatic adjustment Automatic adjustment is carried out based on the characteristics of the printed paper scanned by the Sensing Unit. Therefore, if you switch to a different paper deck, add more paper to it, or make any other changes to the paper stack, the adjustment based on the characteristics of the new paper will not take effect immediately. |