
Setting Sounds
You can adjust the volume of sounds produced by the machine when sending/receiving a fax. In addition to setting sounds for faxes, you can specify whether or not confirmation and warning sounds are produced.
 |
This setting works only for Line 1 (the standard line). Use this setting with Line 1 (the standard line). |
Adjusting the Volume for Sending/Receiving Faxes
You can adjust the volume of the communication sounds during fax transmission and the sound produced for the fax sending/receiving result.
1
Press <Volume Settings>. <Home> Screen
2
Adjust the volume or specify the setting, and press <OK>.
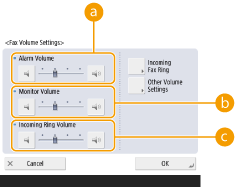
 <Alarm Volume>
Adjust the volume of the tone that sounds when the sending or receiving faxes is complete (except when printing received faxes) and the volume of the tone that sounds when a fax is canceled or ends due to an error. To mute the sound, press  several times to set the volume to the far left.
 several times to set the volume to the far left.
 <Monitor Volume>
Adjust the volume of the following tones. To mute the sound, press  several times to set the volume to the far left.
 several times to set the volume to the far left.
 The tone that sounds when sending faxes
The tone that sounds when printing of a received fax is complete, and the tone that sounds when a fax ends due to an error
 <Incoming Ring Volume>
Press to adjust the volume of incoming faxes when <RX Mode> is set to <Fax/Tel(Auto Switch)>. To mute the sound, press  several times to set the volume to the far left.
 several times to set the volume to the far left.
Setting the Incoming Fax Tone
You can set the incoming fax tone not only when your machine has a fax function but also when a commercial telephone is connected.
1
Press <Volume Settings>. <Home> Screen
2
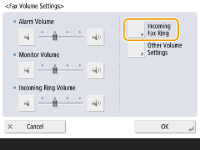
Press <Incoming Fax Ring>.
3
Set the incoming tone.
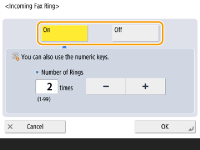
Select <On> to emit the incoming tone or <Off> to not. If you selected <Off>, proceed to step 5.
4
Select the incoming tone count.
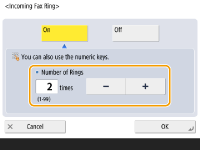
Set the count using <->/<+> or the numeric keys.
5
Press <OK>.
 |
Even if the incoming tone is set to <Off>, the incoming tone will be emitted when a fax arrives during the Sleep mode if the power consumption during Sleep mode is set to low. <Sleep Mode Energy Use> |
Setting the Confirmation Sound and Warning Sound
You can individually adjust the tone that sounds when control panel keys and touch panel buttons are pressed and the error tone that sounds when a problem occurs with the machine. You can also set whether to sound a tone indicating the result of Fax Memory Lock sending/receiving.
1
Press <Volume Settings>. <Home> Screen
If your machine does not have a fax function, proceed to Step 3.
2
Press <Other Volume Settings>.
If the option to enable use of the fax function is not installed (System Options), <Volume Settings> is displayed.
3
Set each confirmation sound/warning sound and press <Close>.
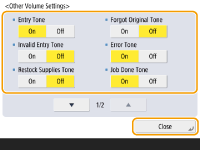
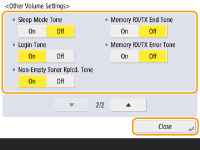
Setting Items | Description |
<Entry Tone> | Sound produced each time a key on the control panel or a button on the touch panel display is pressed |
<Invalid Entry Tone> | Sound produced when an invalid key/button operation is performed, or when you enter a number outside the valid setting range |
<Restock Supplies Tone> | Sound produced when the amount of toner is low |
<Forgot Original Tone> | Sound produced if original is remained on the platen glass after operation is finished |
<Error Tone> | Sound produced when a malfunction such as paper jam or operational error occurs |
<Job Done Tone> | Sound produced when an operation such as copying or scanning is complete |
<Sleep Mode Tone> | Sound produced when the machine enters sleep mode, or when the machine is turned OFF if you set <Quick Startup Settings for Main Power> to <On>. (Depending on the situations, the machine does not startup quickly and the tone does not sound.) |
<Login Tone> | Sound produced when login is successful |
<Non-Empty Toner Rplcd. Tone> | Sound produced when a non-empty toner cartridge is removed |
<Memory RX/TX End Tone> | Sound produced when Fax Memory Lock sending/receiving completes without an error Saving Received Documents in the Machine (Memory Reception) |
<Memory RX/TX Error Tone> | Sound produced when Fax Memory Lock sending/receiving completes with an error Saving Received Documents in the Machine (Memory Reception) |
4
Press <OK>.