
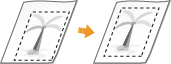
Adjusting the Print Position
You can adjust the print position when printing is lopsided or protruding from the print range. The print position can be adjusted for each paper source.
|
Ensure that the following are set correctly before performing print position adjustment. Setting the print mode (1-Sided/2-Sided) to adjust (Custom Settings Setting the paper type to feed Specifying Paper Size and Type When performing print position adjustment, set the correct paper type for the paper source, rather than selecting <Free>. |
Step 1: Printing the Current Print Position
You can print a sample print to confirm the direction and distance for adjustment.
1
Select <Set> on the <Home> screen. <Home> Screen
2
Select <Adjustment/Maintenance>  <Adjust Image Quality> <Adjust Print Position>.
3
Select <Print Sample> <Yes>, and press  .
.
.A sample print is output.
Step 2: Confirming the Direction and Distance for Adjustment
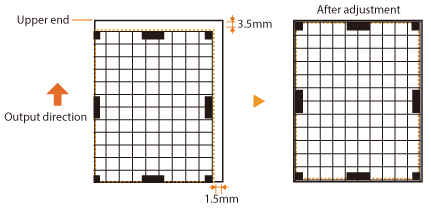
Marks for confirming the print position are printed on the sample print. The position of these marks determines the direction and distance for adjustment. Normally, all marks are printed on the edge of the paper.
Viewing the Sample Print
The lead edge of the output paper is the top edge of the sample print. Remember which edge is the top edge when picking up the paper.
 | The size of the marks for confirming the print position is indicated below.  |
When the Print Position Is Lopsided
Print position adjustment is required when the marks for confirming the print position are lopsided. The direction of the print position can be specified using a positive value (+) or negative value (-), and the distance can be specified in millimeters. To perform vertical adjustment, set a negative value (-) to move the print position up or a positive value (+) to move the print position down. To perform horizontal adjustment, set a negative value (-) to move the print position left or a positive value (+) to move the print position right.
Vertical direction 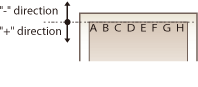 | Horizontal direction 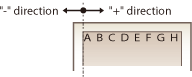 |
In the following example, because it is necessary to shift the print position 3.5 mm up and 1.5 mm to the right, specify -3.5 mm in the vertical direction and +1.5 mm in the horizontal direction.
Step 3: Adjusting the Print Position for Each Paper Source
Adjust the print position after confirming the direction and distance for adjustment. The print position can be adjusted in the range -3.5 mm to +3.5 mm in both the horizontal and vertical directions, in 0.1 mm increments.
1
Select <Set> on the <Home> screen. <Home> Screen
2
Select <Adjustment/Maintenance> <Adjust Image Quality> <Adjust Print Position>.
3
Select the paper source to adjust or <Common> to adjust all paper sources.

Print position adjustment in the vertical direction for 2-sided printing
The print position for the first page (front side) of two-sided printing can be adjusted with <Common>. The print position for the second page (back side) can be adjusted with the setting for each paper source.
First page (front side) | Setting value for <Common> |
Second page (back side) | Setting value for each paper source |
4
Select the direction to adjust and the combination of one-sided/two-sided printing, and press .
.5
Set the adjustment value, and press .
.Enter the value based on the print result of the sample print using  /
/ .
.
/.For <Adj. Vertically (1st Side for 2-Sided)>, the print position of all paper sources is adjusted with the entered value.
Repeat steps 3 to 5 to adjust the other positions and paper sources.
6
Output a sample print, and check whether adjustment has been performed correctly. Step 1: Printing the Current Print Position