
Configuring IPSec Settings
Internet Protocol Security (IPSec or IPsec) is a protocol suite for encrypting data transported over a network, including Internet networks. While TLS only encrypts data used on a specific application, such as a Web browser or an e-mail application, IPSec encrypts either whole IP packets or the payloads of IP packets, offering a more versatile security system. The IPSec of the machine works in transport mode, in which the payloads of IP packets are encrypted. With this feature, the machine can connect directly to a computer that is in the same virtual private network (VPN). Check the system requirements (Management Functions) and set the necessary configuration on the computer before you configure the machine.

 |
Using IPSec with IP address filterIP address filter settings are applied before the IPSec policies. Specifying IP Addresses for Firewall Settings |
Configuring IPSec Settings
Before using IPSec for encrypted communication, you need to register security policies (SP). A security policy consists of the groups of settings described below. After registering policies, specify the order in which they are applied.
Selector
Selector defines conditions for IP packets to apply IPSec communication. Selectable conditions include IP addresses and port numbers of the machine and the devices to communicate with.
IKE
IKE configures the IKEv1 that is used for key exchange protocol. Note that instructions vary depending on the authentication method selected.
[Pre-Shared Key Method]
This authentication method uses a common key word, called Shared Key, for communication between the machine and other devices. Enable TLS for the Remote UI before specifying this authentication method (Configuring the Key and Certificate for TLS).
This authentication method uses a common key word, called Shared Key, for communication between the machine and other devices. Enable TLS for the Remote UI before specifying this authentication method (Configuring the Key and Certificate for TLS).
[Digital Signature Method]
The machine and the other devices authenticate each other by mutually verifying their digital signatures. Generate or install the key and certificate beforehand (Registering the Key and Certificate for Network Communication).
The machine and the other devices authenticate each other by mutually verifying their digital signatures. Generate or install the key and certificate beforehand (Registering the Key and Certificate for Network Communication).
AH/ESP
Specify the settings for AH/ESP, which is added to packets during IPSec communication. AH and ESP can be used at the same time. You can also select whether or not to enable PFS for tighter security.
 |
For more information about the basic operations to be performed when setting the machine from the Remote UI, see Setting Up Menu Options from Remote UI. |
1
Start the Remote UI and log in to System Manager Mode. Starting Remote UI
2
Click [Settings/Registration] on the Portal page. Remote UI Screen
3
Select [Network Settings]  [IPSec Settings].
 [IPSec Settings].
4
Click [Edit].
5
Select the [Use IPSec] check box and click [OK].
If you want the machine to only receive packets that match one of the security policies that you define in the steps below, clear the [Receive Non-Policy Packets] check box.
6
Click [Register New Policy].
7
Specify the Policy Settings.
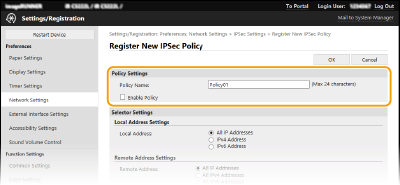
1 | In the [Policy Name] text box, enter alphanumeric characters for a name that is used for identifying the policy. |
2 | Select the [Enable Policy] check box. |
8
Specify the Selector Settings.
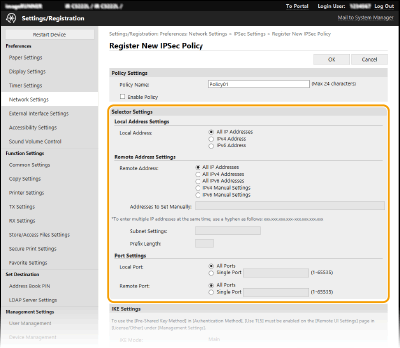
[Local Address]
Click the radio button for the type of IP address of the machine to apply the policy.
Click the radio button for the type of IP address of the machine to apply the policy.
[All IP Addresses] | Select to use IPSec for all IP packets. |
[IPv4 Address] | Select to use IPSec for all IP packets that are sent to or from the IPv4 address of the machine. |
[IPv6 Address] | Select to use IPSec for all IP packets that are sent to or from an IPv6 address of the machine. |
[Remote Address]
Click the radio button for the type of IP address of the other devices to apply the policy.
Click the radio button for the type of IP address of the other devices to apply the policy.
[All IP Addresses] | Select to use IPSec for all IP packets. |
[All IPv4 Addresses] | Select to use IPSec for all IP packets that are sent to or from IPv4 addresses of the other devices. |
[All IPv6 Addresses] | Select to use IPSec for all IP packets that are sent to or from IPv6 addresses of the other devices. |
[IPv4 Manual Settings] | Select to specify a single IPv4 address or a range of IPv4 addresses to apply IPSec. Enter the IPv4 address (or the range) in the [Addresses to Set Manually] text box. |
[IPv6 Manual Settings] | Select to specify a single IPv6 address or a range of IPv6 addresses to apply IPSec. Enter the IPv6 address (or the range) in the [Addresses to Set Manually] text box. |
[Addresses to Set Manually]
If [IPv4 Manual Settings] or [IPv6 Manual Settings] is selected for [Remote Address], enter the IP address to apply the policy. You can also enter a range of addresses by inserting a hyphen between the addresses.
If [IPv4 Manual Settings] or [IPv6 Manual Settings] is selected for [Remote Address], enter the IP address to apply the policy. You can also enter a range of addresses by inserting a hyphen between the addresses.

Entering IP addresses
Description | Example | |
Entering a single address | IPv4: Delimit numbers with periods. | 192.168.0.10 |
IPv6: Delimit alphanumeric characters with colons. | fe80::10 | |
Specifying a range of addresses | Insert a hyphen between the addresses. | 192.168.0.10-192.168.0.20 |
[Subnet Settings]
When manually specifying IPv4 address, you can express the range by using the subnet mask. Enter the subnet mask using periods to delimit numbers (example: "255.255.255.240").
When manually specifying IPv4 address, you can express the range by using the subnet mask. Enter the subnet mask using periods to delimit numbers (example: "255.255.255.240").
[Prefix Length]
Specifying the range of IPv6 addresses manually also allows you to specify the range using prefixes. Enter a range between 0 and 128 as the prefix length.
Specifying the range of IPv6 addresses manually also allows you to specify the range using prefixes. Enter a range between 0 and 128 as the prefix length.
[Local Port]/[Remote Port]
If you want to create separate policies for each protocol, such as HTTP or WSD, click the [Single Port] radio button and enter the appropriate port number for the protocol to determine whether to use IPSec.
If you want to create separate policies for each protocol, such as HTTP or WSD, click the [Single Port] radio button and enter the appropriate port number for the protocol to determine whether to use IPSec.

IPSec is not applied to the following packets
Loopback, multicast, and broadcast packets
IKE packets (using UDP on port 500)
ICMPv6 neighbor solicitation and neighbor advertisement packets
9
Specify the IKE Settings.
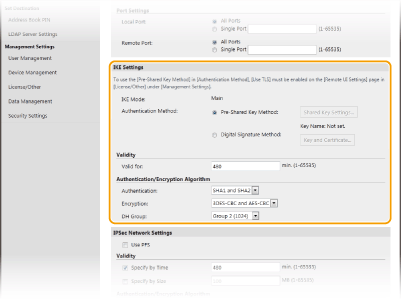
[IKE Mode]
The mode used for the key exchange protocol is displayed. The machine supports the main mode, not the aggressive mode.
The mode used for the key exchange protocol is displayed. The machine supports the main mode, not the aggressive mode.
[Authentication Method]
Select [Pre-Shared Key Method] or [Digital Signature Method] for the method used when authenticating the machine. You need to enable TLS for the Remote UI before selecting [Pre-Shared Key Method]. You need to generate or install the key and certificate before selecting [Digital Signature Method]. Configuring the Key and Certificate for TLS
Select [Pre-Shared Key Method] or [Digital Signature Method] for the method used when authenticating the machine. You need to enable TLS for the Remote UI before selecting [Pre-Shared Key Method]. You need to generate or install the key and certificate before selecting [Digital Signature Method]. Configuring the Key and Certificate for TLS
[Valid for]
Specify how long a session lasts for IKE SA (ISAKMP SA). Enter the time in minutes.
Specify how long a session lasts for IKE SA (ISAKMP SA). Enter the time in minutes.
[Authentication]/[Encryption]/[DH Group]
Select an algorithm from the drop-down list. Each algorithm is used in the key exchange.
Select an algorithm from the drop-down list. Each algorithm is used in the key exchange.
[Authentication] | Select the hash algorithm. |
[Encryption] | Select the encryption algorithm. |
[DH Group] | Select the Diffie-Hellman group, which determines the key strength. |
 Authenticating a machine using a pre-shared key
1 | Click the [Pre-Shared Key Method] radio button for [Authentication Method] and then click [Shared Key Settings]. |
2 | Enter alphanumeric characters for the pre-shared key and click [OK]. |
3 | Specify the [Valid for] and [Authentication]/[Encryption]/[DH Group] settings. |
 Authenticating a machine using digital signature method
1 | Click the [Digital Signature Method] radio button for [Authentication Method] and then click [Key and Certificate]. |
2 | Click [Register Default Key] on the right of the key and certificate you want to use.  Viewing details of a certificate You can check the details of the certificate or verify the certificate by clicking the corresponding text link under [Key Name], or the certificate icon. |
3 | Specify the [Valid for] and [Authentication]/[Encryption]/[DH Group] settings. |
10
Specify the IPSec Network Settings.
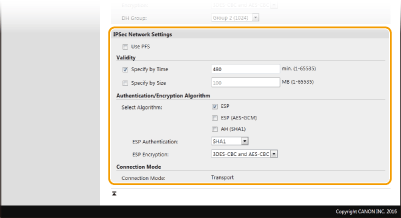
[Use PFS]
Select the check box to enable Perfect Forward Secrecy (PFS) for IPSec session keys. Enabling PFS enhances the security while increasing the load on the communication. Make sure that PFS is also enabled for the other devices.
Select the check box to enable Perfect Forward Secrecy (PFS) for IPSec session keys. Enabling PFS enhances the security while increasing the load on the communication. Make sure that PFS is also enabled for the other devices.
[Specify by Time]/[Specify by Size]
Set the conditions for terminating a session for IPSec SA. IPSec SA is used as a communication tunnel. Select either or both of the check boxes as necessary. If both check boxes are selected, the IPSec SA session is terminated when either of the conditions has been satisfied.
Set the conditions for terminating a session for IPSec SA. IPSec SA is used as a communication tunnel. Select either or both of the check boxes as necessary. If both check boxes are selected, the IPSec SA session is terminated when either of the conditions has been satisfied.
[Specify by Time] | Enter a time in minutes to specify how long a session lasts. |
[Specify by Size] | Enter a size in megabytes to specify how much data can be transported in a session. |
[Select Algorithm]
Select the [ESP], [ESP (AES-GCM)], or [AH (SHA1)] check box(es) depending on the IPSec header and the algorithm used. AES-GCM is an algorithm for both authentication and encryption. If [ESP] is selected, also select algorithms for authentication and encryption from the [ESP Authentication] and [ESP Encryption] drop-down lists.
Select the [ESP], [ESP (AES-GCM)], or [AH (SHA1)] check box(es) depending on the IPSec header and the algorithm used. AES-GCM is an algorithm for both authentication and encryption. If [ESP] is selected, also select algorithms for authentication and encryption from the [ESP Authentication] and [ESP Encryption] drop-down lists.
[ESP Authentication] | To enable the ESP authentication, select [SHA1] for the hash algorithm. Select [Do Not Use] if you want to disable the ESP authentication. |
[ESP Encryption] | Select the encryption algorithm for ESP. You can select [NULL] if you do not want to specify the algorithm, or select [Do Not Use] if you want to disable the ESP encryption. |
[Connection Mode]
The connection mode of IPSec is displayed. The machine supports transport mode, in which the payloads of IP packets are encrypted. Tunnel mode, in which whole IP packets (headers and payloads) are encapsulated is not available.
The connection mode of IPSec is displayed. The machine supports transport mode, in which the payloads of IP packets are encrypted. Tunnel mode, in which whole IP packets (headers and payloads) are encapsulated is not available.
11
Click [OK].
If you need to register an additional security policy, return to step 6.
12
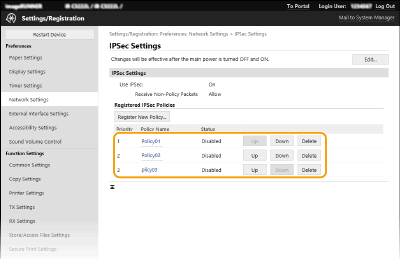
Arrange the order of policies listed under [Registered IPSec Policies].
Policies are applied from one at the highest position to the lowest. Click [Up] or [Down] to move a policy up or down the order.

Editing a policy
Click the corresponding text link under [Policy Name] for the edit screen.
Deleting a policy
Click [Delete] on the right of the policy name you want to delete  click [OK].
 click [OK].
13
Restart the machine. Restarting the Machine
 |
Using the operation panelYou can also enable or disable IPSec communication from <Menu> in the Home screen. <Use IPSec> |