
Printing from a USB Memory Device (Memory Media Print)
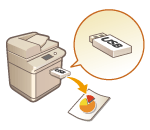
You can print files directly by connecting a USB memory device to the machine. Using this function, you can print without using a computer. For more information about the available USB memory devices and how to insert/remove the USB memory device, see Using a USB Memory Device.
 |
It is necessary to set <Use Print Function> to <On>. <Memory Media Settings> |
1
Select <Memory Media Print> in the Home screen. Home Screen
If you set <Screen When Memory Media Connected> to <On>, shortcuts to available functions are displayed when a USB memory device is inserted to the machine while the Home screen is displayed. If you select <Memory Media Print>, the Memory Media Print screen is displayed.
Using a USB Memory Device
<Screen When Memory Media Connected>
Using a USB Memory Device
<Screen When Memory Media Connected>
2
Select the check box for the file to print.
You can select multiple files.
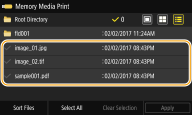
To clear a selection, select the file you have selected ( ) again.
 ) again.
Selecting a folder displays its contents. To return to the folder in the upper level, select  .
.
 .
.
Folders and files lower than the fifth directory are not displayed.
When you move to another folder, the previous file selections will be cleared.
 To select all files
1 | Select <Select All>. To clear all selections, select <Clear Selection>. |
2 | If file types are mixed, select <JPEG/TIFF Files> or <PDF Files>. |
 To change the file display method
You can select the file display method from "Preview"/"Thumbnail"/"Details."
Preview 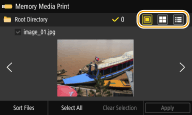 | Thumbnail 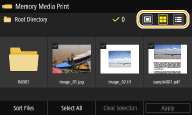 | Details 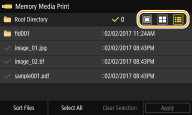 |

You can specify the file display method used to display the <Memory Media Print> screen. <Default Display Settings>
 To change the file sort order
You can change the sort order of the files in a USB memory device.

You can specify a sort setting such as <Name (Ascending)> or <Date/Time (Ascending)> as the default setting for the file sort order. <File Sort Default Settings>
1 | Select <Sort Files>. |
2 | Select the criteria for file sorting.  When you select <Date/Time (Ascending)> or <Date/Time (Descending)>, files are sorted based on the modification dates and time of the files. |
3
Select <Apply>.
4
Specify the print settings as necessary.
You can select <Reset> to restore all the default print settings.
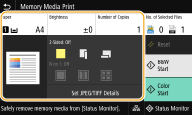
<Paper>
Select the paper source that contains the paper to use for printing.
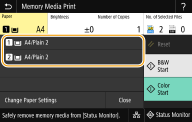
 | Uses the paper that is loaded in the paper drawer (Drawer 1) of the machine to print files. |
 | Uses the paper that is loaded in the paper drawer (Drawer 2) of the machine to print files. |
 When specifying other print settings, select <Close>. |
<Brightness>
You can adjust the brightness of the entire image.
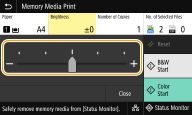
 When configuring other print settings, select <Close>. |
<Number of Copies>
Enter the number of copies.
 When configuring other print settings, select <Close>. |
<2-Sided Printing> 
You can make 2-sided printouts. Select the binding position.
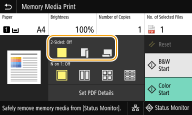
 | Does not make 2-sided printouts. |
 | Prints images in such a way that the printed pages are opened horizontally when bound.  |
 | Prints images in such a way that the printed pages are opened vertically when bound.  |
 <2-Sided Printing> may not be available with some sizes or types of paper. Available Paper |
<N on 1> 
<N on 1> is not available for printing TIFF files.
You can print images on multiple pages onto one page. Select the number of pages to be combined onto one page.
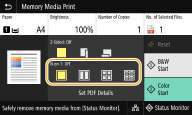
 | Does not apply N on 1. |
 | Prints images on two pages onto one page. |
 | Prints images on four pages onto one page. |
 (PDF only) | Prints images on eight pages onto one page. |
 To combine images on nine or 16 pages onto one page when printing a PDF file, select <Set PDF Details>  <N on 1>. <N on 1>. |
<Set JPEG/TIFF Details> 
You can change the print settings for JPEG and TIFF images.
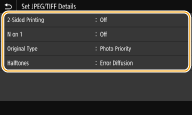
<2-Sided Printing> You can make 2-sided printouts. Select the binding position. |
<N on 1> (JPEG files only) Prints data for multiple pages of image data on the same side of a sheet of paper. You can specify the number of pages to print on one side of a sheet of paper. For example, to print four pages on one side of a sheet of paper, select <4 on 1>. |
<Original Type> You can select the type of original depending on the image to print. 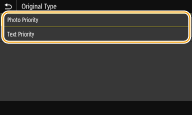 <Photo Priority> Gives priority to printing photo images smoothly. <Text Priority> Gives priority to printing text clearly. |
<Halftones> You can select the printing method used to reproduce halftones (the intermediate range between the lighter and darker areas of an image) for optimal image quality. 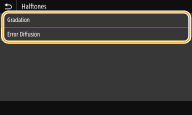 <Gradation> Prints images with fine gradation, such as digital camera images, with a smooth finish. <Error Diffusion> This mode is suitable for printing data with text and thin lines and the curved lines of CAD data, etc.  The stability of the texture and fixed toner may be reduced when this mode is used. <Matching Method> Specify the processing method used to correct the color. 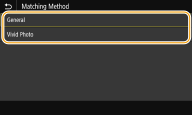 <General> Performs processing so that the color tone is suitable for printing general papers such as photos or documents. <Vivid Photo> Performs processing so that the color tone is deeper and more vivid than <General>. |
<Set PDF Details>
You can change the print settings for PDFs.
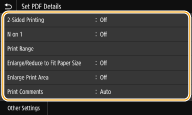
<2-Sided Printing> You can make 2-sided printouts. Select the binding position. |
<N on 1> Prints data for multiple pages of image data on the same side of a sheet of paper. You can specify the number of pages to print on one side of a sheet of paper. For example, to print four pages on one side of a sheet of paper, select <4 on 1>. |
<Print Range> Specify pages you want to print. 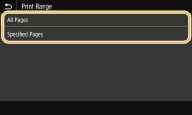 <All Pages> Prints all pages. <Specified Pages> Specify the range of pages you want to print. Enter the desired value in each of <Start Page> and <End Page> , and select <Apply>.  When the specified page range does not match any of the pages of the PDF file, printing is not performed. |
<Enlarge/Reduce to Fit Paper Size> Specify whether to enlarge or reduce the original according to the print range of paper. Note that size enlargement/reduction will not affect the aspect ratio of the original. |
<Enlarge Print Area> Specify whether to extend the print range to the paper size.  If you set to <On>, part of print data may not be printed in edge areas or paper may be partly smudged depending on the document. |
<Print Comments> This setting specifies whether to print annotations in the PDF file. 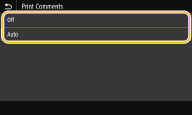 <Off> Prints no annotations. <Auto> Prints only those annotations that are specified to be printed in the PDF file. |
<Line Refinement> This setting determines whether to perform the process for unifying the thickness of fine lines. 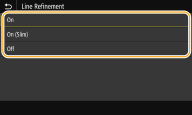 <On> The thickness of fine lines is unified. <On (Slim)> The thickness of fine lines is unified and the fine lines are printed thinner. Fine lines may appear too thin or faint. <Off> The thickness of fine lines is not unified. Fine lines may appear thick or uneven depending on printed positions or angles of the lines. |
<Password to Open Document> You can print password protected PDF files by entering the password required to open them. Enter the password, and select <Apply>. |
<Other Settings> |
<Halftones>
You can select the printing method used to reproduce halftones (the intermediate range between the lighter and darker areas of an image) for optimal image quality. You can make this setting for each of the types of image contained in one document. See <Halftones> for the description of the setting.
<Pure Black Text>
You can print black text of which color information is "R=G=B=0%," "C=M=Y=100%," or "C=M=Y=0% / K=100%," using only the K (black) toner. See <Pure Black Text> for the description of the setting.
<Black Overprint>
Specify the printing method used when black text overlaps a colored background or figure. See <Black Overprint> for the description of the setting.
<RGB Source Profile>
Select the source profile for color matching to print RGB data, according to the monitor you are using. See <RGB Source Profile> for the description of the setting.
<CMYK Simulation Profile>
This setting allows you to specify the simulation target to print the CMYK (Cyan Magenta Yellow Black) data. The machine converts CMYK data into a device dependent CMYK color model based on this simulation. See <CMYK Simulation Profile> for the description of the setting.
<Use Grayscale Profile>
Specify whether to convert gray data to CMYK (cyan, magenta, yellow, and black) data using the grayscale profile of the machine. See <Use Grayscale Profile> for the description of the setting.
<Output Profile>
Select the appropriate profile for print data. This option can be specified for each image type in one document. See <Output Profile> for the description of the setting.
<Matching Method>
Select the element to be prioritized when making color adjustment in <RGB Source Profile>. See <Matching Method> for the description of the setting.
<Composite Overprint>
Specify whether to overprint CMYK data, with overprint specified, as composite output. See <Composite Overprint> for the description of the setting.
<Grayscale Conversion>
Specify the way of printing color data in black and white. See <Grayscale Conversion> for the description of the setting.
<Print Quality>
<Density>
Adjust the toner density to be used for printing. See <Density> for the description of the setting.
<Toner Save>
Selecting <On> prints in toner saving mode. Select <On> when you want to check the layout or other appearance characteristics before proceeding to final printing of a large job. See <Toner Save> for the description of the setting.
<Gradation>
Specify the processing method used to reproduce gradation. <High 2> gives finer gradation than <High 1>. See <Gradation> for the description of the setting.
<Resolution>
Specify the resolution to process print data. See <Resolution> for the description of the setting.
<Speed/Img. Qlty Priority for 1200 dpi>
Select a priority between printing speed and image quality when printing at 1200 dpi resolution. See <Speed/Image Quality Priority for 1200 dpi> for the description of the setting.
<Special Smoothing Mode>
Specify the mode to print data with a smooth finish. If the quality of the printout is not acceptable in <Mode 1> (default), try another mode. See <Special Smoothing Mode> for the description of the setting.
<Toner Volume Correction>
When the toner volume for text or lines exceeds the limit value of the machine, make a correction so that the toner volume does not exceed the limit value. See <Toner Volume Correction> for the description of the setting.
<Line Control>
Specify the processing method used to reproduce lines. See <Line Control> for the description of the setting.
<Width Adjustment>
Configure a setting to print text or fine lines in bold. See <Width Adjustment> for the description of the setting.
<Advanced Smoothing>
Configure the smoothing setting to print the outline of graphics (e.g., illustrations created using applications) or text with a smooth finish. <Level 2> applies a stronger smoothing effect than <Level 1>. You can apply the setting separately for text and graphics. See <Advanced Smoothing> for the description of the setting.
<Gradation Smoothing>
Configure the smoothing setting to print the gradation (color density) of graphics (e.g., illustrations created using applications) or bit map images with a smooth finish. <Level 2> applies a stronger smoothing effect than <Level 1>. You can apply the setting separately for graphics and images. See <Gradation Smoothing> for the description of the setting.
5
Select <Start>.
Selecting <B&W> starts black and white printing. Selecting <Color> starts color printing.
If you want to cancel printing, select <Cancel>  <Yes>.
 <Yes>.
 |
If you always want to print with the same settings: Memory Media Print |