
<Printer>
All the settings about the printer are listed with short descriptions. Default settings are marked with a dagger ( ).
).
). |
Asterisks (*)Settings marked with an asterisk (*) cannot be imported or exported. Priority of settingsIf a print setting is specified both from the printer driver and the operation panel of the machine, the specification from the printer driver overrides that from the operation panel. The specification from the operation panel becomes effective in some specific cases, such as when printing from UNIX or other operating system that does not support printer drivers. 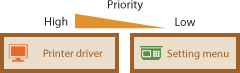 |
<Printer Settings>
Configure settings about printing and printer operations.
<Copies>
Set the number of copies to print.
1 to 999 |
<Menu>  <Function Settings> <Printer> <Printer Settings> <Copies> Set the number of copies to print <Apply>
<2-Sided Printing>
Select whether to make 2-sided printouts.
<Off> <On> |
<Menu> <Function Settings> <Printer> <Printer Settings> <2-Sided Printing> Select <Off> or <On>
<Default Paper>
Use this item to specify the paper size and type. Available Paper
<Menu> <Function Settings> <Printer> <Printer Settings> <Default Paper> Select the paper size Select the paper type
<Paper Size Override>
Select whether to switch between printing on A4 and LTR size paper if one of these paper sizes is loaded but the other is not. When you select <On>, if you specify A4 size paper to print from the computer but A4 size paper is not loaded in the machine, it will print your document on Letter size paper.
<Off> <On> |
<Menu> <Function Settings> <Printer> <Printer Settings> <Paper Size Override> Select <Off> or <On>
|
You can specify print settings, such as the number of copies or 1-sided/2-sided printing, from an application or the printer driver. However, the <Paper Size Override> setting can only be specified on the machine. |
<Print Quality>
You can change settings related to print quality.
<Density>
Adjust the toner density.
Yellow/Magenta/Cyan/Black 17 Levels <Fine Adjust> <Yellow>/<Magenta>/<Cyan>/<Black> <High>/<Medium>/<Low> 17 Levels |
<Menu> <Function Settings> <Printer> <Printer Settings> <Print Quality> <Density> Adjust the density of each color <Apply>
|
You can use <Fine Adjust> to adjust the toner density of each color to three density levels: high density, medium density, and low density. |

When <Toner Save> is set to <On>, you cannot set this item.
<Toner Save>
You can save toner consumption. Select <On> when you want to check the layout or other appearance characteristics before proceeding to final printing of a large job.
<Off> <On> |
<Menu> <Function Settings> <Printer> <Printer Settings> <Print Quality> <Toner Save> Select <Off> or <On>
<Gradation>
Specify the processing method used to reproduce gradation. To obtain quality higher than <High 1>, set to <High 2>.
<High 1> <High 2> |
<Menu> <Function Settings> <Printer> <Printer Settings> <Print Quality> <Gradation> Select <High 1> or <High 2>
This setting is only available when <Resolution> is set to <600 dpi>.
<Resolution>
Specify the resolution to be used for print data processing.
<1200 dpi> <600 dpi> |
<Menu> <Function Settings> <Printer> <Printer Settings> <Print Quality> <Resolution> Select <1200 dpi> or <600 dpi>
<Speed/Image Quality Priority for 1200 dpi>
Select a priority between printing speed and image quality when printing at 1200 dpi resolution.
<Speed Priority> <Image Quality Priority> |
<Menu> <Function Settings> <Printer> <Printer Settings> <Print Quality> <Speed/Image Quality Priority for 1200 dpi> Select <Speed Priority> or <Image Quality Priority>
<Special Smoothing Mode>
Specify the mode to print data with a smooth finish. If the quality of the printout is not acceptable in <Mode 1> (default), try another mode.
<Mode 1> <Mode 2> <Mode 3> <Mode 4> <Mode 5> <Mode 6> |
<Menu> <Function Settings> <Printer> <Printer Settings> <Print Quality> <Special Smoothing Mode> Select a mode
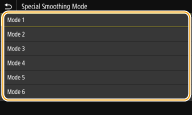
<Mode 1>
Prints an outline of dark text or a figure with a smooth finish. This is the optimal mode for various types of printing.
Prints an outline of dark text or a figure with a smooth finish. This is the optimal mode for various types of printing.
<Mode 2>
Prints figure outline and internal halftones with a smooth finish.
Prints figure outline and internal halftones with a smooth finish.
<Mode 3>
Prints dark text or lines on an area with a colored background with a smooth finish.
Prints dark text or lines on an area with a colored background with a smooth finish.
<Mode 4>
Prints an image such as a photo or an outline of a figure or text with a smooth finish.
Prints an image such as a photo or an outline of a figure or text with a smooth finish.
<Mode 5>
Prints an image and halftones with an even balance.
Prints an image and halftones with an even balance.
<Mode 6>
Prints the entire image with a smooth finish.
Prints the entire image with a smooth finish.
When <Error Diffusion> is set to <On> in <Halftones>, printing in modes other than <Mode 5> all produces the same results.
This setting is only available when <Resolution> is set to <600 dpi>.
<Toner Volume Correction>
When the toner volume for text or lines exceeds the limit value of the machine, make a correction so that the toner volume does not exceed the limit value.
<Standard> <Gradation Priority> <Text Priority> |
<Menu> <Function Settings> <Printer> <Printer Settings> <Print Quality> <Toner Volume Correction> Select an item
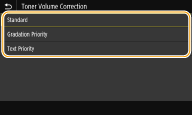
<Standard>
Adjusts the toner supply amount so that proper resolution is ensured for text and lines, and that proper color tone is ensured for other types of print data.
Adjusts the toner supply amount so that proper resolution is ensured for text and lines, and that proper color tone is ensured for other types of print data.
<Gradation Priority>
Adjusts the toner supply amount so that proper color tone is ensured for all types of print data.
Adjusts the toner supply amount so that proper color tone is ensured for all types of print data.
<Text Priority>
Adjusts the toner supply amount so that proper resolution is ensured for all types of print data.
Adjusts the toner supply amount so that proper resolution is ensured for all types of print data.
<Line Control>
Specify the processing method used to reproduce lines.
<Resolution Priority> <Gradation Priority> |
<Menu> <Function Settings> <Printer> <Printer Settings> <Print Quality> <Line Control> Select <Resolution Priority> or <Gradation Priority>
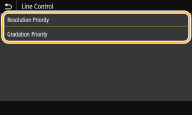
<Resolution Priority>
Draws lines with the same resolution as for text.
Draws lines with the same resolution as for text.
<Gradation Priority>
Draws lines while maintaining color and gradation.
Draws lines while maintaining color and gradation.
<Width Adjustment>
Configure a setting to print text or fine lines in bold.
<Off> <On> <Text> <Line> <Text and Line> <Text, Line, and Graphics> |
<Menu> <Function Settings> <Printer> <Printer Settings> <Print Quality> <Width Adjustment> <On> Select the target
If you set to <On>, the printing speed may be slower or image quality may be affected.
Even if you set to <On>, bold printing may not be possible depending on the printing application.
<Advanced Smoothing>
Configure the smoothing setting to print the outline of graphics (e.g., illustrations created using applications) or text with a smooth finish.
<Advanced Smoothing>
Select whether to perform smoothing processing. <Level 2> prints an outline with a smoother finish than <Level 1>. First try with <Level 1>
<Off> <Level 1> <Level 2> |
<Menu> <Function Settings> <Printer> <Printer Settings> <Print Quality> <Advanced Smoothing> <Advanced Smoothing> Select an item
<Apply to Graphics>
Specify whether to apply smoothing processing to graphics when <Advanced Smoothing> is set to <Level 1> or <Level 2>.
<Off> <On> |
<Menu> <Function Settings> <Printer> <Printer Settings> <Print Quality> <Advanced Smoothing> <Apply to Graphics> Select <Off> or <On>
<Apply to Text>
Specify whether to apply smoothing processing to the text when <Advanced Smoothing> is set to <Level 1> or <Level 2>.
<Off> <On> |
<Menu> <Function Settings> <Printer> <Printer Settings> <Print Quality> <Advanced Smoothing> <Apply to Text> Select <Off> or <On>
The settings of <Apply to Graphics> and <Apply to Text> are only effective when [Advanced Smoothing] is set to [Printer Default] in the printer driver.
<Gradation Smoothing>
Configure the smoothing setting to print the gradation (color density) of graphics (e.g., illustrations created using applications) or bit map images with a smooth finish.
<Gradation Smoothing>
Select whether to perform smoothing processing. <Level 2> prints an outline with a smoother finish than <Level 1>. First try with <Level 1>.
<Off> <Level 1> <Level 2> |
<Menu> <Function Settings> <Printer> <Printer Settings> <Print Quality> <Gradation Smoothing> <Gradation Smoothing> Select an item
<Apply to Graphics>
Specify whether to apply smoothing processing to graphics when <Gradation Smoothing> is set to <Level 1> or <Level 2>.
<Off> <On> |
<Menu> <Function Settings> <Printer> <Printer Settings> <Print Quality> <Gradation Smoothing> <Apply to Graphics> Select <Off> or <On>
<Apply to Images>
Specify whether to apply smoothing processing to images when <Gradation Smoothing> is set to <Level 1> or <Level 2>.
<Off> <On> |
<Menu> <Function Settings> <Printer> <Printer Settings> <Print Quality> <Gradation Smoothing> <Apply to Images> Select <Off> or <On>
[Gradation Smoothing] in the printer driver applies only to graphics data. The setting configured here applies to smoothing processing for image data.
<Enhance Text for B&W Printing>
When printing a color document in black and white, using this item adjusts the density of text to make it more legible. This is useful and effective for printing in black and white a color document containing light-colored text.
<Off> <On> |
<Menu> <Function Settings> <Printer> <Printer Settings> <Print Quality> <Enhance Text for B&W Printing> Select <Off> or <On>
This item does not apply to text drawn as graphics or images.
This item has no effect on PDF print data.
If you set this item to <Off> when printing documents that contain light-colored text, the text is printed thinner than when <On> is selected, so it may be more or less illegible.
Even when this item is set to <Off>, the print result may be such that text looks emphasized. If so, also set <Advanced Smoothing> to <Off>. <Advanced Smoothing>
<Layout>
Specify the page layout settings such as binding position and margin values.
<Binding Location>
If you are binding the printouts with a binding tool such as a stapler, use this item to specify whether to bind on the long or short edge. Specify the setting of this item in combination with <Gutter>, which specifies the binding margin to apply to the binding position.
<Long Edge> <Short Edge> |
<Menu> <Function Settings> <Printer> <Printer Settings> <Layout> <Binding Location> Select <Long Edge> or <Short Edge>
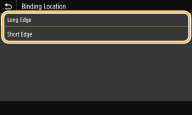
<Long Edge>
Specify this to bind on the long edge of paper.
Specify this to bind on the long edge of paper.
<Short Edge>
Specify this to bind on the short edge of paper.
Specify this to bind on the short edge of paper.
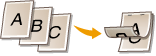
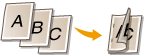
<Gutter>
Shift the print position to adjust the binding margin to apply to the binding edge specified by <Binding Location>. The value "00.0" exerts no effect on the binding margin.
-50.0 to 00.0 to +50.0 (mm) |
<Menu> <Function Settings> <Printer> <Printer Settings> <Layout> <Gutter> Specify the binding margin <Apply>

 Entering the setting value
Specify the print position shift direction and shift width. Whether the setting value is a "+" or "-" value determines the binding edge along which to adjust the binding margin. The margin width can be adjusted in 0.5 mm increments. Basic Operation
Setting Value | Long Edge | Short Edge |
A value with a "+" sign | Left edge of paper  | Top edge of paper  |
A value with a "-" sign | Right edge of paper  | Bottom edge of paper  |
<Offset Short Edge/Offset Long Edge>
Irrespective of the paper source, you can shift the print position in units of "0.5 mm" for all print jobs.
-50.0 to 00.0 to +50.0 (mm) |
<Menu> <Function Settings> <Printer> <Printer Settings> <Layout> Select the combination of adjustment direction and printing side Specify the offset value <Apply>
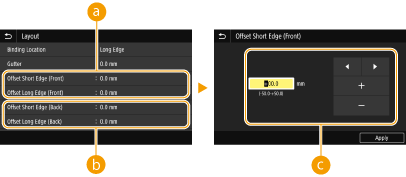
<Offset Short Edge (Front)>/<Offset Long Edge (Front)>
Shifts the print position on the side of paper facing up.
 <Offset Short Edge (Back)>/<Offset Long Edge (Back)>
Shifts the print position on the side of paper facing down.
 Entering the setting value
For <Offset Short Edge (Front)>/<Offset Short Edge (Back)>, specify a value with a "+" sign to shift the print position in the left-to-right direction. For <Offset Long Edge (Front)>/<Offset Long Edge (Back)>, specify a value with a "+" sign to shift the print position in the up-to-down direction. To shift in the reverse direction, specify a value with a "-" sign. Basic Operation
<Offset Short Edge (Front)> <Offset Short Edge (Back)> 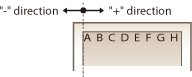 | <Offset Long Edge (Front)> <Offset Long Edge (Back)> 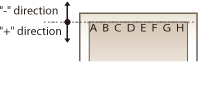 |
<Auto Skip Error>
Printing stops if a certain error occurs in the process. However, if you set this item to <On>, the certain error will be skipped and printing can continue. Normally, set this item to <Off>.
<Off> <On> |
<Menu> <Function Settings> <Printer> <Printer Settings> <Auto Skip Error> Select <Off> or <On>
<Timeout>
Set the time period after which the current print job is automatically canceled in the case of a print data reception interruption.
5 to 15 to 300 (sec.) |
<Menu> <Function Settings> <Printer> <Printer Settings> <Timeout> Set the time period <Apply>
<Personality>
Specify the mode in which the machine should operate when the format of document data is unknown.
<Auto> <PDF> <Imaging> |
<Menu> <Function Settings> <Printer> <Printer Settings> <Personality> Select the Personality mode
<Color Mode>
Select whether to print data in color or black and white.
<Auto (Color/B&W)> <Black & White> |
<Menu> <Function Settings> <Printer> <Printer Settings> <Color Mode> Select <Auto (Color/B&W)> or <Black & White>
<Compressed Image Output>
Specify the operation that is to be performed when the image quality has degraded due to insufficient memory during printing.
<Output> <Display Error> |
<Menu> <Function Settings> <Printer> <Printer Settings> <Compressed Image Output> Select <Output> or <Display Error>
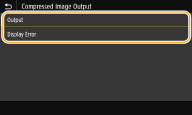
<Output>
Continues printing regardless of how much the image quality has degraded.
Continues printing regardless of how much the image quality has degraded.
<Display Error>
If the image quality has degraded significantly, an error message is displayed, and printing is stopped.
If the image quality has degraded significantly, an error message is displayed, and printing is stopped.
<UFR II>
You can change the settings that become effective when printing from the UFR II printer driver.
<Halftones>
You can select the printing method used to reproduce halftones (the intermediate range between the lighter and darker areas of an image) for optimal image quality.
<Error Diffusion>
This mode is suitable for printing data with text and thin lines and the curved lines of CAD data, etc.
The stability of the texture and fixed toner may be reduced when this mode is used.
<Off> <On> |
<Menu> <Function Settings> <Printer> <Printer Settings> <UFR II> <Halftones> <Error Diffusion> Select <Off> or <On>
This setting is only available when <Resolution> is set to <600 dpi>.
<Resolution/Gradation>
Select a method used to reproduce halftones, if <Error Diffusion> is set to <Off>. This option can be specified for each image type in any one document.
<Text> <Resolution> <Gradation> <Graphics> <Resolution> <Gradation> <Image> <Resolution> <Gradation> |
<Menu> <Function Settings> <Printer> <Printer Settings> <UFR II> <Halftones> <Resolution/Gradation> Select an image type Select <Resolution> or <Gradation>
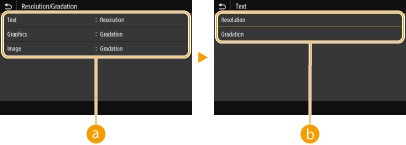
Type of image
Select the object for which to change the setting. <Text> represents letters and characters, <Graphics> represents lines and figures, and <Image> represents photos and images.
Setting value
<Resolution>
Produces a fine print with clear edges of text. It is suitable for printing characters and fine lines.
<Gradation>
Produces a print with smooth gradation or smooth edges. It is suitable for printing figures or graphs containing gradation areas.
<Matching Method>
Specify the processing method used to correct the color.
<General> <Perceptual> <Colorimetric> <Vivid Photo> |
<Menu> <Function Settings> <Printer> <Printer Settings> <UFR II> <Matching Method> Select an item
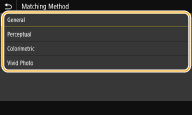
<General>
Performs processing so that the color tone is suitable for printing general papers such as photos or documents.
Performs processing so that the color tone is suitable for printing general papers such as photos or documents.
<Perceptual>
Performs processing so that the color tone is suitable for printing bitmap images. When this item is selected, an image is printed in the colors closest to those displayed on the monitor.
Performs processing so that the color tone is suitable for printing bitmap images. When this item is selected, an image is printed in the colors closest to those displayed on the monitor.
<Colorimetric>
Minimizes a color variance that occurs when RGB data is converted to CMYK data.
Minimizes a color variance that occurs when RGB data is converted to CMYK data.
<Vivid Photo>
Performs processing so that the color tone is deeper and more vivid than <General>.
Performs processing so that the color tone is deeper and more vivid than <General>.
<Gray Compensation>
Configures a setting so that black or gray data of which color information is "R = G = B" is printed using only the K (black) toner. If <Off> is selected, data is printed using the toner of four colors: CMYK. This option can be specified for each image type in any one document.
<Text> <Off> <On> <Graphics> <Off> <On> <Image> <Off> <On> |
<Menu> <Function Settings> <Printer> <Printer Settings> <UFR II> <Gray Compensation> Select an image type Select <Off> or <On>
<Paper Save>
Specify whether to disable a blank page in print data from being output.
<Off> <On> |
<Menu> <Function Settings> <Printer> <Printer Settings> <UFR II> <Paper Save> Select <Off> or <On>
<Imaging Settings>
You can change the print settings that will apply when printing image files (JPEG/TIFF).
<Halftones>
You can change the printing method used to reproduce halftones (the intermediate range between the lighter and darker areas of an image) for optimal image quality.
<Gradation> <Error Diffusion> |
<Menu> <Function Settings> <Printer> <Printer Settings> <Imaging Settings> <Halftones> Select <Gradation> or <Error Diffusion>
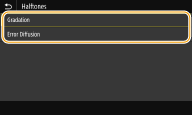
<Gradation>
Prints images with fine gradation, such as digital camera images, with a smooth finish.
Prints images with fine gradation, such as digital camera images, with a smooth finish.
<Error Diffusion>
This mode is suitable for printing data with text and thin lines and the curved lines of CAD data, etc.
This mode is suitable for printing data with text and thin lines and the curved lines of CAD data, etc.
The stability of the texture and fixed toner may be reduced when this mode is used.
<Matching Method>
Specify the processing method used to correct the color.
<General> <Vivid Photo> |
<Menu> <Function Settings> <Printer> <Printer Settings> <Imaging Settings> <Matching Method> Select <General> or <Vivid Photo>
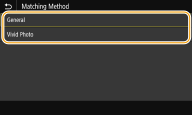
<General>
Performs processing so that the color tone is suitable for printing general papers such as photos or documents.
Performs processing so that the color tone is suitable for printing general papers such as photos or documents.
<Vivid Photo>
Performs processing so that the color tone is deeper and more vivid than <General>.
Performs processing so that the color tone is deeper and more vivid than <General>.
<PDF>
You can change settings for PDF files.
<Enlarge/Reduce to Fit Paper Size>
Specify whether to enlarge or reduce the original according to the print range of paper. Note that size enlargement/reduction will not affect the aspect ratio of the original.
<Off> <On> |
<Menu> <Function Settings> <Printer> <Printer Settings> <PDF> <Enlarge/Reduce to Fit Paper Size> Select <Off> or <On>
<Enlarge Print Area>
Specify whether to extend the print range to the paper size.
<Off> <On> |
<Menu> <Function Settings> <Printer> <Printer Settings> <PDF> <Enlarge Print Area> Select <Off> or <On>
If you specify <On>, it may occur that edge-adjacent portions of page are not printed or that printouts come out partially smudged depending on the original.
<N on 1>
Specify whether to shrink multiple pages and print them on one page in such arrangement that the first page is positioned at top left. For example, to print 4 pages onto a single sheet, select <4 on 1>.
<Off> <2 on 1> <4 on 1> <6 on 1> <8 on 1> <9 on 1> <16 on 1> |
<Menu> <Function Settings> <Printer> <Printer Settings> <PDF> <N on 1> Select the number of pages to be combined
<Print Comments>
Specify whether to print comments. If you specify <Auto>, comments in PDF files will be printed.
<Off> <Auto> |
<Menu> <Function Settings> <Printer> <Printer Settings> <PDF> <Print Comments> Select <Auto> or <Off>
<Line Refinement>
This setting determines whether to perform the process for unifying the thickness of fine lines.
<On> <On (Slim)> <Off> |
<Menu> <Function Settings> <Printer> <Printer Settings> <PDF> <Line Refinement> Select an item
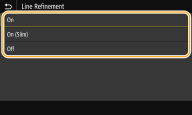
<On>
The thickness of fine lines is unified.
The thickness of fine lines is unified.
<On (Slim)>
The thickness of fine lines is unified and the fine lines are printed thinner. Fine lines may appear too thin or faint.
The thickness of fine lines is unified and the fine lines are printed thinner. Fine lines may appear too thin or faint.
<Off>
The thickness of fine lines is not unified. Fine lines may appear thick or uneven depending on printed positions or angles of the lines.
The thickness of fine lines is not unified. Fine lines may appear thick or uneven depending on printed positions or angles of the lines.
<Pure Black Text>
Configures a setting so that black text of which color information is "R = G = B = 0%," "C = M = Y = 100%," or "C = M = Y = 100%" is printed using only the K (black) toner. When <Off> is selected, text is printed based on the <Output Profile> setting.
<Off> <On> |
<Menu> <Function Settings> <Printer> <Printer Settings> <PDF> <Pure Black Text> Select <Off> or <On>
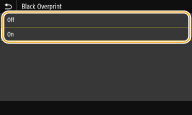
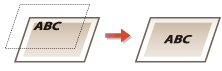
<Black Overprint>
Specify the printing method used when black text overlaps a colored background or figure. This option is not displayed when <Pure Black Text> is set to <Off>.
<Off> <On> |
<Menu> <Function Settings> <Printer> <Printer Settings> <PDF> <Black Overprint> Select <Off> or <On>
<Off>
Outlines black text from a colored background or figure first, then prints black text in the outlined part. Printouts may be faded much more than <On>, or text may be outlined.
Outlines black text from a colored background or figure first, then prints black text in the outlined part. Printouts may be faded much more than <On>, or text may be outlined.

<On>
Prints all the colored backgrounds and figures, and overlaps black text on these backgrounds and figures using only the black (K) toner, then prints.
Prints all the colored backgrounds and figures, and overlaps black text on these backgrounds and figures using only the black (K) toner, then prints.
<RGB Source Profile>
Select a profile for RGB data according to the monitor you are using.
<sRGB> <Gamma 1.5> <Gamma 1.8> <Gamma 2.4> <None> |
<Menu> <Function Settings> <Printer> <Printer Settings> <PDF> <RGB Source Profile> Select a profile
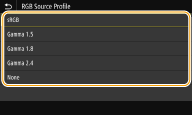
<sRGB>
Sets the image quality to the industry standard for general Windows computer monitors. If the monitor supports sRGB, data can be printed in the color tones closest to the displayed colors.
Sets the image quality to the industry standard for general Windows computer monitors. If the monitor supports sRGB, data can be printed in the color tones closest to the displayed colors.
<Gamma 1.5> to <Gamma 2.4>
Adjusts the brightness of the print result to prevent the image quality of the brightest and darkest parts from being degraded. The greater the gamma value is, the darker the printed text or image becomes.
Adjusts the brightness of the print result to prevent the image quality of the brightest and darkest parts from being degraded. The greater the gamma value is, the darker the printed text or image becomes.
<None>
Carries out color separation from RGB data to CMYK data without applying an RGB source profile.
Carries out color separation from RGB data to CMYK data without applying an RGB source profile.
<CMYK Simulation Profile>
Select a simulation target to print the CMYK data. The machine converts CMYK data into a device dependent CMYK color model based on the simulation.
<JapanColor(Canon)> <U.S. Web Coated v1.00(Canon)> <Euro Standard v1.00(Canon)> <None> |
<Menu> <Function Settings> <Printer> <Printer Settings> <PDF> <CMYK Simulation Profile> Select a profile
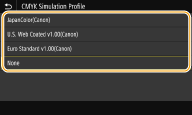
<JapanColor(Canon)>
Set a JapanColor profile. Data is printed in the color tones closest to those of the Japanese printing standard.
Set a JapanColor profile. Data is printed in the color tones closest to those of the Japanese printing standard.
<U.S. Web Coated v1.00(Canon)>
Set a U.S. Web Coated profile. Data is printed in the color tones closest to those of the U.S. printing standard.
Set a U.S. Web Coated profile. Data is printed in the color tones closest to those of the U.S. printing standard.
<Euro Standard v1.00(Canon)>
Set a Euro Standard profile. Data is printed in the color tones closest to those of the European printing standard.
Set a Euro Standard profile. Data is printed in the color tones closest to those of the European printing standard.
<None>
Prints CMYK data by using a device-dependent CMYK color model without applying the CMYK simulation profile.
Prints CMYK data by using a device-dependent CMYK color model without applying the CMYK simulation profile.
When <None> is selected, the dark color gradation may become uneven depending on data.
<Use Grayscale Profile>
Specify whether to convert gray data to CMYK data using the grayscale profile of the machine.
<Off> <On> |
<Menu> <Function Settings> <Printer> <Printer Settings> <PDF> <Use Grayscale Profile> Select <Off> or <On>
Even if <On> is selected, data is printed using only the K (black) toner depending on the setting of <Output Profile> or <Pure Black Text>.
<Output Profile>
Select the appropriate profile for the print data. This option can be specified for each image type in any one document.
<Text> <Normal> <Photo> <TR Normal> <TR Photo> <Graphics> <Normal> <Photo> <TR Normal> <TR Photo> <Image> <Normal> <Photo> <TR Normal> <TR Photo> |
<Menu> <Function Settings> <Printer> <Printer Settings> <PDF> <Output Profile> Select an image type Select a profile
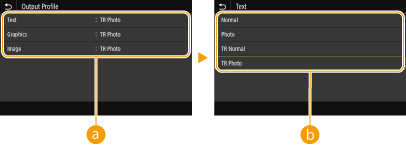
Image type
Select the object for which to change the setting. <Text> represents letters and characters, <Graphics> represents lines and figures, and <Image> represents photos and images.
Setting value
<Normal>
Prints data by adjusting it to the color tones closest to those displayed on the monitor.
<Photo>
Prints data by adjusting it to photo-like color tones.
<TR Normal>
Prints data by adjusting it to the color tones closest to those displayed on the monitor and using only the K (black) toner to reproduce black and gray elements.
<TR Photo>
Prints data by adjusting it to photo-like color tones and using only the K (black) toner to reproduce black and gray elements.
The setting of this item is unavailable when one of the following settings is selected.
<RGB Source Profile> is set to <None>
<CMYK Simulation Profile> is set to <None>
<Use Grayscale Profile> is set to <Off>
<Matching Method>
Select the element to be prioritized when carrying out color matching in <RGB Source Profile>.
<Perceptual> <Saturation> <Colorimetric> |
<Menu> <Function Settings> <Printer> <Printer Settings> <PDF> <Matching Method> Select an item
<Perceptual>
Provides the color tone that is suitable for printing photos or bit map images.
Provides the color tone that is suitable for printing photos or bit map images.
<Saturation>
Provides the color tone that is suitable for printing artworks, graphs, and other images used for presentation materials.
Provides the color tone that is suitable for printing artworks, graphs, and other images used for presentation materials.
<Colorimetric>
Set this option when you want to reproduce the RGB color value in the color reproduction range of the machine as accurately as possible.
Set this option when you want to reproduce the RGB color value in the color reproduction range of the machine as accurately as possible.
The setting of this item is unavailable when <RGB Source Profile> is set to <None>.
<Halftones>
You can select the printing method used to reproduce halftones (the intermediate range between the lighter and darker areas of an image) for optimal image quality.
<Error Diffusion>
This mode is suitable for printing data with text and thin lines and the curved lines of CAD data, etc.
The stability of the texture and fixed toner may be reduced when this mode is used.
<Off> <On> |
<Menu> <Function Settings> <Printer> <Printer Settings> <PDF> <Halftones> <Error Diffusion> Select <Off> or <On>
This setting is only available when <Resolution> is set to <600 dpi>
<Resolution/Gradation>
Select a method used to reproduce halftones, if <Error Diffusion> is set to <Off>. This option can be specified for each image type in any one document.
<Text> <Resolution> <Gradation> <Graphics> <Resolution> <Gradation> <Image> <Resolution> <Gradation> |
<Menu> <Function Settings> <Printer> <Printer Settings> <PDF> <Halftones> <Resolution/Gradation> Select an image type Select <Resolution> or <Gradation>
Type of image
Select the object for which to change the setting. <Text> represents letters and characters, <Graphics> represents lines and figures, and <Image> represents photos and images.
Setting value
<Resolution>
Produces a fine print with clear edges of text. It is suitable for printing characters and fine lines.
<Gradation>
Produces a print with smooth gradation or smooth edges. It is suitable for printing figures or graphs containing gradation areas.
<Brightness>
Adjust the brightness of the entire image in increments of 5%. The lower the setting value is, the brighter the image or text becomes. The greater the setting value is, the darker the image or text becomes.
85 to 100 to 115(%) |
<Menu> <Function Settings> <Printer> <Printer Settings> <PDF> <Brightness> Adjust the brightness <Apply>
<Composite Overprint>
Specify whether to overprint CMYK data, with overprint specified, as composite output.
<Off> <On> |
<Menu> <Function Settings> <Printer> <Printer Settings> <PDF> <Composite Overprint> Select <Off> or <On>
Overprinting using special colors is not permitted.
<Grayscale Conversion>
Specify the type of grayscale conversion of color print data.
<sRGB> <NTSC> <Uniform RGB> |
<Menu> <Function Settings> <Printer> <Printer Settings> <PDF> <Grayscale Conversion> Select the type of grayscale conversion
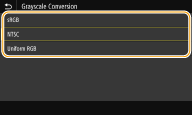
<sRGB>
Prints in black and white with emphasis on color differences so that a smooth gradation is achieved.
Prints in black and white with emphasis on color differences so that a smooth gradation is achieved.
<NTSC>
Prints in black and white so that the resulting image looks like a black and white television picture (of the NTSC system).
Prints in black and white so that the resulting image looks like a black and white television picture (of the NTSC system).
<Uniform RGB>
Prints in black and white so that R, G, and B are uniformly converted to the same gray level by using only brightness as the reference.
Prints in black and white so that R, G, and B are uniformly converted to the same gray level by using only brightness as the reference.
<PDL Selection (Plug and Play)>
Select a page description language so that the machine is detected as a printer that is compatible with that language when it is connected to a computer by using Plug and Play.
<Network> *
Select a page description language so that the machine is detected as a printer that is compatible with that language when it is detected over the network.
<UFR II> <UFR II (V4)> |
<USB>
Select a page description language so that the machine is detected as a printer that is compatible with that language when it is connected to a computer via USB.
<UFR II> <UFR II (V4)> |
<Menu> <Function Settings> <Printer> <PDL Selection (Plug and Play)> Select <Network> or <USB> Select a page description language Restart the machine
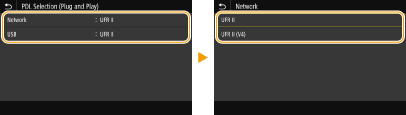
<UFR II>
Detects and connects the machine as a UFR II printer.
Detects and connects the machine as a UFR II printer.
<UFR II (V4)>
Detects and connects the machine as a UFR II printer that is compatible with XML Paper Specification (XPS).
Detects and connects the machine as a UFR II printer that is compatible with XML Paper Specification (XPS).