Managing Address Lists
This section describes the procedure for creating and managing the address lists and one-touches to distribute to devices.
IMPORTANT |
If destinations in the destination list are edited or deleted, the changes are also reflected to the destinations in the address lists and one-touches that include those destinations. |
NOTE |
The destinations managed in the destination list can be registered to address lists and one-touches. |
Displaying the List of Address Lists
1.
Select the [Data Management] menu > [Address Books].
2.
Select [Address Lists] from the drop-down list on the top of the [Address Books] page.

Creating Address Lists/One-Touches
1.
Click [Create] on the [Data Management] menu > [Address Books] > [Address Lists] page.

2.
Enter a name in [Address List Name].
3.
Select the type of address list from the [Address List Type] drop-down list.
[Address List] | Select this when creating an address list. |
[One-Touch] | Select this when creating the following types of address list. One-Touch of Type I Printers Favorites (One-Touch for some models) for Type II printers One-touch Speed Dial of Type III Printers |
4.
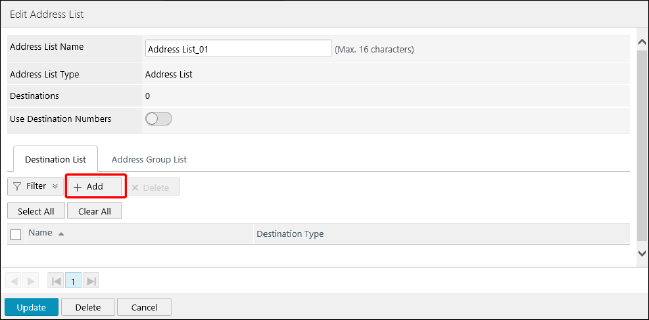
Click [Add].
For details on adding destinations on the [Edit Address List] page, see the following.
5.
Click [Update].
Adding Destinations to Address Lists/One-Touches
Adding Destinations to Address Lists/One-Touches
Select the destinations to add to address lists and one-touches from those registered in the destination list.
1.
Click the desired address list or one-touch on the [Data Management] menu > [Address Books] > [Address Lists] page.

2.
Click [Add] on the [Destination List] tab.

3.
Add the destinations.
Adding destinations to an address list
Select the type of destination to add from the [Destination List] drop-down list.
Select the destinations to add.
Click [Add].
Adding a destination to a one-touch
Select the destination type to add from the drop-down list in [Destination List].
Select the destination to add.
Enter the following.
[One-Touch Button Number]
[Button Name] (Not required for Type II printer.)
Click [Update].
4.
Edit the [No.] of the destination as required.
Enable [Use Destination Numbers] to distribute the address lists being edited to printers other than Type I printers.
Select the destination to edit the [No.] of.
Enter the number, and click [Update].
NOTE |
Set [Destination Number] or [One-Touch Button Number] to a unique value in the address list/one-touch. |
Type I printers
It is not necessary to enable [Use Destination Numbers] to distribute address lists to Type I printers. For one-touches to distribute to Type I printers, [No.] refers to [One-Touch Button Number]. Assign an arbitrary number from 1 to 200.
Type II printers
Address lists/one-touches to distribute to Type II printers must have an appropriate [No.] assigned for each destination.
[Favorites] ([One-Touch] for some models) | 1 to 19 |
[Coded Dial] | 1 to 281 |
Type III printers
Address lists/one-touches to distribute to Type III printers must have an appropriate [No.] assigned for each destination.
The relationship between the number used on the printer and the number on the screen of this software is indicated below. Note that different values are assigned to the same destination.
Printer | This Software | |
[One-touch Speed Dial] | 001 to 200 | 1 to 200 |
[Address Book] | 000 to 299 | 1 to 300 |
Example:
Destinations with "1" as the number in an address list in this software are set to "001" in the destination printer.
Destinations with "1" as the number in a one-touch in this software are set to "000" in the destination printer. Note that the number differs by one.
5.
Click [Update].
Adding Destination Groups to Address Lists/One-Touches
NOTE |
Only destinations that are registered to the address lists/one-touches that the destination group belongs to can be registered to a destination group. Destinations registered to other address lists/one-touches cannot be registered. |
1.
Click the desired address list or one-touch on the [Data Management] menu > [Address Books] > [Address Lists] page.
2.
On the [Edit Address List] page, add the destination groups.
Click the [Address Group List] tab.
Click [Add].
Enter the followings in [Address Group Settings].
[Group Name]
[One-Touch Name] (for a one-touch)
Enter the followings for destinations to distribute to Type I printers.
[Access Number]
Select the destinations to add to the destination group.
Click [Add].
3.
Click [Update].
Deleting Address Lists/One-Touches
NOTE |
Note the following when regions are set. Users with a region set can only delete address lists included in [Sets (Address Lists + Printers)] combined with printers in the same region. |
1.
Click the desired address list or one-touch on the [Data Management] menu > [Address Books] > [Address Lists] page.
2.
Click [Delete].