Forwarding the Received Documents Automatically
The machine can forward all the received documents to specified destinations. Even if you are out of the office, you can receive fax information anytime, anywhere.
Specifying Settings for Documents to be Forwarded Automatically
While the Forwarding feature is activated, all the documents to be received are automatically forwarded.
1
Select <Menu> in the Home screen. Home Screen
2
Select <Function Settings>  <Receive/Forward>
  <Fax Settings>.
 <Receive/Forward>
  <Fax Settings>.
3
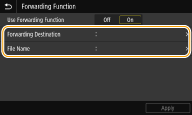
Select <Forwarding Settings>  <Forwarding Function>.
 <Forwarding Function>.
4
Select <On> in <Use Forwarding Function>.
When not using the forwarding function, select <Off>.
5
Configure the forwarding settings.

<Forwarding Destination>
Specify a forwarding destination. In the Address Book, select the check box for a destination to which to forward, and select <Apply>.
Specify a forwarding destination. In the Address Book, select the check box for a destination to which to forward, and select <Apply>.
<File Name>
You can specify a character string to be used in the file name when sending a document by E-mail/I-fax or when saving to a shared folder/FTP server. The file name is automatically assigned based on the following format: arbitrary character string_communication management number (four digits)_sent date and time_document number (three digits).file extension name.
You can specify a character string to be used in the file name when sending a document by E-mail/I-fax or when saving to a shared folder/FTP server. The file name is automatically assigned based on the following format: arbitrary character string_communication management number (four digits)_sent date and time_document number (three digits).file extension name.

When not specifying <File Name>, you can use the following format for file name: communication management number (four digits)_sent date and time_document number (three digits).file extension name.
6
Select <Apply>.
Printing Documents to be Forwarded
If you want to check the documents to be forwarded for yourself, you can set the machine to print the documents whenever they are forwarded, or to print only the documents that failed to be forwarded.
<Menu>  <Function Settings>
  <Receive/Forward>
  <Fax Settings>
  <Forwarding Settings>
  <Print Images>
  Select <On> or <Only When Error Occurs>

 <Function Settings>
  <Receive/Forward>
  <Fax Settings>
  <Forwarding Settings>
  <Print Images>
  Select <On> or <Only When Error Occurs>

Printing/Resending/Deleting Documents that Failed to be Forwarded
You can store documents that failed to be forwarded in memory, and print, resend, or delete them later.
Storing Documents that Failed to be Forwarded in Memory
<Menu>  <Function Settings>
  <Receive/Forward>
  <Fax Settings>
  <Forwarding Settings>
  <Store Images in Memory>
  <Only When Error Occurs>

 <Function Settings>
  <Receive/Forward>
  <Fax Settings>
  <Forwarding Settings>
  <Store Images in Memory>
  <Only When Error Occurs>

Printing/Resending/Deleting Documents Stored in Memory
1
Select <Status Monitor>.
2
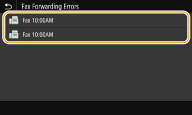
Select <Fax Forwarding Errors>.
3
Select the document you want to print/resend/delete.

Displays detailed information about the document.
To print the document, select <Print>  <Yes>.
 <Yes>.
To resend the document, select <Forward>, select the check box for the target destination, and then select <Apply>.
To delete the document, select <Delete>  <Yes>.
 <Yes>.
 |
You can use the Remote UI to preview the documents that failed to be forwarded. Checking Information of Documents That Failed To Be Forwarded |