Setting Screen and Operations for Printing Saved Files
When you press <Access Stored Files> on the <Home> screen, and select the Mail Box to print files, the following setting screen is displayed.
 |
Depending on the function, see the <Copy> function for details. |
Setting screen for Mail Box
Print Screen/Print Settings Screen

(Items shown on the screen may differ depending on your model and options.)
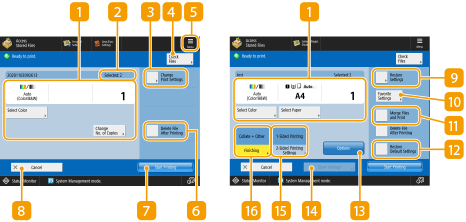
 Current setting status and setting buttons
Displays setting status such as paper size to print on and the number of prints. Make sure to confirm the settings in order to print properly. To change the settings, press the button under the display section. To change the number of prints, enter the number using the numeric keys.
You can select the color mode for printing by pressing <Select Color>.
Depending on the settings you are specifying, the <Print Sample> button is displayed, which enables you to check the print result of a file.
If you select multiple files, the <Change No. of Copies> button appears. Press this button when changing the number of copies.
You can select the paper size/type and the paper source by pressing <Select Paper>.
 <Print Sample> appears only if you set to make multiple prints and one of the following settings at the same time. Note that the available functions may differ depending on your model and the installed options. <Collate (Page Order)> <Offset> <Staple + Collate> <Booklet> <Front Cover> <Insert Sheets> <Merge Files and Print> when multiple files are selected |
 Number of selected files
Displays the number of selected files.
When selecting multiple files, the <Change No. of Copies> button appears. To change the number of prints, press this button.
 <Change Print Settings>
To change the specified print settings, press this button to display the print settings screen.
 The settings registered in <Change Default Settings> are applied as print settings to the files saved using the <Scan and Store> function. <Change Default Settings> The print settings used for the files below are those current when the files were saved. Files saved from the printer driver Files saved using <Store in Mail Box> in the <Copy> function Storing Copy Documents in the Machine |
 <Check Files>
Can be used to check the types and names of selected files.
Select a file in the <Check Files> screen and press <Details> to display information such as the file size and update date/time.
Select a file in the <Check Files> screen and press <Display Image> to display a preview image of the file.
Press this icon to register the current settings in <Favorite Settings> of  or to change the factory default print settings.
 or to change the factory default print settings.
 <Delete File After Printing>
Deletes a file automatically after it is printed.
 <Start Printing>
Starts printing.
 <Cancel>
Cancels print settings and returns to the file selection screen.
 <Restore Settings>
Press to specify the settings again from the beginning and return to the print screen.
 <Favorite Settings>
Register frequently used scan settings here in advance to easily recall them when necessary.
 <Merge Files and Print>
Prints multiple selected files as one file. The file is printed using the settings registered in <Change Default Settings> instead of the print settings stored in each file. <Change Default Settings>
 <Restore Default Settings>
Changes print settings into setting values registered in <Change Default Settings>. <Change Default Settings>
 <Options>
Enables you to specify the settings of functions that are not displayed in  /
/ . For details about each setting item, see Options.
 /
/ . For details about each setting item, see Options.
 <Store Settings>
Resaves a file with the print settings you changed.
This key cannot be used if multiple files are selected.
If there are already print settings stored, the information is overwritten.
 <2-Sided Printing Settings>
Select the type of 2-sided printing. Select <Book Type> when printing the front and back sides in the same top-bottom orientation. Select <Calendar Type> when printing the front and back sides in opposite top-bottom orientations.
 <Finishing>
Select the finishing method.
Finishing by Collating/Grouping
Finishing with the Stapler
Other Finishing Functions
Finishing by Collating/Grouping
Finishing with the Stapler
Other Finishing Functions
Options

(Items shown on the screen may differ depending on your model and options.)
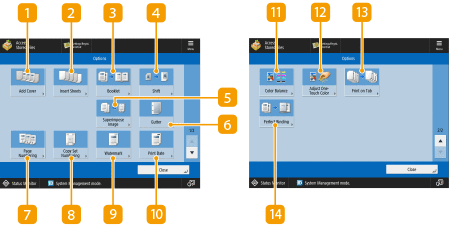
 <Add Cover>
Adds covers. Adding a Cover and Back Cover
 <Insert Sheets>/<Job Separator>
Inserts blank sheets between the specified pages. When selecting multiple documents, you can select <Job Separator> which can separate each document. Inserting Sheets and Chapter Pages (Insert Sheets)
 <Booklet>
Prints a document with several pages in such a way that the prints are made into a booklet. Making Booklets (Booklet Copying)
 <Shift>
Shifts the image to the specified location on the paper. Shifting the Image
 <Superimpose Image>
Superimposes an image stored in memory on the original image for printing. Superimposing Images
 <Gutter>
Creates gutters along the sides of the paper. Setting Binding Margins
 <Page Numbering>
Adds page numbers. Attaching Numbers and Symbols to Copies
 <Copy Set Numbering>
Adds the number of sets. Attaching Numbers and Symbols to Copies
 <Watermark>
Adds watermarks. Attaching Numbers and Symbols to Copies
 <Print Date>
Adds the date. Attaching Numbers and Symbols to Copies
 <Color Balance>
Enables you to adjust the color balance. Adjusting the Color
 <Adjust One-Touch Color>
Enables you to adjust the contrast. One Touch Color Mode
 <Print on Tab>
Prints on the tabs of tab paper. Inserting Tab Paper
 <Perfect Binding>
Prints the cover page and main document glued together. Perfect Binding
