Scanning from a Computer (Saving to a Computer)
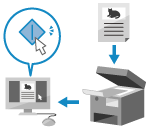 | You can scan an original and save the scanned data to a computer connected to the machine. You can set the format and save location when scanning from a computer. This method lets you see the scanned data immediately on the computer screen so you can check the image quality and make adjustments. |
Use either of the following applications to perform scanning.
Dedicated application (MF Scan Utility)
Scan easily using the setting to suit your purpose. Send scanned data to a specified application to display it and send it by e-mail. You can also use the ScanGear MF screen to configure advanced settings.
Using a Dedicated Application to Perform Scanning - MF Scan Utility
Using a Dedicated Application to Perform Scanning - MF Scan Utility
Other TWAIN- and WIA-supported Applications
You can also use image processing software, document software, and other applications that support TWAIN*1 or WIA*2. Scanned data is imported directly to the application for immediate editing and processing.
Check the manual of the application you are using to see if it supports TWAIN or WIA.
Scanning Using Other TWAIN- and WIA-supported Applications
Check the manual of the application you are using to see if it supports TWAIN or WIA.
Scanning Using Other TWAIN- and WIA-supported Applications
*1 TWAIN is a standard for connecting a scanner or other image input device to a computer. *2 WIA is a function that comes standard in Windows. |
Other WSD-supported Applications (Windows)
WSD is a protocol for automatic detection of printers and scanners on a network in a Windows environment. You can scan originals using an application that supports WSD without installing a scanner driver.
Check the manual of the application you are using to see if it supports WSD.
Scanning Using Other WSD-supported Applications (Windows)
Check the manual of the application you are using to see if it supports WSD.
Scanning Using Other WSD-supported Applications (Windows)
Using a Dedicated Application to Perform Scanning - MF Scan Utility
After placing an original on the machine, scan using MF Scan Utility on a computer.
Required Preparations |
Install the scanner driver (ScanGear MF) and application (MF Scan Utility) on the computer. Installing Software and Drivers to the Computer |
1
Place the original on the machine. Placing Originals
2
Start MF Scan Utility on a computer. Starting MF Scan Utility
3
For [Product Name], select the machine.
4
Click the button corresponding to the original type and purpose to start scanning.
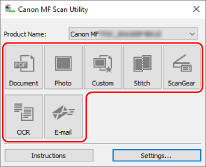
Click [ScanGear] to display ScanGear MF and configure the advanced scan settings. For more information, click [ ] on ScanGear MF to display help.
 |
When Scanning Cannot Be PerformedThe machine may not be online (scan standby mode). On the operation panel, select [Scan] in the [Home] screen, and press [Remote Scanner] to turn the machine online, and then repeat the operation. |
Scanning Using Other TWAIN- and WIA-supported Applications
After placing an original on the machine, scan using other TWAIN- and WIA-supported application on your computer.
This section describes the general procedure for this operation. Check the manual of the application you are using for detailed operations on how to use it.
This section describes the general procedure for this operation. Check the manual of the application you are using for detailed operations on how to use it.
Required Preparations |
Install the scanner driver (ScanGear MF) on the computer. Installing Software and Drivers to the Computer |
1
Place the original on the machine. Placing Originals
2
On the computer, start the application used to import the scanned data.
3
In the application, select the command to start the scanning operation.
4
Select the scanner driver (ScanGear MF or WIA) of the machine, and configure the scan settings.
For more advanced scan settings, select ScanGear MF. For more information, click [] on ScanGear MF to display help.
5
Start scanning.
When scanning is completed, the scanned data is imported to the application.
If the next pages of the original are not scanned or an error message appears after scanning is completed, place the originals on the machine one at a time and perform scanning.
|
When Scanning Cannot Be PerformedThe machine may not be online (scan standby mode). On the operation panel, select [Scan] in the [Home] screen, and press [Remote Scanner] to turn the machine online, and then repeat the operation. |
Scanning Using Other WSD-supported Applications (Windows)
After placing an original on the machine, scan using a WSD-supported application on your computer. This section describes the procedure using "Windows Fax and Scan" as an example.
Check the manual of the application you are using for detailed operations on how to use it.
Check the manual of the application you are using for detailed operations on how to use it.
Required Preparations |
Set the machine to enable use of WSD to scan. Configuring LPD, RAW, or WSD Register the machine with the computer to which to save scanned data. Registering the Machine as a WSD Scanner with a Computer (Windows) |
1
Place the original on the machine. Placing Originals
2
On the operation panel, press [Scan] in the [Home] screen. [Home] Screen
3
Press [Remote Scanner].
4
On the computer, select [ ] (Start)
  [Windows Accessories] [Windows Fax and Scan].
] (Start) The [Windows Fax and Scan] screen is displayed.
5
Click [Scan].
6
Click [New Scan].
The [New Scan] screen is displayed.
If the [Select Device] screen appears, select the machine, and then click [OK].
7
In [Source], select the location where the original is placed.
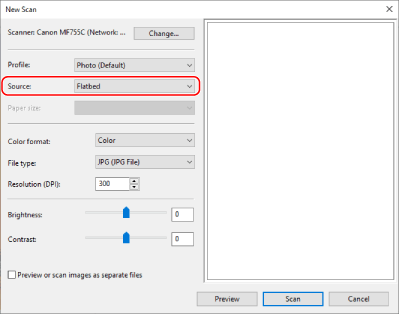
When placing the original on the platen glass, select [Flatbed].
When placing the original on the feeder, select [Feeder (Scan one side)].
8
Configure the other scan settings, as needed.
When adjusting the image quality, select the original type from [Profile].
When scanning an original with large volumes of text, select [Document]. When scanning a photo, select [Photo (Default)].
When scanning an original with large volumes of text, select [Document]. When scanning a photo, select [Photo (Default)].
Select the scanned data format with [File type].
To see a preview of the scanned data, click [Preview].
9
Click [Scan].
Scanning of the original starts.
When scanning is completed, the scanned data is saved to the [Scanned Documents] folder in [Documents] and displayed in the file list on the [Windows Fax and Scan] screen.
When scanning is completed, the scanned data is saved to the [Scanned Documents] folder in [Documents] and displayed in the file list on the [Windows Fax and Scan] screen.
| |
Registering Frequently Used SettingsYou can use the following procedure to register frequently used scan settings as profiles, and then call up these settings as needed when scanning.
|