Copy Operations
This section describes the basic copy operations when copying documents, photos, and other printed materials ("originals").
 |
When copying originals that have text or images extending to the edges without margins, the copy may printed with an area missing around the edge. For the size of the margin, see the basic specifications. Basic Specifications |
1
Place the original. Placing Originals
2
On the operation panel, press [Copy] in the [Home] screen. [Home] Screen
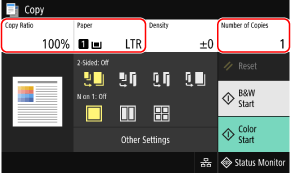
The copy screen is displayed.
3
Set the Copy Ratio, Paper, and Number of Copies.

[Copy Ratio]
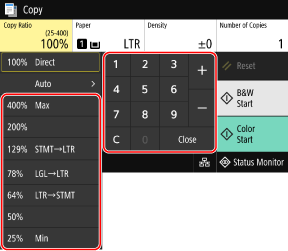
Set the ratio for enlarging or reducing copies.
Automatically Setting the Copy Ratio According to the Paper Size
Press [Auto], and select the size of the placed original.
The copy ratio is set automatically according to the size of the paper used for copying.
The copy ratio is set automatically according to the size of the paper used for copying.
Manually Setting the Copy Ratio
Select a fixed copy ratio from the list or enter a custom ratio using the numeric keys, and press [Close].
You can specify a value from 25% to 400% in 1% increments.
You can specify a value from 25% to 400% in 1% increments.

[Paper]
Select the paper to use for copying.
Select the paper source with the loaded paper to use or [Auto Select Paper (LTR/LGL)], and press [Close].
Select the paper source with the loaded paper to use or [Auto Select Paper (LTR/LGL)], and press [Close].
* If the paper loaded in the paper source does not match the setting of the paper size or paper type, you can use [Change Paper Settings] to change the paper settings.
* [Auto Select Paper (LTR/LGL)] automatically selects LTR, and LGL size paper depending on the original size loaded in the feeder.
* [Auto Select Paper (LTR/LGL)] is not available when no original is loaded in the feeder or when using [N on 1], [Erase Frame], or [ID Card Copy].
* [Auto Select Paper (LTR/LGL)] may not be displayed depending on the model you are using.
[Number of Copies]
Specify the number of copies.
Use the numeric keys to enter the number of copies, and then press [Close].
Use the numeric keys to enter the number of copies, and then press [Close].
4
Configure the other copy settings, as needed. Additional Copying Features
You can perform 2-sided copying and adjust the image quality and other settings to suit your original and purpose.
5
Press [Start B&W] or [Start Color].
Copying starts.
To copy the original in black and white, press [Start B&W]. To copy in color, press [Start Color].
To cancel copying, press [Cancel]  [Yes]. Canceling Copy Operations
 [Yes]. Canceling Copy Operations
Use [Status Monitor] to view the copy job status and log. Viewing the Print Job Status and Log
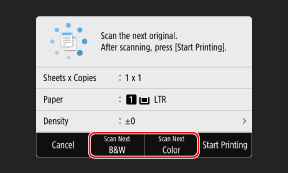
 When [Scan Next] appears
When an original is placed on the platen glass and copied using 2-sided copying or N on 1, the screen is displayed for scanning the next original.
1 | Place the next original on the platen glass, and press [Scan Next B&W] or [Scan Next Color].  The next original is scanned, and the same screen is displayed. Repeat this process until scanning of all originals is completed. You can select the color mode (Black & White or Color) for each original. To copy the next original in black and white, press [Scan Next B&W]. To copy in color, press [Scan Next Color]. You can also press [Density], [Original Type], and [Color Balance] to change the settings for each original. If the size of the original is different, part of the image may be missing, or the image may be printed smaller on the paper. |
2 | Press [Start Printing]. The scanned originals are printed. |