An Error Code Is Displayed
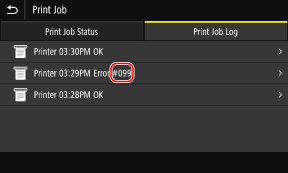
If printing cannot be performed, an I-Fax cannot be received, or another error occurs, an error code (three-digit number starting with "#") is displayed in the job log.

Select the error code from the list below, and check how to troubleshoot the problem.
 |
If the problem persists even after trying the troubleshooting methods, contact your dealer or service representative. If the Problem Persists |
#037
Printing could not be performed due to the file size.
Reduce the File Size or Divide the File.
Optimize the file to make it smaller, or divide the file and then print it.
#099
The job was canceled.
This does not indicate a malfunction. Perform the operation again, as needed.
This does not indicate a malfunction. Perform the operation again, as needed.
#408
The USB memory device may have been removed, or the USB memory device was formatted with an unsupported file system.
Has the USB Memory Device Been Removed?
Confirm the orientation of the USB memory device, and insert it correctly into the machine. Inserting and Removing a USB Memory Device
Was the USB Memory Device Formatted with a Supported File System?
You can use a USB memory device with a FAT16 or FAT32 file system.
#701
Authentication could not be performed due to incorrect entry of the Department ID or PIN. Alternatively, the user attempted to perform an operation restricted with Department ID Management without entering the Department ID.
Enter the Correct Department ID and PIN.
If you lost your Department ID or PIN, contact the system administrator.
To Cancel Restriction, Change the [Department ID Management] Setting.
Log in to Remote UI in System Manager Mode  [Settings/Registration] [Settings/Registration]  [User Management] [User Management]  [Department ID Management] [Department ID Management]  [Edit] [Edit]  select the [Allow Print Jobs with Unknown IDs] checkbox select the [Allow Print Jobs with Unknown IDs] checkbox  [OK] [OK] |
On the operation panel, select [Menu] in the [Home] screen, and then select [Management Settings] to change the setting. [Department ID Management]
#752
The POP3 server name is not configured correctly, or the machine is not connected correctly to the network.
Configure the POP3 Server Name Correctly.
Check the Network Status and Settings.
If the machine is not connected to a network, reconfigure the network settings.
Checking the Network Status and Settings
Setting Up the Network
Checking the Network Status and Settings
Setting Up the Network
#753
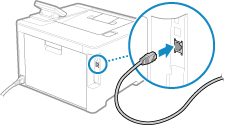
The machine was unable to connect to the network due to a disconnected Ethernet cable.
Check That the Ethernet Cable Is Properly Connected.

#766
The certificate has expired.
Renew the certificate, or use a certificate that is not expired.
Are the current date and time on the machine correct?
Check the date and time setitngs. If the settings are not correct, set the time zone, and then set the current date and time. Setting the Date and Time
#802
The POP3 server name is not set correctly.
When Receiving an I-Fax, Correctly Set the POP3 Server Name.
#810
The machine cannot connect to the POP3 server, or the information of the POP3 server is not set correctly.
Check the Network Status and Settings.
If the machine is not connected to a network, reconfigure the network settings.
Checking the Network Status and Settings
Setting Up the Network
Checking the Network Status and Settings
Setting Up the Network
Set the information of the POP3 server correctly.
Check the Status of the POP3 Server.
Check that the POP3 server is operating properly on the network. For details about the POP3 server status, contact your provider.
#816
The maximum number of pages that can be printed for the department has been reached.
Check the Usage, and Reset the Count to Zero.
#818
The received data is in a format that cannot be printed.
Have the sender change the file format and resend the file.
Have the sender change the file format and resend the file.
#819
The received data has invalid MIME information and cannot be processed.
Have the sender check the settings and resend the data.
Have the sender check the settings and resend the data.
#820
The received data has invalid BASE64 or uuencode data and cannot be processed.
Have the sender check the settings and resend the data.
Have the sender check the settings and resend the data.
#821
The received data has a TIFF analysis error and cannot be processed.
Have the sender check the settings and resend the data.
Have the sender check the settings and resend the data.
#822
The file format is unsupported, and printing cannot be performed.
Save using a supported file format.
The following file formats can be printed from a USB memory device:
JPEG (DCF, Exif2.21 or earlier, JFIF)
TIFF (JPEG, MH, MR, MMR compression)
PDF
#827
The received data includes unsupported MIME information and cannot be processed.
Have the sender check the settings and resend the data.
Have the sender check the settings and resend the data.
#829
The received data exceeds the maximum size that can be received by the machine.
Have the Sender Check and Resend the Data.
When Receiving an I-Fax
The machine cannot receive an e-mail that exceeds 24 MB. Have the sender reduce the size of the e-mail to 24 MB or less and resend it.
#852
The power of the machine turned OFF for some reason.
Make sure the power plug is firmly inserted into an outlet.
Make sure the power plug is firmly inserted into an outlet.
#853
Printing or Secure Print failed for some reason.
If the operation was canceled when print data was being sent from a computer to the machine, try printing again.
Otherwise, check the following:
If the operation was canceled when print data was being sent from a computer to the machine, try printing again.
Otherwise, check the following:
Are You Printing a Large Job?
The data volume may have exceeded the processing capacity of the machine. Reduce the number of pages to print, or print when there is no print data being printed or waiting to be printed.
Is the Data to Be Printed Corrupted?
If the data is corrupted or otherwise damaged, fix the data.
Are You Trying to Print a PDF File from a USB Memory Device?
When printing a password-protected PDF file, enter the password before printing.
Touch Panel Model
[Home] screen on the operation panel  [Memory Media Print] [Memory Media Print]  select the file to print select the file to print  [Apply] [Apply]  [Set PDF Details] [Set PDF Details]  [Password to Open Document] [Password to Open Document]  enter the password enter the password  [Apply] [Apply] |
Black and White LCD Model
[Home] screen on the operation panel  [Memory Media Print] [Memory Media Print]    [Select File and Print] [Select File and Print]    select the file to print select the file to print    [<Apply>] [<Apply>]    [Set PDF Details] [Set PDF Details]    [Password to Open Document] [Password to Open Document]    enter the password enter the password  <Apply>] <Apply>]   |
Are You Trying to Print with Secure Print?
The machine may be configured not to use the Secure Print function. Try either of the following methods:
Enable Secure Print.
The machine must be restarted to apply the settings.
Log in to Remote UI in System Manager Mode  [Settings/Registration] [Settings/Registration]  [Secure Print Settings] [Secure Print Settings]  [Edit] [Edit]  select the [Secure Print] checkbox select the [Secure Print] checkbox  [OK] [OK]  restart the machine restart the machine |
On the operation panel, select [Menu] in the [Home] screen, and then select [Function Settings] to configure the settings. [Secure Print]
Print without using the Secure Print function.
Was the Secure Print Data Left for a While?
If printing of the Secure Print data is not performed after a set period of time, the data is deleted from the memory automatically. If the save period elapses and the data is deleted automatically, try printing with Secure Print again.
* You can change the save period (time until the data is deleted). Changing the Time Period That Print Data with a PIN (Secure Data) Is Saved
#861
You are using an unsupported printer driver, or the data you are trying to print is corrupted.
Use the printer driver of the machine, and try printing again.
Is the Data to Be Printed Corrupted?
If the data is corrupted or otherwise damaged, fix the data.
#863
An error occurred, preventing printing.
Restart the Machine, and Then Print the Data Again.
#934
The job was deleted by the Auto Delete Suspended Jobs function.
Resolve the Error That Caused the Job to Be Suspended.
Resolve the error, and try printing again.
* Disable the Auto Delete Suspended Jobs function, or change the time until the data is automatically deleted. [Auto Delete Suspended Jobs]
#995
Receiving of a waiting job was canceled.
Try receiving again, as needed.
Try receiving again, as needed.