Creating Tasks
This section describes the method for creating a user-defined task.
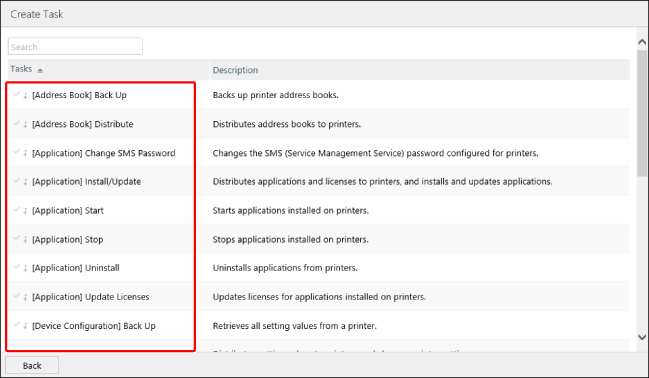
1.
Select the [Tasks] menu > [Task List].
2.
Click [Create] on the [Task List] page.

3.
Select the task to create in the list on the [Create Task] page.
4.
On the [Scheduled] tab, specify the basic information and schedule of the task.
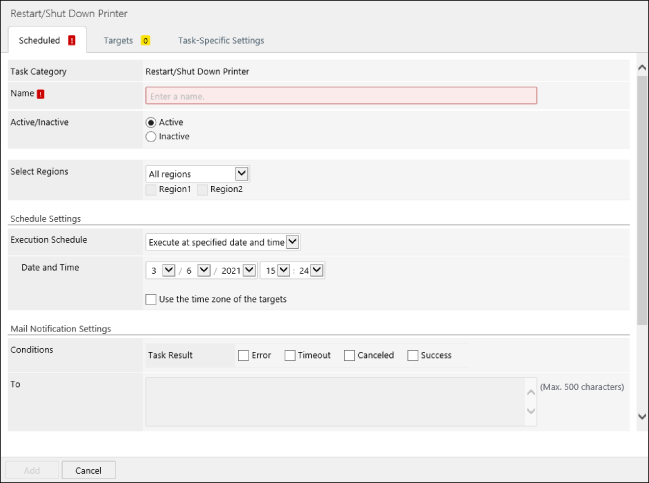
If the required items are not set,  is displayed on the [Scheduled] tab.
is displayed on the [Scheduled] tab.In [Name], enter a name indicating the content of the task.
In [Active/Inactive], set the state of the task.
[Active] | Executes the task automatically at the specified schedule. |
[Inactive] | Does not execute the task. Select this to defer or stop a task. |
In [Select Regions], select the regions to set for the task.
For [Selected regions only], select the regions to set. Multiple regions can be set for a task.
NOTE |
Regions can be set when devices are the target of the task. [Select Regions] is displayed when regions are set. For details, see the following. |
In [Schedule Settings], set the task execution schedule.
[Execution Schedule] | Specify the timing to execute the task. |
[Execute now] | Immediately executes the task after registration. |
[Execute at specified date and time] | Executes the task at the specified date and time. |
[Date and Time] | Specify the date and time for executing the task. The task is executed when the date and time of the computer where the web browser is running becomes the date and time specified here. Select [Use the time zone of the targets] to follow the time zone of the region where the target devices or Agents of the task is located. |
[Execute periodically] | Periodically executes the task at the specified interval. |
[Task Execution] | Specify the interval for executing the task. Select [day], [week], or [month] from the drop-down list as the interval, and specify the interval using a numeric value. For example, when "1" is specified as the interval, the task is executed every day, week, or month. When "2" is specified, the task is executed every second day, week, or month. If you selected [week], select the day of the week to execute the task in [Execute On]. If you selected [month], specify the date or day of the week for executing the task in [Specify Day of the Month/Week]. Tasks are not executed when the specified date or day of the week does not exist for a month. If you want to execute the task on the last day or last week of the month, specify [Last] for the date or day of the week. In [Start Time], specify the time to execute the task. In [Time Zone], select the time zone of the time to execute the task. To specify a periodic execution period, select [Specify the start of the task execution period] or [Specify the end of the task execution period], and specify the day/time. |
To send the task execution history via e-mail, set the notification conditions, destination, and e-mail priority in [Mail Notification Settings].
5.
On the [Targets] tab, specify target devices or Agents for the task.
The target differs according to the type of task. The [Targets] tab is also not displayed when the target does not need to be specified.
If the execution target of the task is not set,  is displayed on the [Targets] tab.
is displayed on the [Targets] tab.Specifying devices
Click [Groups] or [Devices], and select the target device groups or devices.
If you selected [Devices], you can apply a filter to filter the devices displayed in the list.
A maximum of 5,000 devices can be selected at once.
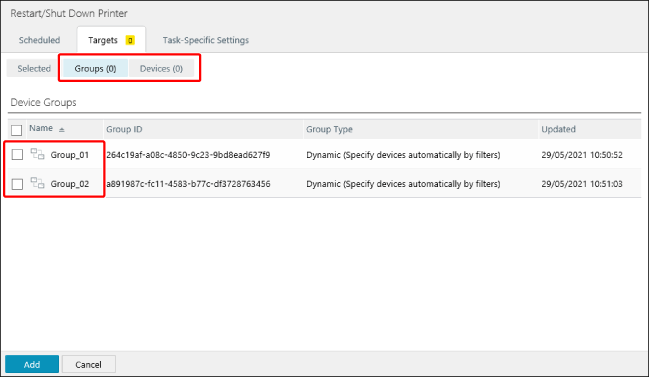
Click [Selected], and confirm that the selected devices and device groups are displayed.
Specifying Agents
Select the target Agents in the [Agent List] list.
6.
Configure the detailed task settings on the [Task-Specific Settings] tab.
The settings that can be configured differ according to the type of task.
If the required items are not set, is displayed on the [Task-Specific Settings] tab.
is displayed on the [Task-Specific Settings] tab.7.
Click [Add].
You can check the information of the registered tasks by selecting the [Tasks] menu > [Task List].
For details, see the following.
You can check the status of executing or completed tasks by selecting the [Tasks] menu > [History].
For details, see the following.