Addition of New Features to the Visual Message Function
The following features have been added to the Visual Message function.
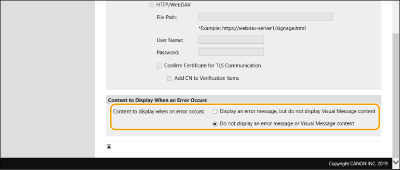
Hiding Error Message Screens
Up until now, error message screens appeared if content was not displayed for some reason. However, you can specify that error message screens not appear.
1
Start the Remote UI.
2
Click [Settings/Registration] on the portal page.
3
Click [License/Other]  [Visual Message Settings] [Display Settings].
4
In [Content to Display When an Error Occurs], select [Do not display an error message or Visual Message content].
5
Click [OK].
Setting Exception Addresses Where a Proxy Server Is Not Used
Specify the proxy settings in the Visual Message function to match the settings in <Proxy Settings>. If a proxy is set, the specified content may not appear. In this case, you can set an exception address so that the proxy server is not used.
1
Start the Remote UI.
2
Click [Settings/Registration] on the portal page.
3
Click [License/Other] [Visual Message Settings] [Proxy Settings].
4
In[Address Without Using Proxy], enter the addresses for which a proxy server will not be used.
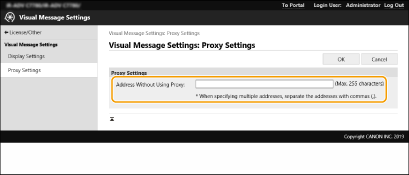
You can specify multiple addresses separated by a comma (,).
You can specify up to 255 characters (ASCII code only).
5
Click [OK].
Using the Visual Message Function for Greater Convenience
You can now configure settings to notify the server of the login information (user name and domain name) of users who display the content in order to collect the information, and also check PDF files linked in the content by printing them.
1
Start the Remote UI.
2
Click [Settings/Registration] on the portal page.
3
Click [License/Other] [Visual Message Settings] [Security Settings].
4
You can print the Visual Message displayed on the touch panel display or provide notifications of login information.
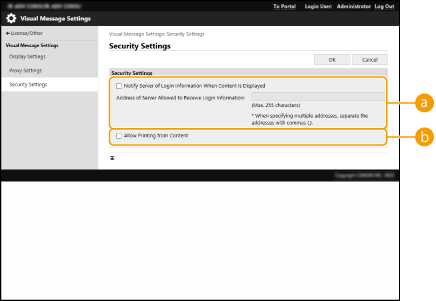
 [Notify Server of Login Information When Content Is Displayed]
Select this check box to post the user information (user name and domain name) to the Web server when the user displays the Visual Message, and enter the Web server path.
 [Allow Printing from Content]
Select this check box to specify the function that prints PDF content included in the HTML displayed in the Visual Message.
5
Click [OK].