POD Deck Lite-C/Paper Deck Unit-E
You can add a large-capacity paper deck. It is convenient when printing large print jobs.
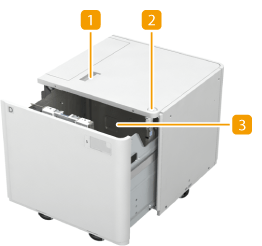 | 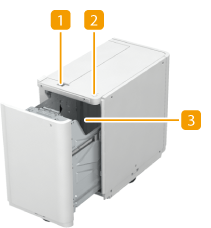 | |
POD Deck Lite-C | Paper Deck Unit-E |
 Release button
Press to move the paper deck away from the machine.
 Open button
Press to open the paper deck such as when loading paper.
 Paper deck
Load Paper.
 |
If the machine is in the Sleep mode, you may be unable to open the paper deck. In this event, touch the touch panel to reactivate the machine and then press the open button on the "POD Deck Lite-C" or "Paper Deck Unit-E." |
Loading Paper into the POD Deck Lite-C
 |
If paper runs out and printing is stopped when you are printing with the staple setting, do not remove the output sheets that are waiting to be stapled. (Printing and stapling resume after you clear the paper jam.) If you need to lift up the lifter (for example, if you drop objects inside the paper deck), do not lift up the lifter more than 1 15/16" (50 mm) or diagonally, as this may result in a malfunction or damage to the machine. 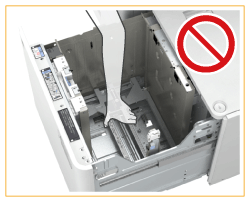 |
1
Open the paper deck.
1 | Press the open button. |
2 | Open the paper deck. The inside lifter automatically descends to the paper loading position. 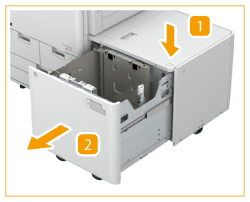 |
2
Prepare the paper to load.
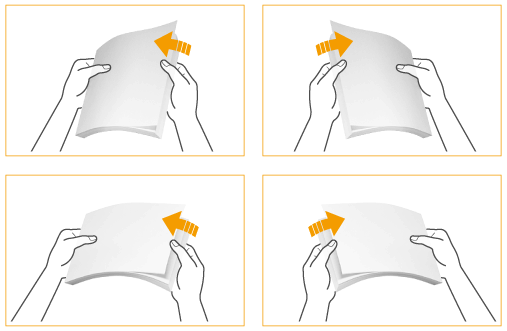
Fan the sheets several times and align the edges to facilitate feeding.
3
Load the paper stack against the left wall of the paper deck.
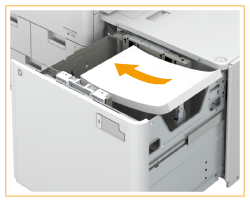

When loading paper, make sure that the height of the paper stack does not exceed 13/16" (20 mm). If the height of the paper stack exceeds 13/16" (20 mm), the edges of the paper stack may become curled or creased, and poor print quality may result.
When you load envelopes or paper with a logo mark, pay attention to the loading orientation.
Loading Envelopes in POD Deck Lite-C
Loading Preprinted Paper in POD Deck Lite-C
Loading Envelopes in POD Deck Lite-C
Loading Preprinted Paper in POD Deck Lite-C
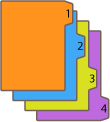
When you load tab paper, load it in normal tab order with the tabs on the opposite side of the feeding direction.
4
Gently push the paper deck back into the machine until it clicks into place in the closed position.
The inside lifter automatically ascends, and prepares the paper deck for feeding.
 |
When loading paper into the paper deck for the first time, adjust the size change plate to match the paper size being loaded. Changing the Paper Size for the POD Deck Lite-C Do not give a strong shock to the rear edge retainer when loading paper into the paper deck, as this may result in a malfunction or damage to the machine. 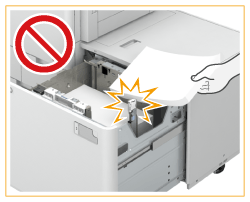 Do not load incompatible paper in the POD Deck Lite-C. Doing so may result in paper jams. Available Paper Paper which is curled must be straightened out before loading it into the paper deck unit. Do not load paper into the POD Deck Lite-C that has been previously copied onto, as this may result in a malfunction or damage to the machine. Always use the multi-purpose tray to feed paper when you want to print onto the back of a sheet of paper (2nd side of 2-Sided copy). Never place paper or any other items in the empty part of the paper deck unit next to the paper stack, as this may result in a malfunction or damage to the machine. A paper blower is attached inside of the POD Deck Lite-C. Do not insert paper clips or other foreign objects into the blower port. Paper jams may occur if you load paper into the POD Deck Lite-C in a low humidity environment. If paper jams occur, follow the instructions on the touch panel display to remove the jammed paper. In addition, make sure that the loaded paper is not curled (Paper Jams in the Paper Deck/POD Deck (Optional)). Paper curls must be straightened out prior to loading. You will not be able to make copies or print if you load paper that exceeds the loading limit mark (  ), or if the paper drawer is not completely pushed into the paper deck unit. ), or if the paper drawer is not completely pushed into the paper deck unit.Make sure that the height of the paper stack does not exceed the loading limit mark (  ). ).Always check that the paper deck unit is in place. |
 |
When loading paper into the paper deck, make sure that the paper size setting is the same size of the paper that is being loaded. Load the paper below the rollers of the rear edge retainer. 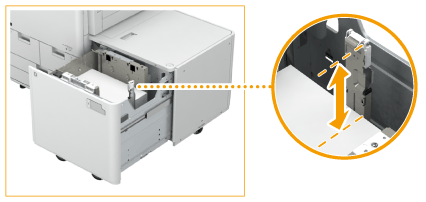 When paper is loaded in the paper deck unit, the side facing up is the one printed on. If problems occur when printing, try turning the paper stack over, and reload it. |
Changing the Paper Size for the POD Deck Lite-C
1
Press 
 <Preferences>
  <Paper Settings>
  <Paper Settings> and register the desired paper size.

 <Preferences>
  <Paper Settings>
  <Paper Settings> and register the desired paper size.
When loading standard size paper, the paper size is automatically detected.
If you want to load free size paper, see Specifying Paper Size and Type in the Paper Deck/Drawer, and register the paper size. The paper for the POD Deck Lite-C is registered in  .
.
2
Open the paper deck.
1 | Press the open button. |
2 | Open the paper deck. The inside lifter automatically descends to the paper loading position. 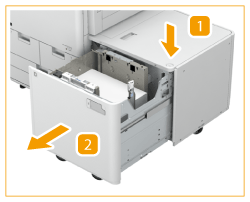 |

It may take some time for the paper deck to open, even if you press the open button.
3
Slide the rear edge retainer until it does not catch on the paper to set.
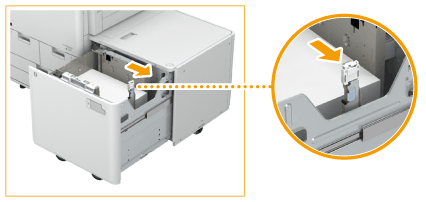
The rear edge retainer slides by holding.
4
Remove all of the loaded paper.
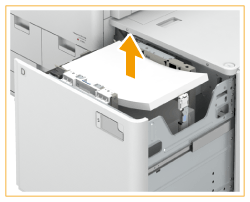
5
After closing the paper deck, press the open button to open the paper deck again.
This close and open operation on the paper deck is to return the lifter to the position for paper loading.
6
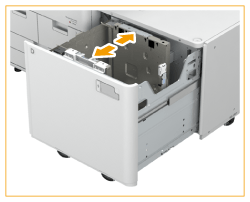
Squeeze the lever. Without releasing the lever, slide the outer size change plate and inner size change plate until it does not catch on the paper to set.
7
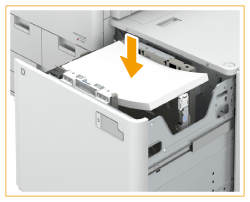
Load the desired paper to approximately 13/16" (20 mm)in height.

When you load envelopes or paper with a logo mark, pay attention to the loading orientation.
Loading Envelopes in POD Deck Lite-C
Loading Preprinted Paper in POD Deck Lite-C
Loading Envelopes in POD Deck Lite-C
Loading Preprinted Paper in POD Deck Lite-C
When you load tab paper, load it in normal tab order with the tabs on the opposite side of the feeding direction.

8
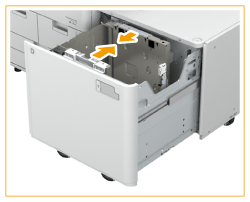
Slide the outer size change plate and inner size change plate to align them with the desired paper size.
9
Slide the rear edge retainer to align it with the desired paper size, as shown below.
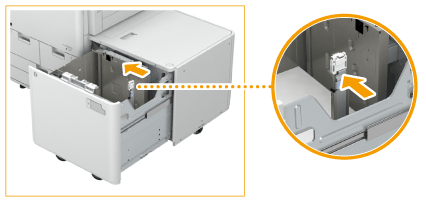

If the rear edge retainer is not aligned properly, paper may become jammed, the quality of the image may be degraded, or the inside of the machine may become dirty. Make sure to load paper with the rear edge retainer properly aligned with the paper size marks on the top and base of the paper deck.
10
Load all remaining paper into the paper deck.
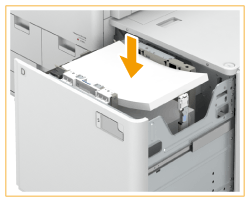

When loading paper, make sure that the height of the paper stack does not exceed 13/16" (20 mm). If the height of the paper stack exceeds 13/16" (20 mm), the edges of the paper stack may become curled or creased, and poor print quality may result.
11
Gently push the paper deck back into the machine until it clicks into place in the closed position.
The inside lifter automatically ascends, and prepares the paper deck for printing.
12
Change the paper size on the media sheet and insert it into the media plate.
1 | Pull the media sheet out of the media plate. |
2 | Stick the paper size label to match the new paper size on the media sheet. 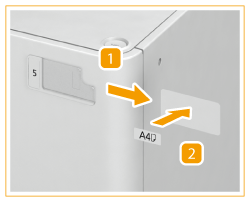 |
3 | Insert the media sheet into the media plate. |
 |
Do not give a strong shock to the rear edge retainer when loading paper into the paper deck, as this may result in a malfunction or damage to the machine.  Adjust the outer size change plate, inner size change plate, and rear edge retainer correctly to avoid causing a paper jam, dirty prints, or making the inside of the machine dirty. Paper which is curled must be straightened out before loading it into the paper deck. You will not be able to make copies or print if you load paper that exceeds the loading limit mark (  ), or if the paper deck is not completely pushed into the machine. ), or if the paper deck is not completely pushed into the machine.Make sure that the height of the paper stack does not exceed the loading limit mark (  ). ).Always check that the paper deck is in place. Never place paper or any other items in the empty part of the paper deck, as this may result in a malfunction or damage to the machine. |
 |
If problems occur when printing, try turning the paper stack over, and reload it. However, textured paper, single-sided coated paper, and paper already printed on cannot be turned over. Change to new paper. |
Loading Envelopes in POD Deck Lite-C
 |
The optional Envelope Feeder Attachment-G is required to load envelopes in the POD Deck Lite-C. Optional Equipment |
1
Prepare for loading envelopes. Before Loading Envelopes
2
Attach the Envelope Feeder Attachment-G to the paper drawer.
For how to attach it, see the manual for the Envelope Feeder Attachment-G.
3
Adjust the position of the paper guides.
4
Load the envelopes.
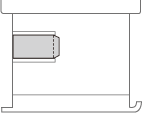
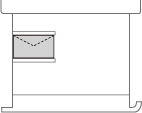
Load the envelopes as indicated below, with the front side (the non-glued side) face up.
Nagagata 3, Kakugata 2
Load the envelopes so that their flaps are on the right side.
Yougatanaga 3, ISO-C5, Monarch, DL, COM10 No. 10
Close the flaps, and load the envelopes so that their flaps are on the far side.

If the envelopes cannot be fed normally, if a paper jam occurs, or if the envelopes become creased, fold the flaps inside the envelopes or rotate the envelopes and load them.
 |
180-degree rotation
Nagagata 3, Kakugata 2 | No. 10(COM10), ISO-C5, DL, Monarch | |||
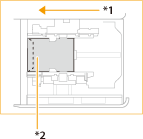 | 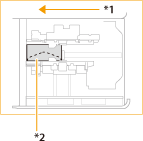 |
90-degree rotation
If the flap becomes folded or a paper jam occurs with the custom size of 5 1/2" x 5 7/8" to 13" x 19 1/4" (139.7 x 148 mm to 330.2 x 487.7 mm). | ||
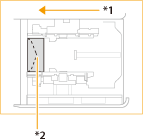 |
*1 Feeding Direction
*2 Print Side Down
When printing, check that the orientation of the loaded paper matches the orientation shown on the print settings screen of the printer driver. For more information, see the online help.
If you copy on the envelopes, rotate the original before placing it.
If you rotate ISO-C5 by 90 degrees, set 9" x 6 3/8" (229 x 162 mm) by custom size before making an output.
Loading Preprinted Paper in POD Deck Lite-C
When you use paper preprinted with a logo, pay attention to the orientation of the paper when loading it. Load the paper properly so that printing is performed on the same side as the logo.
 |
When performing a copy operation, pay attention to the orientation of the original to be placed. Orientation of the original when copying |
 |
Set <Image Orientation Priority> and <Speed Priority for Copying from Feeder> to <Off> in advance. <Image Orientation Priority> <Speed Priority for Copying from Feeder> |
Loading portrait orientation paper with a logo

Load the paper with the logo face up as shown in the following figure according to the paper size.
LTR/A4/B5 | 11" x 17"/LGL/A3/B4 | |
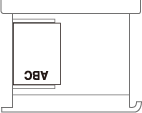 | 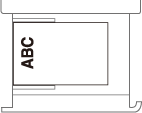 |
Loading landscape orientation paper with a logo

Load the paper with the logo face up as shown in the following figure according to the paper size.
LTR/A4/B5 | 11" x 17"/LGL/A3/B4 | |
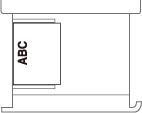 | 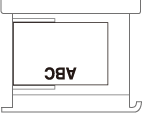 |
Loading Paper into the Paper Deck Unit-E
 |
If paper runs out and printing is stopped when you are printing with the staple setting, do not remove the output sheets that are waiting to be stapled. (Printing and stapling resume after you clear the paper jam.) |
 |
The paper size of the Paper Deck Unit-E is fixed to LTR, A4, or B5. For instructions on changing the paper size that can be loaded in the Paper Deck Unit-E, contact your dealer or service representative. |
1
Open the paper deck.
1 | Press the open button. |
2 | Open the paper deck. The inside lifter automatically descends to the paper loading position. 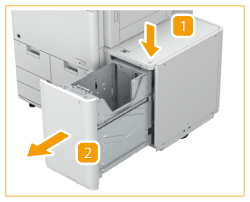 |
2
Prepare the paper to load.
Fan the sheets several times and align the edges to facilitate feeding.

3
Load the paper stack into the paper deck.
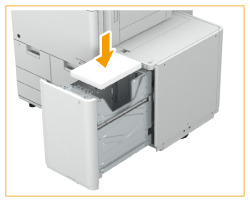

When you load paper with a logo mark, pay attention to the loading orientation. Loading Preprinted Paper in Paper Deck Unit-E
4
Close the paper deck.
The inside lifter automatically ascends, and prepares the paper deck for feeding.
 |
Do not load incompatible paper in the Paper Deck Unit-E. Doing so may result in paper jams. Available Paper Paper which is curled must be straightened out before loading it into the paper deck unit. Do not load paper into the Paper Deck Unit-E that has been previously copied onto, as this may result in a malfunction or damage to the machine. Always use the multi-purpose tray to feed paper when you want to print onto the back of a sheet of paper (2nd side of 2-Sided copy). Never place paper or any other items in the empty part of the paper deck unit next to the paper stack, as this may result in a malfunction or damage to the machine. You will not be able to make copies or print if you load paper that exceeds the loading limit mark (  ), or if the paper drawer is not completely pushed into the paper deck unit. ), or if the paper drawer is not completely pushed into the paper deck unit.Make sure that the height of the paper stack does not exceed the loading limit mark (  ). ).Always check that the paper deck unit is in place. |
 |
When paper is loaded in the paper deck unit, the side facing up is the one printed on. If problems occur when printing, try turning the paper stack over, and reload it. |
Loading Preprinted Paper in Paper Deck Unit-E
When you use paper preprinted with a logo, pay attention to the orientation of the paper when loading it. Load the paper properly so that printing is performed on the same side as the logo.
 |
When performing a copy operation, pay attention to the orientation of the original to be placed. Orientation of the original when copying |
 |
Set <Image Orientation Priority> and <Speed Priority for Copying from Feeder> to <Off> in advance. |
Loading portrait orientation paper with a logo

Load the paper with the logo face up as shown in the following figure according to the paper size.

Loading landscape orientation paper with a logo

Load the paper with the logo face up as shown in the following figure according to the paper size.
