Finishing with the Stapler
 | You can bind each copy with the stapler after a collate or group output. |
1
Press <Access Stored Files>. <Home> Screen
2
Select a mail box, select a file you want to print and press <Print>.
3
Press <Change Print Settings> and <Finishing>.
4
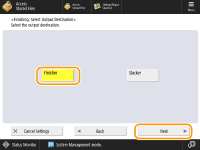
Select <Finisher> and press <Next>.

This screen is only displayed when both the finisher and the "High Capacity Stacker-J" are attached. If this screen is not displayed, proceed to the next step.
5
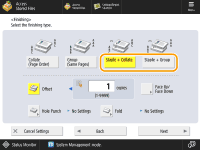
Select <Staple + Collate> or <Staple + Group> and press <Next>.

6
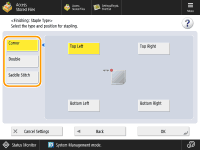
Select how to staple.

To staple in one location in the corner of the page, select <Corner> for the staple position.

To staple in two locations in the side of the page, select <Double> for the staple position.

To staple in the section where the paper is folded in half, select <Saddle Stitch>. Depending on the option, you can attach a cover or change the folding position. When trimming the edges of the output sheets, you can adjust the trimming position.

7
Press <OK>.
8
Press <Start Printing>.
Printing starts.
 |
Depending on finishing functions, the installation of optional devices is needed. Optional Equipment Depending on the paper type, you cannot use finishing functions. Hardware Specifications You can specify the procedure to perform when there are too many sheets to staple at once. <Action When Too Many Sheets to Staple> <Saddle Stitch> can be set only if 2-Sided Printing is set. |