Paper Jams in the Front-Left Cover of the Main Unit
Check the paper jam location on the screen, and follow the procedure below to remove the paper.
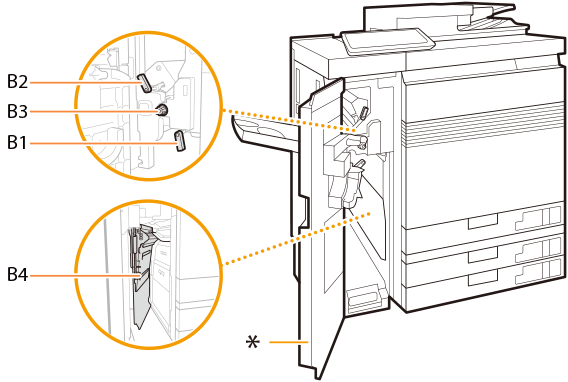
Paper jam locations are indicated by number such as B1 or B2, which are shown in the illustration below.
Paper jam locations are indicated by number such as B1 or B2, which are shown in the illustration below.

* Front-left cover of the main unit
 |
Confirm before handlingEven when a screen appears prompting you to clear paper jams in the front-left cover of the main unit, it is possible that long paper is jammed in the machine near the multi-purpose tray. Paper Jams in the Long Sheet Tray-B (Optional) |
1
Open the front-left cover of the main unit.

2
Open the B1 guide and B2 guide.
 | Open the B1 guide. |
 | Open the B2 guide.  |
3
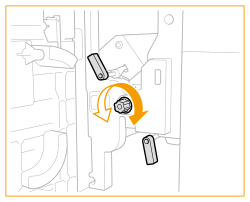
Turn the B3 knob to move any jammed paper.

Turn the B3 knob in the counter-clockwise direction to feed the jammed paper to the B1 guide.
Turn the B3 knob in the clockwise direction to feed the jammed paper to the B2 guide.
4
Remove any jammed paper.
When feeding any jammed paper to the B2 guide

When feeding any jammed paper to the B1 guide

5
Remove any jammed paper from the B4 cover.
 | Open the B4 cover. |
 | Remove any jammed paper. |
 | Close the B4 cover.  |
6
Close the B1 guide and B2 guide.
 | Close the B1 guide. |
 | Close the B2 guide. |
7
Close the front-left cover of the main unit.
Continue following the instructions on the screen to proceed with the interrupted operation or continue clearing paper jams.
 |
After you remove jammed long paper and then close the front-left cover of the main unit, a screen may appear prompting you to open the front cover of the insertion unit or finisher. You can make this screen disappear by opening and then closing the front cover of the main unit in Question. |