Printing Reports and Lists
You can print reports and lists to check information such as the total number of copied pages, communication results, and machine settings.
Printing a Report on the Number of Copied and Printed Pages
Counter Report
You can print a report to check the total number of all copied, printed, and scanned pages.
 (Counter/Device Information)
  <Print List>
  <Yes>
<Yes>Page Count List
You can print a list to check the total number of pages* that were copied, printed, and scanned for each Department ID. To print this list, you need to log in with administrator privileges. Logging into the Machine
 (Settings/Registration)
  <Management Settings>
  <User Management>
  <Department ID Management>
  <On>
<On>  <Page Totals>
  <Print List>
  Select the items to print
  <Start Printing>
 |
Department ID Management must be set in order to calculate the Page Count List for each Department ID. Setting the Department ID Management With the Remote UI Page Count List, you can check how many pages have been printed or scanned by individual user names linked to a Department ID. To display the list, Starting the Remote UI  click [Settings/Registration] click [Settings/Registration]  [User Management] [User Management]  [Department ID Management]. However, note that user names will not be displayed if multiple users are allocated to the same Department ID, or if you are using DepartmentID Authentication as the login service. [Department ID Management]. However, note that user names will not be displayed if multiple users are allocated to the same Department ID, or if you are using DepartmentID Authentication as the login service.The Page Count List can also be saved as a CSV file using the Remote UI. Starting the Remote UI  click [Settings/Registration] click [Settings/Registration]  [User Management] [User Management]  [Department ID Management] [Department ID Management]  [Store in CSV Format...]. [Store in CSV Format...]. |
* In this report, the numbers are based on copied or printed sides of the page. For example, the count is 1 if you print on one side of a page, and the count is 2 if you print on both sides of the page.
Printing a List of Usage History
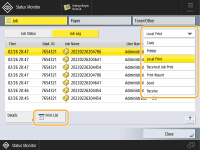
When you press  (Status Monitor), the Status Monitor screen is displayed, allowing you to check the usage history for each function, such as copying, printing, sending e-mail, sending/receiving I-faxes, etc. From this screen, you can also print the usage history for each function.
 (Status Monitor), the Status Monitor screen is displayed, allowing you to check the usage history for each function, such as copying, printing, sending e-mail, sending/receiving I-faxes, etc. From this screen, you can also print the usage history for each function.
 |
If "NG" appears in the "RESULT" column in the printed list, check the three-digit number preceded by "#" to find the reason and solutions. If  (Settings/Registration) (Settings/Registration)  <Management Settings> <Management Settings>  <Device Management> <Device Management>  <Restrict Access to Other User Jobs> is set to <On>, jobs other than those of the logged-in user are displayed as "***" and cannot be operated. If you log in with administrator privileges, the jobs of all users are displayed. <Restrict Access to Other User Jobs> is set to <On>, jobs other than those of the logged-in user are displayed as "***" and cannot be operated. If you log in with administrator privileges, the jobs of all users are displayed. |
1
Press  (Status Monitor).
 (Status Monitor).
2
Display the usage history of each function and print a list.
 Copy/print log
1 | Press <Job>  <Job Log>. <Job Log>. |
2 | Select the items you want to print, and press <Print List>.  |
3 | Press <Yes>. |
 Sending/receiving log
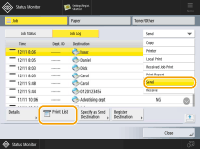
1 | Press <Job>  <Job Log>. <Job Log>. |
2 | Select <Send> or <Receive> from the list, and press <Print List>.  |
3 | Press <YesYesYesYesYesYes>. |
 |
For documents sent by e-mail, the list indicates the sending results between the machine and the mail server, not between the machine and the destination. If you select <Output Spec. No. of Transm.> in step 3, you can specify the number of log results that appear in the list. You can specify whether or not to print the list automatically. |
 Fax sending/receiving log
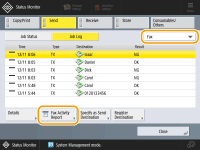
1 | Press <Job>  <Job Log>. <Job Log>. |
2 | Select <Send (Fax)> or <Receive (Fax)> from the list, and press <Print List>.  |
3 | Press <Yes>. |
 |
If you select <Output Spec. No. of Transm.> in step 3, you can specify the number of log results that appear in the list. |
 Storage log
1 | Press <Job>  <Job Log>. <Job Log>. |
2 | Select <Store> from the list, and press <Print List>. |
3 | Press <Yes>. |
 |
There are three types of store locations printed as the protocol. If one of the following conditions is met, the corresponding store location is printed. Memory Media: If the data is stored in a removable media such as USB memory from <Scan and Store> Local: If the data is stored in the Advanced Space of the machine from <Scan and Store> Network: If the data is stored in the Windows server from <Scan and Store> |
Outputting a Communication Result Report
You can print a list of results for sending/receiving e-mail, or I-fax, and results for storing items in the file server or Mail Box (machine's temporary storage space). A report is set to be printed automatically or printed only when an error occurs. However, you can change the setting to print only at a specified time or not to print at all. In addition, you can send the report to a specified destination as a CSV file.
 |
If "NG" appears in the "RESULT" column in the printed list, check the three-digit number preceded by "#"to find the reason and solutions. If  (Settings/Registration) (Settings/Registration)  <Management Settings> <Management Settings>  <Device Management> <Device Management>  <Restrict Access to Other User Jobs> is set to <On>, jobs other than those of the logged-in user are displayed as "***" and cannot be operated. If you log in with administrator privileges, the jobs of all users are displayed. <Restrict Access to Other User Jobs> is set to <On>, jobs other than those of the logged-in user are displayed as "***" and cannot be operated. If you log in with administrator privileges, the jobs of all users are displayed. |
Communication Management Report
You can configure the machine to automatically print the report or send it as a CSV file to destinations registered in the Address Book when the specified number of communication results, including sent or received e-mails, and I-faxes, as well as items saved in the file server or Mail Box (machine's temporary storage space), is reached. You can also configure the machine to print the report or send it as a CSV file at a specified time.
1
Press  (Settings/Registration).
 (Settings/Registration).
2
Press <Function Settings>  <Send>
  <Common Settings>
  <Communication Management Report>.
 <Send>
  <Common Settings>
  <Communication Management Report>.
3
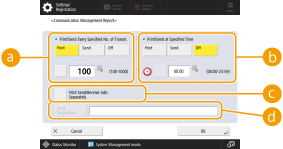
Configure the necessary settings, and press <OK>.

 <Print/Send Every Specified No. of Transm.>
Select this to print/send a report when the specified number of communication results is reached. Set the number of communication results using the numeric keys.
 <Print/Send at Specified Time>
Select this to print/send a report at the specified time. Set the time using the numeric keys.
 <Print Send/Receive Jobs Separately>
Select this to output separate reports for send jobs and receive jobs.
 <Send Destination>
Specify the destination.

Press <Send Destination>  <To Remote Address Book> to specify the destination to the destinations registered in a remote address book.
 <To Remote Address Book> to specify the destination to the destinations registered in a remote address book.
 |
You cannot configure the settings for the Communication Management Report while <Display Job Log> in <Management Settings> is set to <Off>. In addition, if you change <Display Job Log> in <Management Settings> from <Off> to <On>, <Print/Send Every Specified No. of Transm.> and <Print/Send at Specified Time> in the Communication Management Report automatically changes to <Off>. <Display Job Log> |
 |
For documents sent by e-mail, the report indicates the sending results between the machine and the mail server, not between the machine and the destination. You can manually print a Communication Management Report from a list in the usage history. When setting to print a report at a specified time If a report is set to print at a specified time, the 100 most recent results are printed, with the most recent results first. If the number of results exceeds 100, the older results are not printed. When setting the machine to send the report as a CSV file at a specified time The 2,000 most recent results are exported to a CSV file, which is sent at the specified time. If the number of results exceeds 2,000 by the specified time for file sending, the older results are not exported. |
TX Report
You can configure the machine to automatically print the report for sending results, including sent e-mails, and I-faxes, as well as items saved in the file server or Mail Box (machine's temporary storage space). You can also configure the setting to print the report only when an error occurs. You are required to log in with administrator privileges to print this report.
 (Settings/Registration)
  <Function Settings>
  <Send>
  <Common Settings>
  <TX Report>
  Set the report
  <OK>
<OK> |
Even if you set <Report with TX Image> to <On>, the sent document is not displayed in the report in the following situations. When an encrypted PDF is sent If <Report with Color TX Image> is set to <Off> and the first page sent is a color original For documents sent by e-mail, the report indicates the sending results between the machine and the mail server, not between the machine and the destination. If unnecessary streaks or shadows appear around the sent document, use <Erase Original Frame>. Erasing Dark Borders When Scanning (Erase Frame) The TX Report includes the results of forwarding in addition to the results of sending. |
Fax Activity Report
You can configure the machine to automatically print a report on fax sending and receiving or send it as a CSV file to destinations registered in the Address Book when the specified number of sent or received faxes is reached. You can also configure the machine to print the report or send it as a CSV file at a specified time.
1
Press  (Settings/Registration).
 (Settings/Registration).
2
Press <Function Settings>  <Send>
  <Fax Settings>
  <Fax Activity Report>.
 <Send>
  <Fax Settings>
  <Fax Activity Report>.
3
Configure the necessary settings, and press <OK>.

 <Print/Send Every Specified No. of Transm.>
Select this to print/send a report when the specified number of communication results is reached. Set the number of communication results using the numeric keys.
 <Print/Send at Specified Time>
Select this to print/send a report at the specified time. Set the time using the numeric keys.
 <Print Send/Receive Jobs Separately>
Select this to output separate reports for send jobs and receive jobs.
 <Send Destination>
Specify the destination.

Press <Send Destination>  <To Remote Address Book> to specify the destination to the destinations registered in a remote address book.
 <To Remote Address Book> to specify the destination to the destinations registered in a remote address book.
 |
You cannot configure the settings for the Fax Activity Report while <Display Job Log> in <Management Settings> is set to <Off>. In addition, if you change <Display Job Log> in <Management Settings> from <Off> to <On>, <Print/Send Every Specified No. of Transm.> and <Print/Send at Specified Time> in the Fax Activity Report automatically changes to <Off>. <Display Job Log> |
 |
You can manually print a Fax Activity Report from a list in the usage history. Fax sending/receiving log The name of the remote party registered in the Address Book is printed when sending to a destination selected from the Address Book. If sending by entering a number with the numeric keys, the Transmitting Subscriber Identification (TSI) is printed if it could be acquired from the recipient. When setting to print a report at a specified time If a report is set to print at a specified time, the 40 most recent results are printed, with the most recent results first. If the number of results exceeds 40, the older results are not printed. When setting the machine to send the report as a CSV file at a specified time The 2,000 most recent results are exported to a CSV file, which is sent at the specified time. If the number of results exceeds 2,000 by the specified time for file sending, the older results are not exported. |
Fax TX Report
You can configure the machine to automatically print the report each time a fax is sent. You can also configure the setting to print the report only when an error occurs.
 (Settings/Registration)
  <Function Settings>
  <Send>
  <Fax Settings>
  <Fax TX Report>
  Set the report
  <OK>
<OK> |
A Fax Multi TX Report is printed when <Fax TX Report> is set to <On> and broadcast transmission is performed. If unnecessary streaks or shadows appear around the sent document, use <Erase Original Frame>. Erasing Dark Borders When Scanning (Erase Frame) If <TX Report> is set to <For Error Only> or <On>, a TX Report is printed with the Fax TX Report. |
Device Information Communication Log Report
You can configure the machine to automatically print the report when the specified number of results for device information distribution or reception is reached. You can also configure the setting to print the report at a specified time. You are required to log in with administrator privileges to change the report setting.
 (Settings/Registration)
  <Management Settings>
  <Device Management>
  <Device Information Distribution Settings>
  <Communication Log>
  Report Settings
 Set the report
  <OK>
<OK> |
When you are logged in with administrator privileges, you can manually print the device information communication history as a list. Press  (Settings/Registration) (Settings/Registration)  <Management Settings> <Management Settings>  <Device Management> <Device Management>  <Device Information Distribution Settings> <Device Information Distribution Settings>  <Communication Log> <Communication Log>  <Print List> <Print List>  <Yes>. <Yes>.When setting to print a report at a specified time If a report is set to print at a specified time, the 100 most recent results are printed, with the most recent results first. If the number of results exceeds 100, the older results are not printed. |
Printing a List of Settings
Information and settings registered in the machine such as registered destinations, send/receive settings, forwarding conditions, files in a Mail Box, etc. can be printed as a list.
Address Lists
You can print a list of destinations registered in the Address Book or in one-touch buttons.
 (Settings/Registration)
  <Set Destination>
  <Address Lists>
  Select the address book or one-touch buttons to print
  <Print List>
  <Yes>
<Yes>TX/RX User Data List
You can print a list of the settings configured for <Send> and <Receive/Forward> under Settings/Registration.
 (Settings/Registration)
  <Function Settings>
  <Send> or <Receive/Forward>
  <Output Report>
  <TX/RX User Data List>
  <Yes>
<Yes> |
Items that have been changed from their default settings are printed with an asterisk (*) next to them. |
Forwarding Settings
You can print a list of the settings configured for I-fax forwarding by using <Receive/Forward> under Settings/Registration. You are required to log in with administrator privileges to print this list.
 (Settings/Registration)
  <Function Settings>
  <Receive/Forward>
  <Common Settings>
  <Forwarding Settings>
  <Print List>
  <Yes>
<Yes>Mail Box File List
You can print a list of temporarily saved files in a Mail Box on the machine.
Network Setting List
You can print a list of the settings configured for <Network> in <Preferences> under Settings/Registration.
 (Settings/Registration)
  <Preferences>
  <Network>
  <Output Report>
  <Yes>
<Yes> |
Items that have been changed from their default settings are printed with an asterisk (*) next to them. The following items are automatically generated from unique information of the machine by default and when the settings are initialized, and have an asterisk (*) next to them. IPv4 Host Name IPv6 Host Name mDNS Name (mDNS Settings) Current Transmission Speed (Ethernet Driver Settings) |
System Information list
You can print a list of information such as MEAP applications and licenses. You are required to log in with administrator privileges to print this list.
 (Settings/Registration)
  <Management Settings>
  <License/Other>
  <MEAP Settings>
  <Print System Information>
  <Yes>
<Yes>Device Information Distribution Destination List
You can print a list of devices registered as information distribution destinations. You are required to log in with administrator privileges to print this list.
 (Settings/Registration)
  <Management Settings>
  <Device Management>
  <Device Information Distribution Settings>
  <Register Destinations>
  <Print List>
  <Yes>
<Yes>LDAP Server Registration List
You can print a list of LDAP server settings registered in the machine. You are required to log in with administrator privileges to print this list.
 (Settings/Registration)
  <Set Destination>
  <Register LDAP Server>
  <Print List>
  <Yes>
<Yes>