Scan to Preset Destinations
You can register a scanning button in which you can specify a destination folder including your user name or a file name including a scanned date. By using this button you may be able to avoid sending scanned data to a wrong destination or mistaking scanned data.
1
Start the Remote UI. Starting the Remote UI
2
Click [Settings/Registration] on the portal page. Remote UI Screen
3
Click [Send]  [Scan to Preset Destination].
 [Scan to Preset Destination].
4
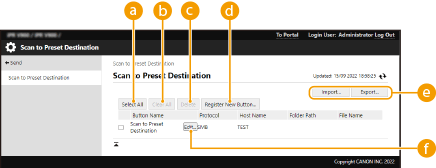
Specify the necessary settings.

 [Select All]
Select all the registered buttons.
 [Clear All]
Deselect all the selected items.
 [Delete]
Delete all the selected buttons.
 [Register New Button...]
Register a new button. Registering a New Button
 [Import...] / [Export...]
Import/Export a Scan to Preset Destination button.
 [Edit...]
Edit the settings of a registered button.
Registering a New Button
The certificate requested and issued based on the CSR is registered in the key.
Start the Remote UI  click [Settings/Registration]
  [Send]
  [Scan to Preset Destination]
  [Register New Button...].
 click [Settings/Registration]
  [Send]
  [Scan to Preset Destination]
  [Register New Button...].
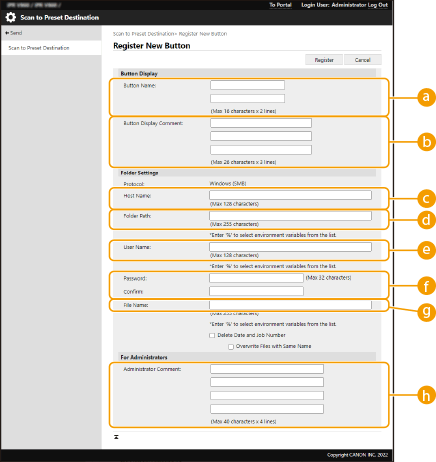
 Button Name:
Enter a button name.
 Button Display Comment:
You can add a comment in three lines with up to 26 characters per line.
 Host Name:
Enter a host name.
Example:
When storing to a shared space: \\192.168.100.50\share
When storing to a personal space: \\192.168.100.50\users
 Folder Path:
Specify the destination folder when sending data.
 User Name:
Enter the login user name.
 Password: / Confirm:
Enter the login password.
 File Name:
Enter the file name.
 Administrator Comment:
You can register a comment in four lines with up to 40 characters per line.