Paper Jams in the Long Sheet Tray-B (Optional)
Check the paper jam location on the screen, and follow the procedure below to remove the paper.
 |
This section describes the case where the "Long Sheet Tray-B" is attached to the main unit. If the "Long Sheet Tray-B" is attached to "Multi-drawer Paper Deck-E," see When the Optional Paper Sources are Attached to the Multi-drawer Paper Deck-E. This section describes how to clear long sheet jams. How to clear plain paper jams is the same as that of the "Stack Bypass-D." Remove the long sheet from the main unit when  is displayed on the device field in the screen or when there is no more than 25 mm of paper left at the tail end of the paper on the tray. <B Multi-Purpose Tray Unit (Pull the open lever.)>, <B B1/B4> and <B C2/C3/C4/C5/C6> are Displayed as Paper Jam Locations is displayed on the device field in the screen or when there is no more than 25 mm of paper left at the tail end of the paper on the tray. <B Multi-Purpose Tray Unit (Pull the open lever.)>, <B B1/B4> and <B C2/C3/C4/C5/C6> are Displayed as Paper Jam Locations |
Long Sheet Jams in the Entrance of the Tray
If <Multi-Purpose Tray (Remove all paper.)> is displayed on the screen, follow the procedure below to remove the long sheet.
1
Pull out the jammed long sheet gently along the tray.

Continue following the instructions on the screen to proceed with the interrupted operation or continue clearing paper jams.
Long Sheet Jams through the Entrance of the Tray to the Front Cover of the main unit
If <Multi-Purpose Tray Unit (Pull the open lever.)>, < C3 >, < C4 >, etc. is displayed on the screen, follow the procedure below to remove the long sheet.
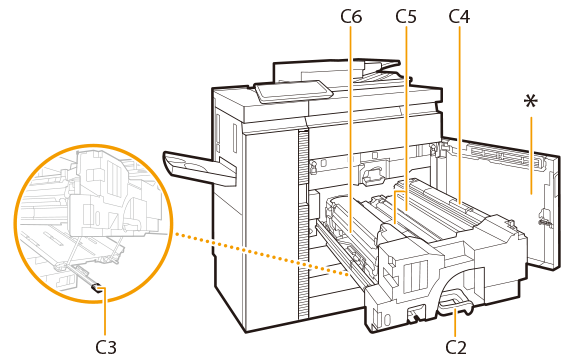
The positions of each unit and area, "C2 lever," "C4 guide," etc. in the procedure are as shown in the figure.

* Front cover of the main unit
1
Pull out the jammed long sheet gently along the tray.


Even if you pull out the paper completely, make sure to perform the following procedures.
2
Check whether or not paper pieces remain around the "Stack Bypass-D."
 | Open the "Stack Bypass-D."  |
 | Check no paper pieces remain in the tray and the main unit. If paper pieces are left, remove those.  |
 | Gently close the "Stack Bypass-D" of the main unit until it clicks. |
3
Check whether or not paper pieces remain in the main unit.
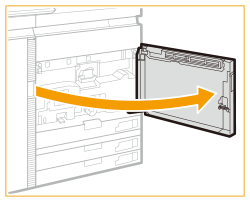
 | Open the front cover of the main unit.  |
 | Tilt the C2 lever to the left to release the lock. |
 | Holding the C2 lever, pull the fixing transport unit out.   The fixing unit and its surroundings are subject to high-temperatures. When removing jammed paper, take care not to touch anything in this area.  If the C2 lever lock indicator (  ) lights up in red, the C2 lever cannot be unlocked. Follow the instructions on the screen to remove the jammed paper. ) lights up in red, the C2 lever cannot be unlocked. Follow the instructions on the screen to remove the jammed paper. |
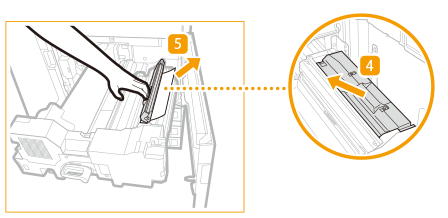
 | Open the C4 guide. |
 | Hold the C4 guide open by hand and check whether or not paper pieces remain. If paper pieces are left, remove those.   When you release the C4 guide, it closes. |
 | Check whether or not paper pieces remain on the feeding belt (C5). If paper pieces are left, remove those.  |
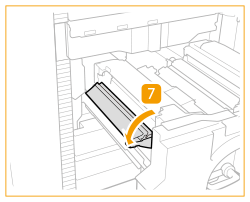
 | Open the inner output guide (C6).  |
 | Check whether or not paper pieces remain in the inner output guide (C6). If paper is jammed, gently pull it out in the direction of the arrow keeping the inner output guide (C6) open.   The inner output guide (C6) and its surroundings are subject to high-temperatures. When removing jammed paper, take care not to touch anything in this area. |
 | Return the inner output guide (C6) to its original position. |
 | Gently push the fixing transport unit back into the machine holding the C2 lever.  When pushing in the fixing transport unit, the C2 lever you hold may move so that it pops up, but this is not a malfunction. Push it all the way in and proceed to the next step. |
 | Turn the C2 lever to the right to lock.  |
 | Close the front cover of the main unit. Continue following the instructions on the screen to proceed with the interrupted operation or continue clearing paper jams. |