Configuring the Authentication Functions
You can configure the user login methods, authentication devices, and other authentication functions based on your system environment and needs. You can also specify how the login screen is displayed.
Configuring the User Login Methods and Authentication Devices
Specify the user login methods (Login Method) and authentication devices (Authentication Device). Note that the authentication devices need to be set up before configuring the settings below.
1
Start the Remote UI. Starting the Remote UI
2
Click [Settings/Registration] on the portal page. Remote UI Screen
3
Click [User Management]  [Authentication Management].
 [Authentication Management].
4
Click [Basic Settings]  [Edit...].
 [Edit...].
5
Select the check box for [Use the user authentication function] and specify the required settings.
Select the login methods that you want to use, and specify detailed settings such as authentication device settings.
 Using keyboard authentication
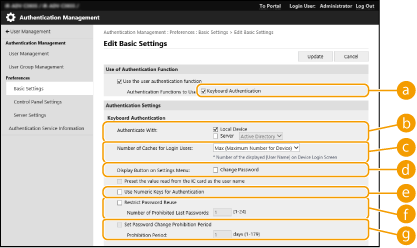
Configure the settings below when using keyboard authentication.

 [Authentication Functions to Use:]
Select the check box for [Keyboard Authentication].
 [Authenticate With:]
Select the user authentication device.
Select the check box for [Local Device] if you are using the database inside this machine to manage user information.
When using an external authentication server, select [Server] and specify the type of server. If [Microsoft Entra ID] for the server type, you can check the connection to the server by pressing [Check Server Connection] in the Menu that appears when you press " ” on the top right corner of the login screen.
 ” on the top right corner of the login screen.
 [Number of Caches for Login Users:]
The names of users who previously logged in can be displayed in a drop-down list on the login screen on the machine. Select [0] to hide the login history, and select [1] to display only the name of the user who logged in most recently.
 [Display Button on Settings Menu:]
Select the check box to add the <Change Password> button to the menu that is displayed when pressing  on the top right corner of the login screen.
 on the top right corner of the login screen.
 [Use Numeric Keys for Authentication]
If this function is enabled and the user name and password are comprised of numbers only, authentication can be performed with numeric key entry only.
 [Restrict Password Reuse]
Select this check box to prohibit the re-use of a password that has already been used. The password history count should also be configured to match this setting.
 [Set Password Change Prohibition Period]
Select this check box to specify the period for which password changes are prohibited. You can also specify the expiry period.
 Configuring detailed settings for authentication functions
You can configure detailed settings for the personal authentication functions.

 [Authentication Mode:]
Select the authentication mode to use for Remote UI login. When [Guest Authentication Mode] is selected, unregistered users can also log in by clicking [Log In (Guest)]. Select [Administrator Authentication Mode] to only allow users with Administrator privileges to log in.
 [Always Require Two-Factor Authentication]
You can require users logging in to the Remote UI to use two-factor authentication. Select [All Users] or [Administrators Only] to set the users to which this applies.
 [Web Service Authentication Method:]
Select the local device authentication method to use for communications with Web service applications.
 [Disable integrated authentication]
Integrated authentication is a function that enables the authentication information used when logging in to be used when logging in at other times. Select the check box to disable the integrated authentication function.
To disable the integrated authentication function only for logged-in users who are registered in the local device, select the check box for [Disable integrated authentication using credentials for local device authentication].
To disable the integrated authentication function only for logged-in users who are registered in the LDAP server, select the check box for [Disable integrated authentication using credentials for LDAP server authentication].

When integrated authentication is disabled, a separate user name and password must be registered in order to access the folders and boxes listed below.
Personal folder
LDAP server
Shared folder/FTP server/WebDAV server
Integrated authentication is valid while the session is valid.
 [Match Case for User Name]
If this function is set, you can set whether user names are case-sensitive.

It is recommended that this is set together with <Function Settings>  <Print>
  <Match Case for User Name>.
 <Print>
  <Match Case for User Name>.
 [Allow Use of @ in User Name]
Select whether to allow "@" to be used in user names.
 [Use department ID as user group]
Select the check box to use Department IDs as the user groups (Registering User Information in the Local Device) to which users are registered.
 [Automatically set the department ID at user registration]
Select the check box to automatically allocate a Department ID when you register/edit a user via the Remote UI. A new Department ID will not be allocated if one has already been allocated. This setting can only be specified from the Remote UI.

If the user name is comprised of numbers and is seven digits or fewer, the same number is assigned to the same user as the Department ID. If the password of the same user is registered as a number that is seven digits or fewer, it is also set as the PIN for that Department ID.
If the user name and password do not meet the above conditions, a Department ID is automatically assigned starting from 0000001, and 0 (none) is set for the PIN.
In the following cases, the Department ID is not registered automatically.
If a user is registered from the control panel of the machine
If 1,000 Department IDs are already registered
If 1,001 or more users are already registered
 [Automatically Delete Department ID at User Deletion]
If this check box is selected, when a user is deleted, the department ID assigned to the user is automatically deleted. Counter information assigned to the corresponding department ID is also deleted. If multiple users are registered to the department ID, it is not automatically deleted.
 [Default Role When Registering User:]
Select the role to apply to users in situations such as when no privileges are set.
 [Allow e-mail address settings]
Select the check box to enable users without Administrator privileges to specify their own e-mail addresses in their user accounts.
 [Functions to Restrict:]
Select the check boxes for functions that cannot be used when personal authentication management is enabled.
 [Delete users that have not logged in for the specified period]
Select the check box to delete users registered in the local device who have not logged in to the machine for a specified period of time. Make sure to also specify the number of days before automatic deletion and the time it is executed.

If you set [Auto Delete After:] to [0], all accounts other than the administrator are deleted at the time set in [Auto Delete Time:].
If the accounts cannot be deleted at the specified time because the machine is turned OFF or is completely in sleep mode, the accounts are deleted the next time that the machine starts.
If a user has never logged in before, the date and time that the user was registered is displayed as the time that the user last logged in.
 [Communication Mode for Kerberos Authentication]
Select the communication method used for Kerberos authentication.
6
Click [Update].
7
Restart the machine. Restarting the Machine
 |
The authentication method selected for [Web Service Authentication Method:] is also used for personal authentication during the device information distribution. Performing User Authentication when Distributing Device Information |
Specifying When to Display the Login Screen
You can specify when to display the login screen by selecting either "when you start using the machine" or "after a function button is pressed." If "after a function button is pressed" is selected, you can specify the functions that require user login. Functions that are not specified are available to unregistered users.
1
Start the Remote UI. Starting the Remote UI
2
Click [Settings/Registration] on the portal page. Remote UI Screen
3
Click [User Management]  [Authentication Management].
 [Authentication Management].
4
Click [Control Panel Settings]  [Edit...].
 [Edit...].
5
Configure the settings as necessary.

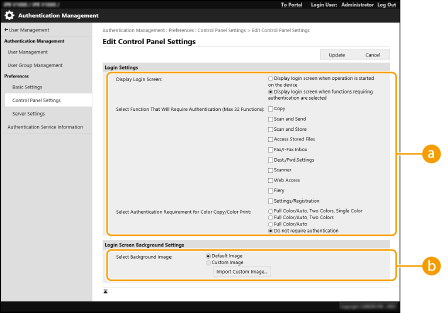
 [Login Settings]
In [Display Login Screen:], select when the login screen is displayed.
If you selected [Display login screen when functions requiring authentication are selected], also select the functions to display the login screen for.
If you selected [Display login screen when functions requiring authentication are selected], also select the functions to display the login screen for.

If you change this setting, <Restrict Access to Other User Jobs> may be set to <On>. The relationship between the settings is indicated below. <Restrict Access to Other User Jobs>
When the [Display login screen when operation is started on the device] check box is selected:
<Copy/Print>, <Send>, and <Store> in <Restrict Access to Other User Jobs> are set to <On>
<Copy/Print>, <Send>, and <Store> in <Restrict Access to Other User Jobs> are set to <On>
When the [Display login screen when functions requiring authentication are selected] check box is selected and the [Copy], or [Access Stored Files] check box is selected in [Select Function That Will Require Authentication]:
<Copy/Print> in <Restrict Access to Other User Jobs> is set to <On>
<Copy/Print> in <Restrict Access to Other User Jobs> is set to <On>
When the [Display login screen when functions requiring authentication are selected] check box is selected and the [Scan and Send] check box is selected in [Select Function That Will Require Authentication]:
<Send> in <Restrict Access to Other User Jobs> is set to <On>
<Send> in <Restrict Access to Other User Jobs> is set to <On>
When the [Display login screen when functions requiring authentication are selected] check box is selected and the [Scan and Store] check box is selected in [Select Function That Will Require Authentication]:
<Store> in <Restrict Access to Other User Jobs> is set to <On>
<Store> in <Restrict Access to Other User Jobs> is set to <On>
If you want to set <Restrict Access to Other User Jobs> to <Off>, set it to <Off> after this setting is complete.
 [Login Screen Background Settings]
You can specify a background image for the login screen.
6
Click [Update].