Registering Groups to the Address Book (Control Panel)
You can register a group of multiple destinations to the Address Book using the control panel.
You can register only the same type of destinations for a group. You cannot register file save locations (shared folder) to a group.
You can register only the same type of destinations for a group. You cannot register file save locations (shared folder) to a group.
Required Preparations |
Register the destinations to be added to a group to the Address Book of the machine. Registering Destinations to the Address Book (Control Panel) |
1
On the control panel, press [Addr. Book] in the [Home] screen. [Home] Screen
2
Press [Regist Dest.].
The [Register As] screen is displayed.
If the [Address Book PIN] screen is displayed, enter the PIN, and press [Apply].
3
Press [Coded Dial] or [One-Touch].
[Destination Type] screen is displayed.
4
Press [Group].
The [Group] screen is displayed.
5
Press [Name] and enter the name, and then press [Apply].
You can register a destination without entering its name, but by entering the name, you can search for it by its initials when specifying the destination.
6
Press [Number of Destinations].
7
Press [Add] and select the address you want to add to the group.

Select the index at the top of the screen of the Address Book to filter and display the destinations.
Repeat this operation until you register every address you want to add to the group.
8
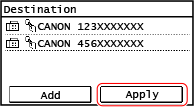
Press [Apply].

Press the added address to check the information of the added address.
If you want to remove an address from the group, press the address you want to remove and press [Remove].
9
Press [Apply].
The destination is registered to the Address Book.
When a destination is registered to [One-Touch], the destination is registered to the [One-Touch] button on the [Home] screen. The name which is entered in [Name] when the destination is registered appears as the button name.