Preparing to Save Scanned Data to a Computer
Make the following preparations for each computer to which to save scanned data.
Step 1: Installing the Driver and Application to the Computer
Install the following driver and application on the computer to which to save scanned data. Installing Software and Drivers to the Computer
ScanGear MF
This scanner driver is required to save scanned data to a computer.
When scanning with a computer, you can use this driver to adjust the scan settings while checking the results.
When scanning with a computer, you can use this driver to adjust the scan settings while checking the results.
MF Scan Utility
This is the application for scanning.
Use this to easily scan photos and documents from a computer. You can also change the scan settings for when performing scanning operations with the machine.
Use this to easily scan photos and documents from a computer. You can also change the scan settings for when performing scanning operations with the machine.
Step 2: Registering the Machine with a Computer
For both of the following cases, you must register the machine with the computer used as the save destination. Performing scanning operations with the machine Setting a computer connected to a network as the save destination |
You do not have to register the machine when scanning from a computer or saving scanned data to a USB-connected computer.
When Using Windows
1
Click [ ] (Canon MF Network Scanner Selector) displayed in the Windows notification area.

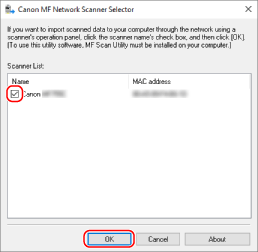
2
Select the checkbox for this machine, and click [OK].
When Using macOS
Use MF Scan Utility to register the machine.
1
From the OS Applications folder, double-click [Canon MF Utilities]  [Canon MF Scan Utility].
MF Scan Utility starts.
2
Click [Canon MF Scan Utility] [Network Scanner Settings].
3
Click [+] at the bottom left.
4
Add the machine on each tab according to the connection method.
 Connecting with Bonjour
On the [Bonjour] tab, select the Bonjour name, and then click [Add].
Connecting with TCP/IP
On the [IP] tab, enter the IP address of the machine, and then click [Add].
5
Restart MF Scan Utility.
The added machine is displayed in [Product Name:] on the [Canon MF Scan Utility] main dialog box.