Sending Faxes
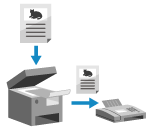 | You can scan a document, photo, or other printed materials (originals) with the machine, converting it to a black and white image, and then send it. You can also send a fax after a phone conversation. Sending a Fax after a Phone Conversation (Manual Sending) |
1
Place the original. Placing Originals
2
On the operation panel, press [Fax] in the [Home] screen. [Home] Screen
The Fax screen appears.
3
Press  .
.
.If the destination setting for the previously sent fax remains, a fax may be sent to an incorrect destination. Reset the setting before operating.
4
Press [Destination], and specify the destination. Specifying Destinations (Touch Panel Model)
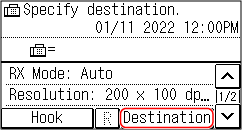
Enter the fax number with the numeric keys, or select a registered destination.
* If the machine is connected via Private Branch Exchange (PBX), press [R] before entering the destination with the numeric keys. If [R] is not available, you must register the R-key setting. [R-Key Setting]
5
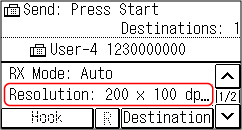
Configure the original scan settings, as needed. Fax Original Scan Settings
6
Press  .
.
.Scanning of the original starts.
To cancel sending of a fax, press [Cancel]  [Yes]. Canceling Fax Sending
When scanning of the original is completed, the fax is sent. Use [Status Monitor] to view the sending status and log. Checking the Status and Log for Sent and Received Faxes
 When [Confirm Destination] appears
Check that the destination is correct, and then press [Start Scan].
When [Scan Size] appears
Select the size of the placed original.
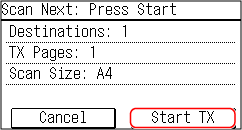
When [Scan Next: Press Start] appears
When an original is placed on the platen glass and scanned, the screen for scanning additional originals is displayed.
To scan additional originals, place them on the platen glass, and press.
When scanning of all documents is completed, press [Start TX].
To scan additional originals, place them on the platen glass, and press
.When scanning of all documents is completed, press [Start TX].
* If the size of the original is different, part of the image may be missing, or the image may be scanned smaller.
Select the size of the placed original.