
[Printer Settings]
Specify the settings for printer operation and for processing print data.
* Values in bold red text are the default settings for each item.
* Values in bold red text are the default settings for each item.
|
If the Operation Panel and Printer Driver Have the Same SettingsPriority is given to the printer driver settings. The operation panel settings are valid for operating systems such as UNIX printing where printer drivers cannot be used and when printing from mobile devices. |
[Action When Free Paper Size Mismatch]
[Menu]  [Function Settings] [Printer] [Printer Settings]
When the paper size of each paper source is set to [Free Size] in [Paper Settings], you can specify the operation that is to be performed when the size of the loaded paper is significantly different from the setting in the printer driver.
If the printer driver's settings do not match the size and type of loaded paper, a paper jam or printing error may occur.
If the printer driver's settings do not match the size and type of loaded paper, a paper jam or printing error may occur.
[Drawer 1] [Force Output] [Display Error] |
[Copies]
[Menu] [Function Settings] [Printer] [Printer Settings]
Specify the number of copies to be printed.
1 to 999 |
[2-Sided Printing]
[Menu] [Function Settings] [Printer] [Printer Settings]
Specify whether to print on both sides of the paper.
[Off] [On] |
[Default Paper]
[Menu] [Function Settings] [Printer] [Printer Settings]
Specify the paper size and type to be used when printing from a mobile device or an OS that does not support the printer driver.
See below for the papers that can be specified.
Usable Paper
See below for the papers that can be specified.
Usable Paper
[Paper Size Override]
[Menu] [Function Settings] [Printer] [Printer Settings]
Specify whether the machine substitutes A4 size paper for Letter size paper and vice-versa when printing.
Specifying [On] in this setting means that if, for example, printing on A4 size paper is specified on the computer and there is only Letter size paper loaded, the job is printed on Letter size paper instead.
Specifying [On] in this setting means that if, for example, printing on A4 size paper is specified on the computer and there is only Letter size paper loaded, the job is printed on Letter size paper instead.
* Print settings are specified in an application or printer driver, but this setting can only be specified on the operation panel.
[Off] [On] |
[Print Quality]
[Menu] [Function Settings] [Printer] [Printer Settings]
Adjust print quality settings such as the density according to the document being printed and the purpose.
[Density]
[Menu] [Function Settings] [Printer] [Printer Settings] [Print Quality]
Adjust the toner density used when printing.
For more precise adjustment, you can adjust the levels of the three density areas in [Density (Fine Adjust)].
For more precise adjustment, you can adjust the levels of the three density areas in [Density (Fine Adjust)].
* Note that you cannot adjust the toner density if [Toner Save] is set to [On].[Toner Save]
* [Density] may not be displayed depending on the model, the installed options, and other settings.
[Density] 17 levels [Density (Fine Adjust)] [High]/[Medium]/[Low] 17 levels |
[Toner Save]
[Menu] [Function Settings] [Printer] [Printer Settings] [Print Quality]
Specify whether to save toner when printing.
Specify [On] in this setting when you only want to check the layout or other finishing prior to the final print, such as before printing a very large job.
Specify [On] in this setting when you only want to check the layout or other finishing prior to the final print, such as before printing a very large job.
[Off] [On] |
[Image Refinement]
[Menu] [Function Settings] [Printer] [Printer Settings] [Print Quality]
Specify whether to use smoothing processing that will produce smoother printed outlines in text and figures.
[Off] [On] |
[Output Adjustment Mode]
[Menu] [Function Settings] [Printer] [Printer Settings] [Print Quality]
Specify the resolution for printing. To print at a higher resolution, specify [On].
* Selecting [On] decreases the printing speed.
[Off] [On] |
[Layout]
[Menu] [Function Settings] [Printer] [Printer Settings]
Specify the gutter direction or margin and the print position.
[Binding Location]
[Menu] [Function Settings] [Printer] [Printer Settings] [Layout]
Specify whether the gutter will be on the long edge or the short edge when the printed document will be bound using a method such as staples. Use this setting in conjunction with the [Gutter] setting to adjust the binding position and margins. [Gutter] To bind the paper on the long edge, specify [Long Edge] in this setting.  To bind the paper on the short edge, specify [Short Edge] in this setting.  |
[Long Edge] [Short Edge] |
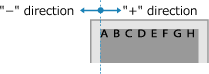
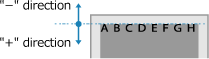
[Gutter]
[Menu] [Function Settings] [Printer] [Printer Settings] [Layout]
Offset the print position to adjust the width of the margin that will form the gutter.
Specify the offset width in 0.01" (0.5 mm) increments in the plus (+) or minus (-) offset direction, in accordance with the edge specified in [Binding Location]. [Binding Location]
Specify the offset width in 0.01" (0.5 mm) increments in the plus (+) or minus (-) offset direction, in accordance with the edge specified in [Binding Location]. [Binding Location]
If [Binding Location] is set to [Long Edge]
Specify the offset width by selecting a positive (+) value to bind on the left edge of the paper or a negative (-) value to bind on the right edge.
 Specified as a positive (+) value |  Specified as a negative (-) value |
If [Binding Location] is set to [Short Edge]
Specify the offset width by selecting a positive (+) value to bind on the top edge of the paper or a negative (-) value to bind on the bottom edge.
 Specified as a positive (+) value |  Specified as a negative (-) value |
-1.90 to 0.00 to +1.90 (inches) or -50.0 to 00.0 to +50.0 (mm) |
[Offset Short Edge] or [Offset Long Edge]
[Menu] [Function Settings] [Printer] [Printer Settings] [Layout]
Offset the print position of text and images. Use this setting when the printed text and images are shifted towards one edge of the paper or when they extend beyond the print range.
Specify the offset width as a positive (+) or negative (-) value in 0.01" (0.5 mm) increments for each paper edge direction and print side.
Specify the offset width as a positive (+) or negative (-) value in 0.01" (0.5 mm) increments for each paper edge direction and print side.
To Offset Along the Short Edge (Horizontally)
Specify the adjustment width by selecting a positive (+) value to adjust to the right on the paper or a negative (-) value to adjust to the left on the paper.
To Offset Along the Long Edge (Vertically)
Specify the adjustment width by selecting a positive (+) value to adjust down on the paper or a negative (-) value to adjust up on the paper.
-2.00 to 0.00 to +2.00 (inches) or -50.0 to 00.0 to +50.0 (mm) |
[Auto Error Skip]
[Menu] [Function Settings] [Printer] [Printer Settings]
Specify whether to continue printing if an error occurs during printing.
It is recommended that the [Off] setting normally be used so that printing stops when an error occurs.
It is recommended that the [Off] setting normally be used so that printing stops when an error occurs.
[Off] [On] |
[Timeout]
[Menu] [Function Settings] [Printer] [Printer Settings]
Specify the time from the start of waiting to receive print data until reception times out when print data reception is interrupted.
5 to 15 to 300 (sec.) |
[Speed/Print Side Priority for 2-Sided]
[Menu] [Function Settings] [Printer] [Printer Settings]
Specify whether to print the last page on one side of the paper when using 2-sided printing and the last page number is odd, or the last page is blank or cannot be printed and ends with an odd page number. To print the last page on one side of the paper, select [Speed Priority]. To print the last page on both sides of the paper, select [Print Side Priority]. When using paper printed with a logo for example, selecting [Print Side Priority] aligns the orientation and print side with that of other pages. |
[Speed Priority] [Print Side Priority] |
[Check Paper Size in Tray]
[Menu] [Function Settings] [Printer] [Printer Settings]
Specify whether to determine the paper size in the paper source and the paper size in the printer driver.
When [On] is selected, printing is canceled if the paper sizes do not match.
When [On] is selected, printing is canceled if the paper sizes do not match.
[Off] [On] |
[Recovery Printing]
[Menu] [Function Settings] [Printer] [Printer Settings]
Specify whether to resume printing from the page where an error that stops printing occurred after the error is resolved.
* When [Off] is selected, the page where the error occurred is not printed. Printing resumes from the next page, but it may resume two pages later when using 2-sided printing and depending on when the error occurred.
[Off] [On] |
[UFR II]
[Menu] [Function Settings] [Printer] [Printer Settings]
Specify the print data processing method used when the UFR II Printer Driver is used.
[Halftones]
[Menu] [Function Settings] [Printer] [Printer Settings] [UFR II]
Specify the print method used to reproduce halftones (intermediate areas between light and dark areas) according to the print data content.
To print at high definition with clear text outlines
Specify [Resolution]. This is useful for printing files with text and fine lines.
To print at a higher resolution than the [Resolution] setting, specify [High Resolution]. This is useful for printing data with fine lines and small text, such as CAD files.
To print at a higher resolution than the [Resolution] setting, specify [High Resolution]. This is useful for printing data with fine lines and small text, such as CAD files.
* Selecting [High Resolution] may reduce the consistency of textures.
To print with highlighted contrast between light and dark areas
Specify [Color Tone]. This is useful for printing image files such as photos.
To print with smoother gradations and outlines
Specify [Gradation]. This is useful for printing files such as figures that use tonal gradations.
[Resolution/Gradation]*1 [Text] [Resolution] [Color Tone] [Gradation] [High Resolution] [Graphics] [Resolution] [Color Tone] [Gradation] [High Resolution] [Image] [Resolution] [Color Tone] [Gradation] [High Resolution] |
*1 May not be displayed depending on the model, the installed options, and other settings. |
[Paper Save]
[Menu] [Function Settings] [Printer] [Printer Settings] [UFR II]
Specify whether to disable output for blank pages included in the print data.
[Off] [On] |
[Imaging Settings]
[Menu] [Function Settings] [Printer] [Printer Settings]
Specify the print data processing method used for printing JPEG or TIFF format image files.
[Halftones]
[Menu] [Function Settings] [Printer] [Printer Settings] [Imaging Settings]
Specify the print method used to reproduce halftones (intermediate areas between light and dark areas) according to the image content.
To print with highlighted contrast between light and dark areas
Specify [Gradation]. This is useful for printing image files such as photos.
To print with smoother gradations and outlines
Specify [Resolution]. This is useful for printing files such as figures that use tonal gradations.
To print at high definition with clear text outlines
Specify [High Resolution]. This is useful for printing files with text and fine lines.
[Gradation] [Resolution] [High Resolution] |