Replacing the Toner Cartridges
Replace the toner cartridges at the appropriate time according to messages that appear and a change in print quality.
Before replacing the toner cartridges, check the precautions in Important Safety Instructions. Manuals of the Machine
When to Replace the Toner Cartridges
When a Message Appears on the Screen of the Control Panel or Remote UI
Follow the message on the screen to prepare a new toner cartridge and replace the old one. Print quality may suffer if you continue using the toner cartridges without replacing them.
For details about the message and how to resolve it, see the following:
A Message Appears
For details about the message and how to resolve it, see the following:
A Message Appears
Replacing Toner Cartridges
1
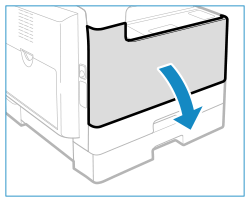
Open the front cover.

2
While pressing the unlock tab on the grip ( ), turn the toner cartridge in the direction of the arrow (clockwise).
 ), turn the toner cartridge in the direction of the arrow (clockwise).
Make sure to avoid applying shocks to the toner cartridge by hitting it against something, etc. Doing so may cause the toner to leak.

3
Pressing the unlock tab, pull out the toner cartridge.

4
Remove the new toner cartridge from its box.

5
Shake the new toner cartridge 5 or 6 times as shown below to evenly distribute the toner inside the cartridge.

6
Install the toner cartridge.

Make sure that the side of the cartridge with the label is facing up, and push the toner cartridge into the machine as far as it will go.
Support the new toner cartridge with one hand from underneath, while pushing it into the machine with the other hand.
7
Hold the toner cartridge in place with one hand, and then remove the protective seal by pulling it straight out with the other hand.

8
Turn the toner cartridge in the direction of the arrow (counterclockwise).

Turn the toner cartridge fully until it locks into place.
9
Close the front cover.