Replacing the Drum Unit
Replace the drum unit at the appropriate time according to messages that appear and a change in print quality.
Before replacing the drum unit, check the precautions in Important Safety Instructions. Manuals of the Machine
When to Replace the Drum Unit
When a Message Appears on the Screen of the Control Panel or Remote UI
Follow the message on the screen to prepare a new drum unit and replace the old one. Print quality may suffer if you continue using the drum unit without replacing them.
For details about the message and how to resolve it, see the following:
A Message Appears
For details about the message and how to resolve it, see the following:
A Message Appears
Replacing Drum Unit
1
Press the button on the cover on the left side of the main unit and open the cover on the left side of the main unit by 50 mm or more.

2
Open the front cover.

3
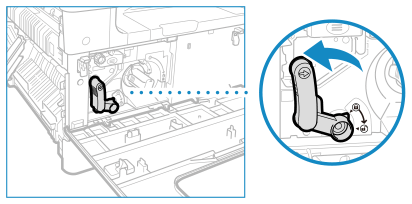
Slowly turn the lock release lever.

4
Turn the screw until it is completely undone.

5
While gripping the handle of the drum unit, pull the unit out slightly upward.

6
Remove the new drum unit from the package.

Do not remove the protective cover of the drum unit at this point.

7
Hold the protective cover of the drum unit, and align it with the slots inside the main unit.

8
Wrap your hand as shown in the diagram while supporting the protective cover ( ) and push the drum unit into the machine (
 ).
).
 ) and push the drum unit into the machine (
 ).
).

9
Remove the protective cover of the drum unit.

10
Tighten the screw.

11
Slowly turn the lock release lever to the vertical position.

12
Close the front cover and the cover on the left side of the main unit.
If the front cover will not close, check that you have not forgotten to tighten the drum unit screw and check the position of the lock release lever.