Registering a Frequently Used Paper Size and Type for the Multi-purpose Tray
By default, when paper is loaded in the multi-purpose tray, the screen for setting the paper size and type is displayed on the control panel.
If you always use the same paper in the multi-purpose tray, you can register the paper size and type. This prevents the paper settings screen from being displayed, saving you the trouble of configuring the settings.
If you always use the same paper in the multi-purpose tray, you can register the paper size and type. This prevents the paper settings screen from being displayed, saving you the trouble of configuring the settings.
When Using Paper of a Size or Type Different from the Registered Paper
After canceling the registration in Step 3, load the paper in the multi-purpose tray. When the screen for setting the paper size and type is displayed on the control panel, configure the settings according to the paper to be used. Setting the Paper Size and Type for the Multi-purpose Tray
This section describes how to register the settings using the control panel.
You can also register the settings using Remote UI from a computer. Managing the Machine from a Computer (Remote UI)
You can also register the settings using Remote UI from a computer. Managing the Machine from a Computer (Remote UI)
1
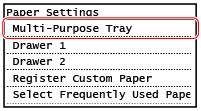
On the control panel, press [Paper Set.] in the [Home] screen. [Home] Screen
2
Select [Multi-Purpose Tray].
3
Select the paper size to register.
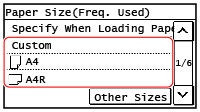
You can scroll the screen to view paper sizes (such as envelopes) not displayed on the screen.
 When Registering Non-standard Size (Custom Size) Paper
1 | Press [Custom]. |
2 | Press [X] or [Y] to enter the length and press [Apply]. imageRUNNER 2224N 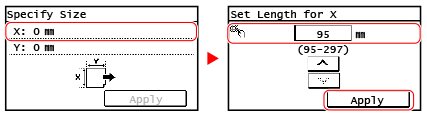 imageRUNNER 2224 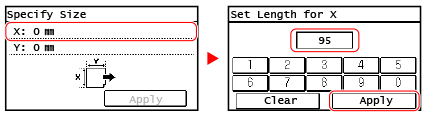 When frequently-used non-standard paper sizes are registered, the registered size is displayed as the paper size. Registering Non-standard Size Paper (Custom Paper) |
3 | Press [Apply]. |
If the Paper Size to Register Is Not Displayed
Press [Other Sizes], and select the paper size from the displayed list.
To Cancel the Registered Paper
Press [Specify When Loading Paper]. You do not need to perform Step 4.
When paper is loaded in the multi-purpose tray, the screen for setting the paper size and type is displayed on the control panel.
When paper is loaded in the multi-purpose tray, the screen for setting the paper size and type is displayed on the control panel.
4
Select the paper type to register.

The paper size and type are registered.
 |
You can change the paper size displayed on the screen in Step 3. Hiding Unused Paper Sizes |