Retrieving/Updating a Certificate from an SCEP Server
A request for issuing the certificate required for keys generated with the machine can be sent to an SCEP (Simple Certificate Enrollment Protocol) server that manages certificates. Certificates issued from the SCEP server are automatically registered to the machine. Administrator privileges are required to send a request for issuing a certificate.
Specifying the Communication Settings of the SCEP Server
You can specify the settings for communicating with the SCEP server.
1
Start the Remote UI. Starting the Remote UI
2
Click [Settings/Registration] on the portal page. Remote UI Screen
3
Click [Device Management]  [Settings for Certificate Issuance Request (SCEP)].
 [Settings for Certificate Issuance Request (SCEP)].
4
Click [Communication Settings].
5
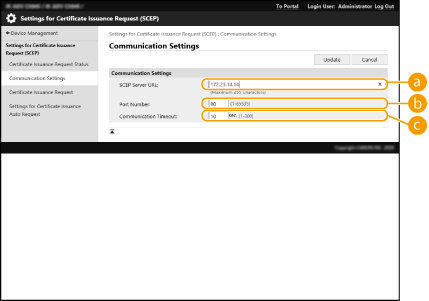
Set the required communication settings.

 [SCEP Server URL:]
Specify the URL of the SCEP server to connect to.
 [Port Number:]
Enter the port number to use for communicating with the SCEP server.
 [Communication Timeout:]
Enter the timeout time for communication with the SCEP server. The connection is canceled if there is no response from the SCEP server within the set time.
6
Click [Update].
 |
The settings cannot be updated when [Enable Timer for Certificate Issuance Auto Request] is selected. Requesting a Certificate to Be Issued at the Specified Time For information on the supported versions of SCEP, see Management Functions. |
Requesting a Certificate to Be Issued
You can manually request a certificate to be issued.
1
Start the Remote UI. Starting the Remote UI
2
Click [Settings/Registration] on the portal page. Remote UI Screen
3
Click [Device Management]  [Settings for Certificate Issuance Request (SCEP)].
 [Settings for Certificate Issuance Request (SCEP)].
4
Click [Certificate Issuance Request].
5
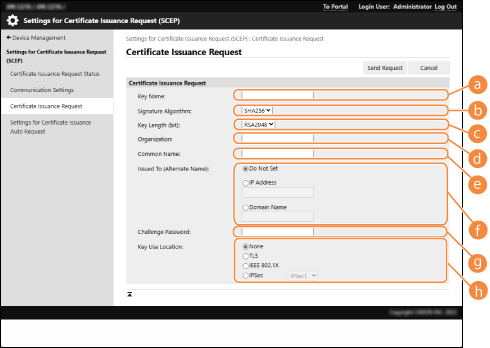
Set the items required for requesting a certificate to be issued.

 [Key Name:]
Enter the name for the key.Enter a name that will be easy to find when displayed in a list.
 [Signature Algorithm:]
Select the hash function to use for the signature.
 [Key Length (bit):]
Select the key length.
 [Organization:]
Enter the organization name.
 [Common Name:]
Enter the IP address or FQDN.
When performing IPPS printing in a Windows environment, make sure to enter the IP address of the machine.
A DNS server is required to enter the FQDN of the machine.Enter the IP address of the machine if a DNS server is not used.
 [Issued To (Alternate Name)]
Enter the IP address or domain to be set for the Subject Alternative Name (SAN), as needed.
If you are not configuring the [Issued To (Alternate Name)] setting, select the [Do Not Set] checkbox.
Only IPv4 addresses can be set in [IP Address].
 [Challenge Password:]
When a password is set on the SCEP server side, enter the challenge password included in the request data (PKCS#9) for requesting a certificate to be issued.
 [Key Use Location:]
Select the destination where the key will be used. When [IPSec] is selected, select the IPSec of the destination from the drop-down list.

When selecting something other than [None], enable the various functions in advance. If a certificate is successfully obtained with the various functions disabled, the certificate is assigned as the destination, but the various functions are not automatically enabled.
6
Click [Send Request].
7
Click [Restart].
 |
A manual request for issuing a certificate cannot be sent when [Enable Timer for Certificate Issuance Auto Request] is selected. Requesting a Certificate to Be Issued at the Specified Time The information set here is not saved to the storage of the machine. |
Requesting a Certificate to Be Issued at the Specified Time
You can set to automatically request a certificate to be issued at a specified time.
1
Start the Remote UI. Starting the Remote UI
2
Click [Settings/Registration] on the portal page. Remote UI Screen
3
Click [Device Management]  [Settings for Certificate Issuance Request (SCEP)].
 [Settings for Certificate Issuance Request (SCEP)].
4
Click [Settings for Certificate Issuance Auto Request].
5
Set the items required for requesting a certificate to be issued.

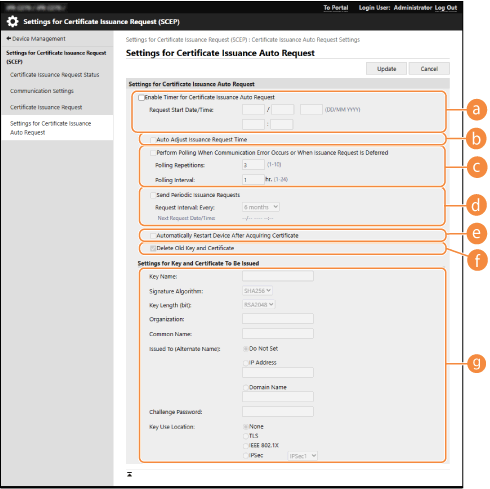
 [Enable Timer for Certificate Issuance Auto Request]
Select this to automatically request a certificate to be issued at a specified time, and specify the start date/time in [Request Start Date/Time:].
 [Auto Adjust Issuance Request Time]
Select this to adjust the time to send the request.This reduces load on the SCEP server when multiple multifunction printers send a request at the same time.The time is randomly adjusted 1 to 600 seconds from the time specified in [Request Start Date/Time:].
 [Perform Polling When Communication Error Occurs or When Issuance Request Is Deferred]
Select this to check the status of the SCEP server when a communication error has occurred or when a certificate issue request is pending. Specify the number of polling times and polling interval.

In the following cases, polling is not performed and an error occurs.
When the machine has exceeded the limit of keys and certificates it can hold
When an error is included in the retrieved response data
When an error occurs on the SCEP server side
 [Send Periodic Issuance Requests]
Select this to periodically send an automatic request for a certificate to be issued, and specify the interval in [Request Interval: Every:].
When an automatic request for a certificate to be issued is performed successfully, the next date/time to issue a request is displayed in [Next Request Date/Time:].
 [Automatically Restart Device After Acquiring Certificate]
Select this to restart the machine after the certificate is retrieved.

The machine is restarted even during batch importing/exporting.
 [Delete Old Key and Certificate]
Select this to overwrite the old key and certificate.

The key and certificate with the same destination for use are overwritten.
The default key is not overwritten.
 [Settings for Key and Certificate To Be Issued]
Enter the information for the key to generate. For information on the settings, see step 5 of Requesting a Certificate to Be Issued.
6
Click [Update].
Checking the Status of Requesting a Certificate to Be Issued
The certificate requested and issued based on the CSR is registered in the key.
Start the Remote UI  click [Settings/Registration]
  [Device Management]
  [Certificate Issuance Request Status].
 click [Settings/Registration]
  [Device Management]
  [Certificate Issuance Request Status].
The following statuses are displayed in [Status].
[To Be Processed]: The next date/time to issue a request is displayed in [Request Date/Time].
[Processing...]: Polling is being performed.
[Error]: An error such as a communication error or key upper limit exceeded error has occurred.
[Successful]: The date/time that the certificate was successfully issued is displayed in [Request Date/Time].
The information displayed in [Details] in [Error] is indicated below.
[Details] | Cause |
Deferred | The pending status was returned from the SCEP server. |
Key and Certificate Registration Limit Error | The limit to the number of keys and certificates that can be registered in the machine was reached. |
Communication Error (TCP ERROR) | Connection to the SCEP server failed/a communication timeout occurred. |
Communication Error (TCP ERROR <HTTP status code>) | An HTTP error occurred. |
Communication Error (SCEP ERROR Fail Info 0) | Unrecognized or unsupported algorithm. |
Communication Error (SCEP ERROR Fail Info 1) | Integrity check (meaning signature verification of the CMS message) failed. |
Communication Error (SCEP ERROR Fail Info 2) | Transaction not permitted or supported. |
Communication Error (SCEP ERROR Fail Info 3) | The signingTime attribute from the CMS authenticatedAttributes was not sufficiently close to the system time. |
Communication Error (SCEP ERROR Fail Info 4) | No certificate could be identified matching the provided criteria. |
 |
History for the last 20 certificates is displayed.When the number of certificates exceeds 20, the oldest information is overwritten. This setting can be imported/exported with models that support batch importing of this setting. Importing/Exporting the Setting Data When performing batch exporting, this setting is included in [Settings/Registration Basic Information]. Importing/Exporting All Settings |