Sending/Saving at a Specified Time
 | You can scan originals in advance and send/save the scanned documents at a specified time. |
1
Place the original. Placing Originals
2
Press <Scan and Send>. <Home> Screen
3
Specify the destination on the Scan Basic Features screen. Scan Basic Features Screen
4
Specify the scan settings as necessary. Basic Operations for Scanning Originals
5
Press <Options>  <Delayed Send>.
 <Delayed Send>.
6
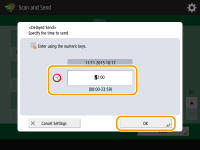
Enter the time to send/save and press <OK>.
Enter all four digits of the time. For example, for 5 minutes past 7, enter "0705" and for 18 minutes past 23, enter "2318."

7
Press <Close>.
8
Press  (Start).
 (Start).
Originals are scanned and sent/saved at the specified time.
 |
You can check on the <Status Monitor> screen whether sending/saving is complete or not. Checking Status and Log for Scanned Documents You can reserve up to 64 jobs for delayed sending. However, the actual number of send jobs that the machine can handle may be fewer than 64, depending on the following conditions: When multiple documents are being sent at the same time When large documents are being sent When a large amount of memory is being used for the Mail Box and Fax/I-Fax Inbox |