Configuring the Key and Certificate for TLS
You can use TLS encrypted communication to prevent sniffing, spoofing, and tampering of data that is exchanged between the machine and other devices such as computers. When configuring the settings for TLS encrypted communication, you must specify a key and certificate (server certificate) to use for encryption. You can use the key and certificate that are preinstalled in the machine, or you can generate your own or acquire them from a certification authority. Administrator or NetworkAdmin privileges are required in order to configure these settings.

 |
If you want to use a key and certificate that you generate yourself, generate the key and certificate before performing the procedure below. Generating the Key and Certificate for Network Communication If you want to use a key and certificate that you acquire from a certification authority (CA), register the key and certificate before performing the procedure below. Registering a Key and Certificate |
Setting TLS
1
Press  (Settings/Register).
 (Settings/Register).
2
Press <Preferences>  <Network>
  <TCP/IP Settings>
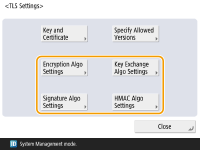
  <TLS Settings>.
 <Network>
  <TCP/IP Settings>
  <TLS Settings>.
3
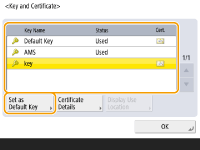
Press <Key and Certificate>.
4
Select the key and certificate to use for TLS encrypted communication, and press <Set as Default Key>  <Yes>.
 <Yes>.
If you want to use the preinstalled key and certificate, select <Default Key>.

TLS encrypted communication cannot use <Device Signature Key>, which is used for the device signature, or <AMS>, which is used for access restrictions.
5
Press <OK>.
6
Press <Specify Allowed Versions>.
7
Specify <Maximum Version> and <Minimum Version>  press <OK>.
 press <OK>.
8
Select the settings for each algorithm.

9
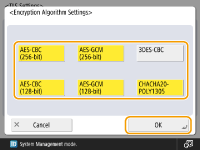
Select the algorithm to use  press <OK>.
 press <OK>.
Example: When <Encryption Algo Settings> is selected


The displayed items may differ, depending on the algorithm.
The following combinations of TLS version and algorithm are available.
 : Available
-: Unavailable
Algorithm | TLS Version | |||
<TLS 1.3> | <TLS 1.2> | <TLS 1.1> | <TLS 1.0> | |
<Encryption Algo Settings> | ||||
<AES-CBC (256-bit)> | - |  |  |  |
<AES-GCM (256-bit)> |  |  | - | - |
<3DES-CBC> | - |  |  |  |
<AES-CBC (128-bit)> | - |  |  |  |
<AES-GCM (128-bit)> |  |  | - | - |
<CHACHA20-POLY1305> |  | - | - | - |
<Key Exchange Algo Settings> | ||||
<RSA> | - |  |  |  |
<ECDHE> |  |  |  |  |
<X25519> |  | - | - | - |
<Signature Algo Settings> | ||||
<RSA> |  |  |  |  |
<ECDSA> |  |  |  |  |
<HMAC Algo Settings> | ||||
<SHA1> | - |  |  |  |
<SHA256> |  |  | - | - |
<SHA384> |  |  | - | - |
10
Press  (Settings/Register)
 (Settings/Register)
  <Apply Set. Chng.>
  <Yes>.
 (Settings/Register)
 (Settings/Register)
  <Apply Set. Chng.>
  <Yes>.
The machine restarts, and the settings are applied.
 Starting the Remote UI with TLS |
If you try to start the Remote UI when TLS is enabled, a security alert may be displayed regarding the security certificate. In this case, check that the correct URL is entered in the address field, and then proceed to display the Remote UI screen. Starting the Remote UI |
Setting the Security Strength and Encryption Method
1
Press  (Settings/Register).
 (Settings/Register).
2
Press <Management Settings>  <Security Settings>
  <Encryption Settings>.
 <Security Settings>
  <Encryption Settings>.
3
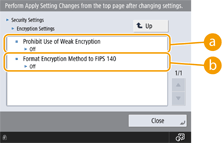
Configure the encryption settings and encryption method.

 <Prohibit Use of Weak Encryption>
Set this to <On> to prohibit the use of weak encryption with a key length of 1,024 bits or less. To prohibit the use of keys and certificates that use weak encryption, set <Prohibit Use of Key/Certificate with Weak Encryption> to <On>.
 <Format Encryption Method to FIPS 140>
Set this to <On> to make the functions using encryption comply with FIPS 140.
 |
If you set <Format Encryption Method to FIPS 140> to <On>, you can make the TLS communication encryption method comply with the United States government-approved FIPS (Federal Information Processing Standards) 140, but the following limitations apply. An error will occur if you specify a certificate for TLS that uses an algorithm not recognized by FIPS (lower than RSA2048bit). A communication error will occur if the communication destination does not support FIPS-recognized encryption algorithms. <CHACHA20-POLY1305> and <X25519> can no longer be used |