Making DNS Settings
The DNS server is a computer which converts the names of devices (domain names) on the Internet into IP addresses. There are many DNS servers on the Internet worldwide. They cooperate with each other to make correspondence between domain names and IP addresses. This section describes the steps for setting the machine's DNS server address, host name, and domain name. You can also set the machine so that an automatic update is carried out if correspondence between the host name and the IP address is changed. If you set DNS under an IPv6 environment, confirm if IPv6 addresses can be used (Setting an IPv6 Address). In addition, you can make correspondence with an IP address by acquiring the host name through a DHCP server without manually entering the host name of the machine.
Making DNS Settings
1
Press  (Settings/Register).
 (Settings/Register).
2
Press <Preferences>  <Network>
  <TCP/IP Settings>
  <DNS Settings>.
 <Network>
  <TCP/IP Settings>
  <DNS Settings>.
3
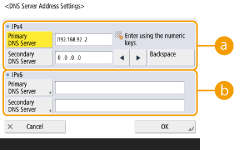
Specify a DNS server address.
1 | Press <DNS Server Address Settings>. |
2 | Carry out the necessary settings. According to your environment, enter an IP address of the DNS server.  For details about the setting information, contact your provider or network administrator. You can also refer to the computer settings. Viewing the Network Connection Information of the Computer   <IPv4> <IPv4>Press <Primary DNS Server>, and enter an IPv4 address of the DNS server. If there is a secondary DNS server, enter its IP address. If you don't set a secondary DNS server, enter "0.0.0.0".  <IPv6> <IPv6>Press <Primary DNS Server>, and enter an IPv6 address of the DNS server. You cannot enter addresses that begin with "ff" (multicast address), addresses that consist of only "0," or local link addresses. If there is a secondary DNS server, enter its IP address. You cannot enter addresses that begin with "ff" (multicast address), addresses that consist of only "0," or local link addresses. This column can be left blank. |
3 | Press <OK>. |
4
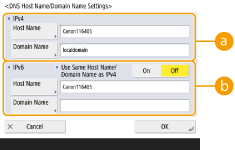
Specify the machine's host name and domain name.
1 | Press <DNS Host Name/Domain Name Settings>. |
2 | Carry out the necessary settings.   <IPv4> <IPv4>Press <Host Name>, and enter the host name of the machine to register on the DNS server using alphanumeric characters. Press <Domain Name>, and enter the domain name which the machine belongs to using alphanumeric characters (Example: "example.com").  <IPv6> <IPv6>To set the host name and domain name to be the same as IPv4, press <On> in <Use Same Host Name/Domain Name as IPv4>. To set to be different from those of IPv4, press <Off>. To set the host name to be different from IPv4, press <Host Name> and enter the host name of the machine to register on the DNS server using alphanumeric characters. To set the domain name to be different from IPv4, press <Domain Name> and enter the domain name that the machine belongs to using alphanumeric characters. (Example: "example.com").  If you set <Use DHCPv6> to <On> for the stateful address settings (Setting an IPv6 Address), the manually configured domain name is overwritten. If you set <Use Same Host Name/Domain Name as IPv4> to <On>, the domain name that is retrieved from DHCPv6 server is used. |
3 | Press <OK>. |
5
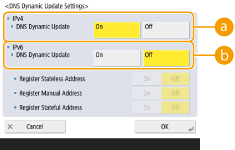
Set automatic correspondence updates.
1 | Press <DNS Dynamic Update Settings>. |
2 | Carry out the necessary settings.   <IPv4> <IPv4>To automatically update the information when correspondence between the host name and the IP address is changed in an environment such as DHCP, press <On> in <DNS Dynamic Update>.  <IPv6> <IPv6>To automatically update the information when correspondence between the host name and the IP address is changed in an environment such as DHCP, press <On> in <DNS Dynamic Update>. Turn <On> the address you want to register as a DNS server in <Register Stateless Address>/<Register Manual Address>/<Register Stateful Address>. Please note that automatic update cannot be carried out if all are set to <Off>. |
3 | Press <OK>. |
6
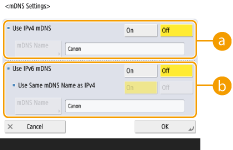
Specify the mDNS settings.
1 | Press <mDNS Settings>. |
2 | Carry out the necessary settings.   <Use IPv4 mDNS> <Use IPv4 mDNS>To enable the DNS function in an environment without a DNS server, press <On>. Press <mDNS Name>, and enter an mDNS name of your choice using alphanumeric characters.  <Use IPv6 mDNS> <Use IPv6 mDNS>To enable the DNS function in an environment without a DNS server, press <On>. To set the same settings as IPv4 for the mDNS name, press <On> for <Use Same mDNS Name as IPv4>. To use different settings, press <mDNS Name> and enter an mDNS name of your choice using alphanumeric characters.  If you set <Use IPv4 mDNS> to <On>, the machine will not completely enter the Sleep mode. If you set <Use IPv6 mDNS> to <On>, the machine will not completely enter the Sleep mode. |
3 | Press <OK>. |
7
Press  (Settings/Register)
  <Yes>.
 (Settings/Register)
  <Yes>.
Using a DHCP Server
You can acquire a host name by using the DHCP server.
 |
The DHCP optional setting only applies to the main line. |
1
Press  (Settings/Register).
 (Settings/Register).
2
Press <Preferences>  <Network>
  <TCP/IP Settings>
  <IPv4 Settings> or <IPv6 Settings>
  <DHCP Option Settings>.
 <Network>
  <TCP/IP Settings>
  <IPv4 Settings> or <IPv6 Settings>
  <DHCP Option Settings>.
3
Carry out the necessary setup.

Some items may not be displayed in <IPv6 Settings>.
 <Acquire Host Name>
To acquire a host name through the DHCP server, press <On>.
 <DNS Dynamic Update>
To make the DHCP server automatically update information regarding correspondence between the IP addresses and the host names without using the machine, press <On>.
 <Acquire DNS Server Address>
To acquire the DHCP server IP address, press <On>.
 <Acquire Domain Name>
To acquire a domain name through the DHCP server, press <On>.
 <Acquire WINS Server Address>
To acquire a domain name through the WINS server, press <On>.
 <Acquire SMTP Server Address>
To acquire a domain name through the SMTP server, press <On>.
 <Acquire POP Server Address>
To acquire a domain name through the POP server, press <On>.
4
Press <OK>.
5
Press  (Settings/Register)
  <Yes>.
 (Settings/Register)
  <Yes>.