Scanning (Sending by E-mail)
 | You can scan an original and send the scanned data by e-mail as an attachment. Just like when sending a regular e-mail, you can add a subject and message and specify multiple destinations. |
Required Preparations |
On the machine, configure the settings of the e-mail server to be used to send e-mail. Preparing to Send Scanned Data by E-mail and I-fax |
1
Place the original. Placing Originals
2
On the control panel, press [Scan] in the [Home] screen. [Home] Screen
The scan type selection screen is displayed.
3
Press [E-Mail].
The scan screen is displayed.
4
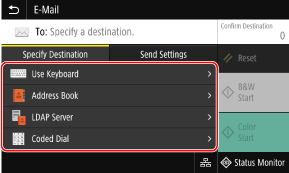
On the [Specify Destination] tab, specify the destination. Specifying Destinations

Use [Address Book] or [Coded Dial] to specify the Cc and Bcc destinations.
 If you can only specify [Specify Myself as Destination]
If the destination when sending is restricted due to the Authentication Settings for Send Function, you cannot specify another destination. For details, contact the administrator.
5
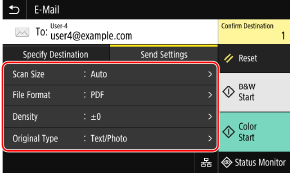
Configure the scan settings on the [Send Settings] tab. Scan Settings

You can also set the subject and main body of the e-mail on the [Send Settings] tab. E-mail and I-Fax Settings
Scanned data is sent with the following file name. You can also use the [Send Settings] tab to specify a custom string and add it to the start. Setting File / Division

 Communications management number
 Date sent (in this example, "April 5, 2023, 9:12:34 AM")
 File sequence number (if one file, then "001")
6
Press [B&W Start] or [Color Start].
Scanning of the original starts.
To scan the original in black and white, press [B&W Start], and to scan in color, press [Color Start].
To cancel scanning, press [Cancel]  [Yes]. Canceling Scanning
 [Yes]. Canceling Scanning
When scanning is completed, the scanned data is sent. Press [Status Monitor] to view the sending status and log.
 When [Confirm Destination] appears
Check that the destination is correct, and then press [Start Scanning].
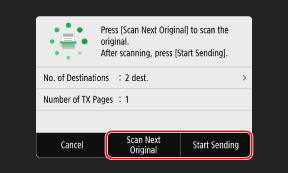
 When [Scan Next Original] appears
After the original is placed on the platen glass and is scanned in PDF or TIFF format, the screen for scanning additional originals is displayed.
To continue scanning originals, place on the platen glass, and press [Scan Next Original].
When scanning of all documents is completed, press [Start Sending] or [Preview & Send].
To continue scanning originals, place on the platen glass, and press [Scan Next Original].
When scanning of all documents is completed, press [Start Sending] or [Preview & Send].

* If the size of the original is different, part of the image may be missing, or the image may be scanned smaller.
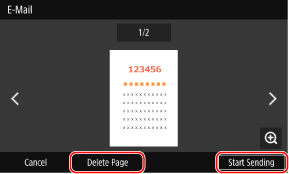
 When the preview screen appears
Press [Start Sending] after previewing the scanned data.
If there are pages you do not want to send, open the page and press [Delete Page].
If there are pages you do not want to send, open the page and press [Delete Page].

 When [SMTP Authentication] appears
Enter the user name and password to be used for SMTP authentication, and then press [Apply].
 |
When a Sending Error OccursDepending on the e-mail server settings, a notification e-mail may be sent to the e-mail address set on the machine when a sending error occurs. If notification e-mails are left in the server, the mailbox may become full, so it is recommended to periodically empty the mailbox. Clearing the Mail Box |