Generating a Key and Certificate Signing Request (CSR)
Certificates generated on this machine do not have a CA signature, which may cause communication errors with some communication peers. To request a certificate with a CA signature, certificate signing request (CSR) data is required. A user who logs in with administrator privileges can generate a CSR.
Generating a Key and CSR
You can generate a key and CSR on the machine. You can also display the CSR data on the screen and export it as a file.
1
Start the Remote UI. Starting the Remote UI
2
Click [Settings/Registration] on the portal page. Remote UI Screen
3
Click [Device Management]  [Key and Certificate Settings].
 [Key and Certificate Settings].
4
Click [Generate Key...].
5
Click [Key and Certificate Signing Request (CSR)].
6
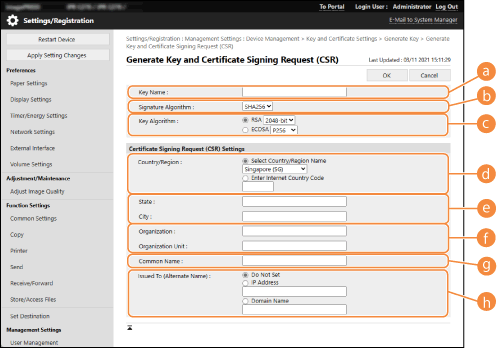
Configure the necessary items for the key and certificate.

 [Key Name]
Enter a name for the key. Use a name that will be easy to find when displayed in a list.
 [Signature Algorithm]
Select the hash algorithm to use for the signature.
 [Key Algorithm]
Select the key algorithm, and specify the key length if [RSA] is selected, or specify the key type if [ECDSA] is selected.
 [Country/Region]
Select the country code from the list, or enter it directly.
 [State]/[City]
Enter the location.
 [Organization]/[Organization Unit]
Enter the organization name.
 [Common Name]
Enter the IP address or FQDN.
When performing IPPS printing in a Windows environment, make sure to enter the machine's IP address.
A DNS server is required in order to enter the FQDN of the machine. Enter the IP address if a DNS server is not used.
 [Issued To (Alternate Name)]
Enter the IP address or domain to be set for the Subject Alternative Name (SAN), as needed.
If you are not configuring the [Issued To (Alternate Name)] setting, select the [Do Not Set] checkbox.
Only IPv4 addresses can be set in [IP Address].
7
Click [OK].
The CSR data is displayed.
If you want to save the CSR data to a file, click [Store in File] and specify the save location.
 |
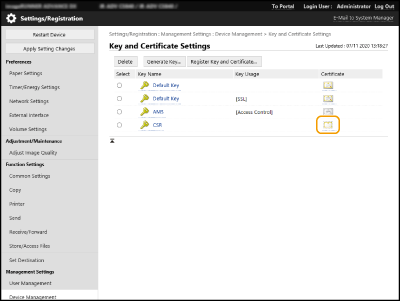
The key that generated the CSR is displayed on the key and certificate list screen, but you cannot use it by itself. To use this key, you need to register the certificate that is later issued based on the CSR. Registering a Certificate to a Key |
Registering a Certificate to a Key
You can register the certificate that was applied for and issued based on the CSR.
1
Start the Remote UI. Starting the Remote UI
2
Click [Settings/Registration] on the portal page. Remote UI Screen
3
Click [Device Management]  [Key and Certificate Settings].
 [Key and Certificate Settings].
4
In the [Certificate] list, click  for the certificate that you want to register.

5
Click [Register Certificate...].
6
Register the certificate.
Click [Browse...], specify the file (certificate) to register, and click [Register].