
Basic Operations for Sending Faxes
This section describes the basic operations for sending fax documents.
1
Place the original. Placing Originals
2
Press <Fax>. <Home> Screen
3
Specify the destination on the Fax Basic Features screen. Fax Basic Features Screen
Specifying Destinations from the Address Book
Specifying Destinations from One-Touch Buttons
Entering Destinations Manually
Specifying Destinations in the LDAP Server

To check the detailed information about the specified destination, select the desired destination using  and
and  and press <Details>. To delete a destination from the specified destinations, press <Delete Dest.>.
 and
and  and press <Details>. To delete a destination from the specified destinations, press <Delete Dest.>.
You can only change destinations from <Details> specified using the New Destination and destinations obtained via an LDAP server.
<ECM TX>, <Sending Speed>, and <Long Distance> do not appear when you specify a destination from the Remote Address Book.
If the server machine is performing the System Manager information settings, authentication between the server machine and the client machine is performed while the client machine is obtaining the Remote Address Book/one-touch buttons. Authentication is performed by matching the System Manager ID and System Manager PIN set by the server machine and client machine. Changing the System Manager ID and PIN
The availability of the Remote Address Book/one-touch buttons depends on the status of the System Manager information settings for the server machine and client machine, as shown below.
The availability of the Remote Address Book/one-touch buttons depends on the status of the System Manager information settings for the server machine and client machine, as shown below.
When the server machine is performing the System Manager information settings | When the client machine is performing the System Manager information settings | The System Manager ID and System PIN for the server machine and client machine match | Can use the Remote Address Book/One-Touch Button |
Performing | Performing | Matches | Yes |
Does Not Match | No | ||
Not Performing | - | No | |
Not Performing | Performing | - | Yes |
Not Performing | - | Yes |
Specifying Destinations from the Address Book
1
Press <Address Book>.
2
Select the destination and press <OK>.
If an access number is set when the destination is registered, press <Access No.> and enter the access number using the numeric keys. The corresponding destination is displayed in the Address Book.
To use the Remote Address Book, press <To Remote Address Book>. When <Change Address Book> is displayed, press <Change Address Book>  <Remote>.
 <Remote>.
 Destination type buttons
Pressing  and
and displays fax and group destinations, respectively.
 and
and displays fax and group destinations, respectively.
 Drop-down list for selection of Address Book types
Enables you to display a specific group of destinations. When you are logged in to the machine with personal authentication management, selecting <Personal Address List> displays your personal Address Book.
 <Search by Name>
Enables you to search the destination by the name you are entering.
 Search buttons by first letter
Enables you to narrow down a search by the first letter of the destination name.
 |
If you select the group destination containing destinations other than fax destinations, sending a fax is not allowed. |
 |
<Register New Destination>, <Details/Edit>, and <Delete> on the <Address Book (Local)> screen can be used to register new destinations, check details, and edit/delete destinations. To use the Remote Address Book, it is necessary to configure the server machine settings. Set to open the Remote Address Book externally on the server machine. |
Back to Top
Specifying Destinations from One-Touch Buttons
1
Press the desired one-touch button.
To specify the destination using a one-touch button number (one-touch number), press  and enter the number for the desired one-touch button.
 and enter the number for the desired one-touch button.
To use the Remote Address Book, press <To Remote Address Book>.
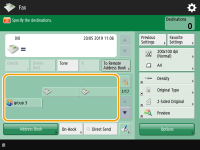
 |
The destinations registered in the one-touch buttons of the server machine are updated in the following times: When a fax job has been sent on the client machine When you press  (Reset) on the client machine (Reset) on the client machineWhen Auto Reset is activated on the client machine |
Back to Top
Entering Destinations Manually
You can specify destinations manually that are not registered in the Address Book or one-touch buttons.
1
Enter a fax number using the numeric keys and press <OK>.
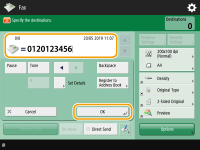
To add another fax number, repeat this step.
If the machine is connected to a PBX (Private Branch Exchange), press <R> before entering the destination. If <R> is not available, you need to register the R-key settings. <R-Key Setting>

You can press <Register to Address Book> to register the entered destination. Set the required conditions, and specify <Name> and <Address Book>. For information on the settings, see Registering Destinations in the Address Book.
Back to Top
Specifying Destinations in the LDAP Server
You can search and specify destinations registered in the LDAP server.
1
Press <Address Book>.
2
Press <To LDAP Server>.
When <Change Address Book> is displayed, press <Change Address Book>  <LDAP Server>.
 <LDAP Server>.
If the network password input screen is displayed, enter the user name and password and press <OK>.
3
Press <Search by Conditions>.
To display all the destinations in the LDAP server without specifying any conditions, proceed to step 5.
4
Specify the search conditions.

 Search categories
Select a criterion to search for destinations from name, fax number, organization name, and organization unit (department name, etc).
 Search conditions
Select a search condition such as a destination name that contains "John" and a department name that begins with "Development."
 Search characters
Press <Set> and enter search characters for the search condition.

To search with multiple conditions
You can search destinations with multiple conditions. Specify the first search condition, press <Add Search Condition>, and then select <or> or <and> for the next condition.
5
Press <Start Searching>.
The search results are displayed.
To search with another condition, press <Delete> to delete the specified settings and then set a new condition.

A maximum of 2,000 destinations can be displayed in the search results.
6
Select the destination and press <OK>.

Back to Top
4
Specify the scan settings as necessary.
Specifying How to Scan Originals
Adjusting Image Quality
Erasing Dark Borders (Erase Frame)
Specifying How to Scan Originals
 | If you are scanning free size/highly transparent originals, or the edge of image is missing when scanning, you need to manually specify the scanning size. |
 | The machine can automatically scan both the front and back sides of an original. |
1
Press the setting button for scanning size.
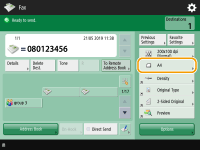
2
Select the scanning size and press <OK>.
To scan the original in A4, select <A4>.
 When scanning a free size original
Place the original in the feeder and select <Free Size>.
 When specifying the values of scanning size
Place the original on the platen glass/in the feeder, select <Custom>, and enter the length and width of the original.

When a scanning size smaller than the minimum size that can be scanned with the feeder is set, scanning cannot be performed with the feeder. For information on the document sizes that can be scanned with the feeder, see Feeder.
 When scanning a long original
Place the original in the feeder and select <Long Original>.
 |
To register the scanning sizeIf you frequently specify the scanning size with the same values, register the size in <Custom>  <Register Size> to quickly recall the setting for convenience. <Register Size> to quickly recall the setting for convenience. |
Back to Top
Place the original in the feeder. For landscape-oriented originals, place them horizontally.
1
Press <Options>  <2-Sided Original Settings>.
 <2-Sided Original Settings>.
2
Select <Book Type> or <Calendar Type> and press <OK>.
Select <Book Type> for originals whose images on the front and back sides face the same direction, or <Calendar Type> for originals whose images on the front and back sides face in opposite directions.
3
Press <Close>.
Back to Top
Adjusting Image Quality
 | You can select the resolution suitable for your type of original. The higher the resolution is, the clearer the image becomes, but the longer it takes to send. |
 | Specifying the type of original such as documents with characters only or magazines with photographs enables you to send with optimal image quality. |
 | You can adjust the density of the entire original. For example, increasing the density enables you to easily read faint characters written in pencil. |
 | You can adjust the density of the background. You can clearly send originals with a colored background or thin originals such as newspapers whose characters and images on the back side are transparently visible. |
 | You can scan the image with clear contours and lines by increasing the sharpness, or soften the image by decreasing the sharpness. Use this function when you want to sharpen blurred text and diagrams, or to reduce moire (a shimmering, wavy pattern) to smoothen the finished image. |
1
Press the setting button for resolution.
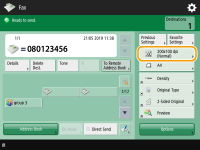 (Items shown on the screen may differ depending on your model and options.) |
2
Select the resolution and press <OK>.
A lower resolution is suitable for originals containing text only, while a higher resolution is suitable for originals containing photographs. The higher the resolution is, the more finely originals can be scanned.
Back to Top
1
Press <Options>  <Original Type>.
 <Original Type>.
2
Select the type of original and press <OK>.
To adjust the text/photo processing priority level, press <Adjust Level>  select <Text Priority> or <Photo Priority>.
 select <Text Priority> or <Photo Priority>.
3
Press <Close>.
Back to Top
1
Press <Options>  <Density>.
 <Density>.
2
Adjust the density and press <OK>.
Press  to decrease the density. Press
  to increase the density.
 to decrease the density. Press
  to increase the density.
3
Press <Close>.
Back to Top
1
Press <Options>  <Density>.
 <Density>.
2
Press <Adjust> in <Background Density>.
To adjust the background automatically, press <Auto> and proceed to step 4.

When the type of original is set to <Text> (Selecting the Type of Original) and <Quality Priority> is specified for <Speed/Image Quality Priority for B&W Scan>, the density of the background is automatically adjusted. <Speed/Image Quality Priority for B&W Scan>
3
Adjust the density and press <OK>.
If <-> is pressed, the density of the entire background decreases. If <+> is pressed, the density of the entire background increases.

Depending on the colors of originals, sections other than the background may be affected.
4
Press <OK>  <Close>.
 <Close>.
Back to Top

The setting for <Sharpness> is invalid when all of the conditions below are met. The setting is reflected in the image displayed for <Preview>, but not for the actual scanned image.
<Original Type>: <Text>
<Resolution>: <200x100 dpi (Normal)>
1
Press <Options>  <Sharpness>.
 <Sharpness>.
2
Adjust the sharpness and press <OK>.
To sharpen blurred text, adjust the control to <High>.
To reduce moire when scanning originals that contain printed photos, such as magazines or pamphlets, adjust the control to <Low>.
3
Press <Close>.
Back to Top
Erasing Dark Borders (Erase Frame)
When scanning originals that are smaller than the scanning size, frame lines of the originals may appear in the scanned image. When scanning a thick book, dark borders may appear. This function enables you to erase these frame lines and dark borders. You can also set the machine to not copy punch holes in the originals.
 |
Place the original with punch holes on the platen glass. Placing in the feeder may result in damage. |
1
Press <Options>  <Erase Frame>.
 <Erase Frame>.
2
Specify the erasing type and width.
 Erasing the frames in copies of documents
1 | Press <Erase Original Frame> and check <Original Size>. 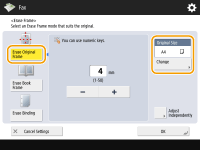 If the size displayed in <Original Size> is different from the size of the original, press <Change> to select the size. You can only set the Erase Original Frame mode for the original sizes shown on the touch panel display. |
2 | Enter the width of the frame to erase. |
 Erasing dark borders in copies of books
You can erase the dark borders both in the center and contour lines that appear when you scan facing pages in a book.
1 | Press <Erase Book Frame> and check <Original Size>. 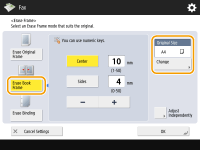 If the size displayed in <Original Size> is different from the size of the book, press <Change> to select the size. You can only set the Erase Book Frame mode for the original sizes shown on the touch panel display. |
2 | Press <Center> or <Sides> and enter each erasing width. |
 Erasing punch holes in copies of documents
1 | Press <Erase Binding> and select the punch hole location. 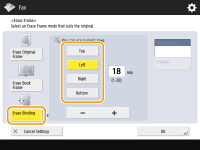 |
2 | Enter the erasing width. |
 |
If you want to adjust the width for each border independently, press <Erase Original Frame> or <Erase Book Frame>, and then press <Adjust Independently> to enter the erasing widths. If you are using <Erase Binding>, the borders you do not select are also erased by 4 mm. |
3
Press <OK>  <Close>.
 <Close>.
Back to Top
5
Press  (Start).
 (Start).
Originals are scanned and sending starts.
To cancel scanning, press <Cancel> or  (Stop)
  <Yes>.
 (Stop)
  <Yes>.
 When <Press the [Start] key to scan the next original.> is displayed
Place the next original to scan and press  (Start). When scanning all of the originals is complete, press <Start Sending> to send the fax.
 (Start). When scanning all of the originals is complete, press <Start Sending> to send the fax.
To cancel sending, see Canceling Sending Faxes.
 |
To check the total number of specified destinationsThe total number of specified destinations is displayed on the top right of the screen. This enables you to confirm that the number of destinations is correct before sending.  To send with the sender informationYou can send with the sender's name and fax number. <TX Terminal ID> To check the statuses for sent documentsOn the <Status Monitor> screen, you can check the statuses for sent documents. This screen enables you to send faxes again or cancel sending after checking the statuses. Checking Status and Log for Sent and Received Documents When <Display Notification When Job Is Accepted> is set to <On>, the <Status Monitor> screen can be displayed from the following screen that is shown after a send job is received. <Display Notification When Job Is Accepted>  When a transmission error occurs because the recipient's line is busyThe machine automatically redials after a certain period of time. You can change the settings such as how many times the machine redials and the interval between redials. <Auto Redial> To print the report for the results of sendingOn the Fax Basic Features screen, pressing <Options>  <TX Report> enables you to set to automatically print the report listing the results of sending. <TX Report> enables you to set to automatically print the report listing the results of sending.To set this for each job from <Options>, it is necessary to select <For Error Only> or <Off> in <TX Report>, and then set <Allow Printing from Options> to <On>. When multiple sheets are fedScanning is stopped and the message is displayed on the screen. Follow the instructions to clear the jam. When you have cleared the jam, the resume job screen is displayed. If the machine mistakenly detects multiple sheet feeding, press <Do Not Detect Multi. Sheet Feed> to resume scanning. To set the machine in advance to not notify you of multiple sheet feeding, perform one of the following operations. Each time you send, press <Options> on the Fax Basic Features screen  select <Detect Feeder Multi Sheet Fd.> to disable the setting. select <Detect Feeder Multi Sheet Fd.> to disable the setting. Set <Set Detection of Feeder Multi. Sheet Feed as Default> to <Off>. <Set Detection of Feeder Multi. Sheet Feed as Default> When photos in the sent image are too dark or light colors in the background of color originals cannot be removedThe quality of the sent image may be able to be improved if the following conditions/settings are met. Job type: Fax (Memory Sending) or Scan and Send (Fax/I-fax) <Select Color>: <Black & White> (Scan and Send) <Original Type>: <Text> <Density>  <Background Density>: <Auto> <Background Density>: <Auto><Resolution>: 200 dpi x 400 dpi, 300 dpi x 300 dpi*, 400 dpi x 400 dpi, or 600 dpi x 600 dpi* *Can be set for Scan and Send <Speed/Image Quality Priority for B&W Scan>  Fax/I-Fax Send Jobs: <Quality Priority> (<Speed/Image Quality Priority for B&W Scan>) Fax/I-Fax Send Jobs: <Quality Priority> (<Speed/Image Quality Priority for B&W Scan>)When multiple telephone lines are setYou can select the telephone line to use for sending faxes by pressing <Options>  <Select Line>. For instructions on specifying fax line settings, see Fax Line Settings. <Select Line>. For instructions on specifying fax line settings, see Fax Line Settings. |
TIPS |
Saving a copy of a sent documentYou can set the machine so that a copy of a sent document is automatically saved in a file server. The copy is converted into an electric file such as PDF and saved, allowing you to easily check the contents from your computer. Saving a Copy of a Sent Document Selecting a sender's nameOn the Basic Fax Features screen, pressing <Options>  <Sender Name (TTI)> enables you to select a name from a list of registered sender's names to include in the sender information. <Register Sender Name (TTI)> <Sender Name (TTI)> enables you to select a name from a list of registered sender's names to include in the sender information. <Register Sender Name (TTI)>If logging in using User Authentication, the login name appears in <100> of Sender Name (TTI). Checking scanned images before sendingYou can check scanned images on the preview screen before sending. Checking Scanned Images Before Sending (Preview) Registering frequently used settingsYou can combine frequently used destinations and scan settings into a button of the machine for later use. By pressing the registered button when scanning originals, you can quickly complete your settings. Registering a Combination of Frequently Used Functions |