Registering Server Information
 | To specify an Active Directory/LDAP Server/Microsoft Entra ID as an additional authentication device, you must register the information of the server used for authentication. Conduct a connection test as necessary. |
1
Start the Remote UI. Starting the Remote UI
2
Click [Settings/Registration] on the portal page. Remote UI Screen
3
Click [User Management]  [Authentication Management].
4
Click [Server Settings] [Edit...].
5
Set the authentication server and domain information.
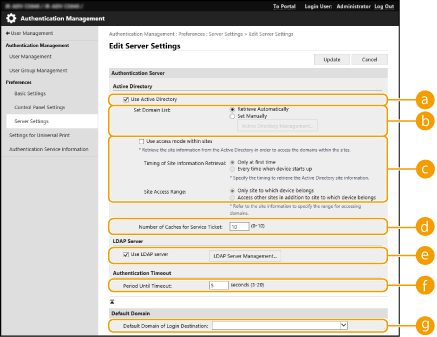
 [Use Active Directory]
Select the check box when using Active Directory.
 [Set Domain List:]
Select whether the Active Directory information of the login destination is retrieved automatically or entered manually. To enter it manually, select [Set Manually] and add the domain of the login destination in [Active Directory Management...].
 [Use access mode within sites]
Select the check box if there are multiple Active Directory servers and you want to assign access priority to the Active Directory located in the same site as the machine. Change the settings for [Timing of Site Information Retrieval:] and [Site Access Range:] as necessary.

Even when [Only site to which device belongs] in [Site Access Range:] is set, the machine may access sites outside the site it belongs to when performing domain controller access during the startup process. However, access to domain controllers in the same site as the machine is prioritized. As an exception, if domain controllers in the same site cannot be accessed but domain controllers outside the site can be accessed, priority is given to accessing domain controllers outside the site.
 [Number of Caches for Service Ticket:]
Specify the number of service tickets that the machine can hold. A service ticket is an Active Directory function that acts as a record of a previous login, which reduces the amount of time it takes for the same user to log in next time.
 [Use LDAP server]
Select the check box when using an LDAP server.
 [Period Before Timeout]
Specify the time limit for attempting to connect to the authentication server and the time limit for waiting for a response. When [Save authentication information for login users] is enabled, if you cannot log in within the time limit specified here, login is attempted using the authentication information saved in the cache.
 [Default Domain of Login Destination:]
Specify the domain that has connection priority.
 Manually specifying the Active Directory domain
1 | Select the check box for [Use Active Directory] and select [Set Manually] for [Set Domain List:]. |
2 | Click [Active Directory Management...] |
3 | Click [Add Domain...]. |
4 | Enter the necessary information.  [Domain Name:] [Domain Name:]Enter the domain name of the Active Directory that is the login destination (Example: company.domain.com). [NetBIOS Name]Enter the NetBIOS domain name (Example: company). [Primary Host Name or IP Address:] / [Secondary Host Name or IP Address:]Enter the host name of the Active Directory server or the IPv4 address. When using a secondary server, specify the name in [Secondary Host Name or IP Address:]. Example: Using a host name: ad-server1 Using an IPv4 address: 192.168.18.138 [User Name:] / [Password:]Enter the user name and password to use for accessing and searching the Active Directory server. [Starting Point for Search:]Specify the location (level) to access and search for user information during Active Directory Server authentication. [Login Name:] / [Displayed As] / [E-Mail Address]Specify the data fields (attribute names) for the login name, display name, and e-mail address of each user account on the Active Directory server (Example: sAMAccountName, cn, mail). |
5 | Click [Connection Test] to confirm that connection is possible, and then click [Add].  To edit server information Click [Edit] for the server information that you want to edit, make the necessary changes, and click [Update]. |
Registering LDAP server information
1 | Select the check box for [Use LDAP server] and click [LDAP Server Management...] |
2 | Click [Add Server...]. |
3 | Enter the LDAP server information.  [Server Name] [Server Name]Enter the name for the LDAP server. The name "localhost" cannot be used. The server name may not include spaces. [Primary Address]Enter the IP address or host name of the LDAP server (Example: ldap.example.com). The loopback address (127.0.0.1) cannot be used. [Port:]Enter the port number used for communicating with the LDAP server. Use the same setting that is configured on the server. If you do not enter a number, it is automatically set to "636" when the check box is selected for [Use TLS], or it is set to "389" when the check box is cleared. [Secondary Address:] / [Port:]When using a secondary server in your environment, enter the IP address and the port number. [Comments]Enter a description or note as necessary. [Use TLS]Select the check box when using TLS encryption for communications with the LDAP server. [Use authentication information]Clear the check box to allow anonymous access to the LDAP server, only if the LDAP server is set to allow anonymous access. When using the user name and password for authentication, select the check box and enter values for [User Name:] and [Password:].  [Starting Point for Search:] [Starting Point for Search:]Specify the location (level) to search for user information when LDAP server authentication is performed. |
4 | Specify how to set the attribute names and domain name. 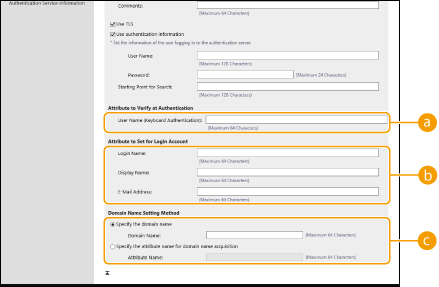 [User Name (Keyboard Authentication):] [User Name (Keyboard Authentication):]Specify the LDAP data field (attribute name) for the user name on the LDAP server (Example: uid). [Login Name:] / [Display Name] / [E-Mail Address]Specify the LDAP data fields (attribute names) for the login name, display name, and e-mail address of each user account on the LDAP server (Example: uid, cn, mail). [Specify the domain name] / [Specify the attribute name for domain name acquisition]Select how to set the domain name of the login destination. To specify the domain name directly, select [Specify the domain name] and enter the domain name. To specify an LDAP data field (attribute name) from which to acquire the domain name on the LDAP server, select [Specify the attribute name for domain name acquisition] and enter the attribute name (Example: dc). |
5 | Click [Connection Test] to confirm that connection is possible, and then click [Add]. |
To edit server information
Click [Edit] for the server information that you want to edit, make the necessary changes, and click [Update].
Specifying the Microsoft Entra ID Information
If you use Microsoft Entra ID as an authentication server, register the application with Microsoft Entra ID.
1 | Select the [Use Microsoft Entra ID] checkbox. |
2 | Click [Domain Settings]. The [Microsoft Entra ID Domain Settings] screen is displayed. |
3 | Specify the Microsoft Entra ID information.  [Login Destination Name] [Login Destination Name]Enter the name to be displayed at the login destination. * You cannot use control characters or spaces. [Domain Name]Enter the domain name of the Microsoft Entra ID that is the login destination. [Application ID]Enter the application (client) ID. [Secret]Enter the secret generated by Microsoft Entra ID. You do not need to enter this when [Key and Certificate] is used. [Key and Certificate]Press [Key and Certificate] when you use a key and certificate. You can press [Export Certificate] to export the certificate to be registered to Microsoft Entra ID. [Microsoft Entra ID Authentication URL] and [Microsoft Entra ID API URL]Enter the URLs. Depending on your cloud environment, you may need to change the settings. |
4 | Specify the attributes. 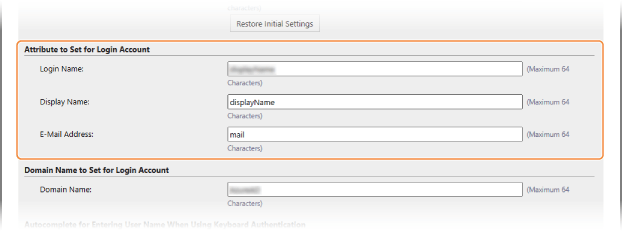 [Attribute to Set for Login Account] Enter the attributes for the login name, display name, and e-mail address of each user account on the server. [Login Name] From the pulldown menu, select the attribute for the login name of each user account on the server. * To specify an attribute not displayed in the pulldown menu, you can enter it directly. [WindowsLogonName]: displayName is obtained from Microsoft Entra ID. displayName is changed as follows to create the login name: Spaces and the following characters are deleted from displayName: * + , . / : ; < > = ? \ [ ] |. "@" and any subsequent characters are deleted. Character strings exceeding 20 characters are shortened to 20 characters or less. Example: When displayName is "user.001@example.com," the login name becomes "user001." [displayName]: displayName obtained from Microsoft Entra ID becomes the login name. [userPrincipalName]: userPrincipalName obtained from Microsoft Entra ID becomes the login name. [userPrincipalName-Prefix]: The portion before "@" in userPrincipalName obtained from Microsoft Entra ID becomes the login name. Example: When userPrincipalName is "user.002@mail.test," the login name becomes "user.002." [Display Name] and [E-Mail Address] Enter the attributes for the display name and e-mail address of each user account on the server. |
5 | Specify the domain name of the login destination in [Domain Name] under [Domain Name to Set for Login Account]. |
6 | Specify the settings in [Autocomplete for Entering User Name When Using Keyboard Authentication] under [Domain Name to Autocomplete]. Enter the name of the domain for which to perform autocomplete. Normally, set the same name as entered in [Domain Name]. |
7 | Click [Connection Test] to test the connection. |
8 | Click [Update]. The screen returns to the [Edit Server Settings] screen. |
6
Enter the user information and set the privileges.
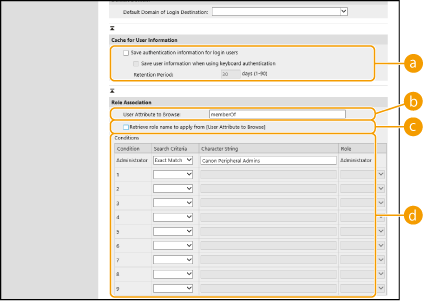 [Save authentication information for login users]
Select the check box to save the authentication information of users who log in via the control panel. Select the [Save user information when using keyboard authentication] check box to save the information of users who log in using keyboard authentication to the cache. After the settings are configured, the saved authentication information can be used for login, even if the machine is unable to connect to the server. Change the [Retention Period:] setting as necessary.
[User Attribute to Browse:]Enter the data field (attribute name) on the referenced server that is used to determine user privileges (roles). Normally, you can use the preset value of "memberOf", which indicates the group that the user belongs to.
[Retrieve role name to apply from [User Attribute to Browse]]Select the check box to use the character string registered in the data field on the server specified in [User Attribute to Browse:] for the role name. Before configuring, check the role names that can be selected on the machine, and register them on the server.
[Conditions]You can set the conditions that determine user privileges. The conditions below are applied in the order that they are listed.
[Search Criteria] | Select the search criteria for [Character String]. |
[Character String] | Enter the character string that is registered to the attribute specified in [User Attribute to Browse:]. To set the privileges based on the group that user belongs to, enter the group name. |
[Role] | Select the privileges that apply to users who match the criteria. |
The [Conditions] settings when using Active Directory servers
"Canon Peripheral Admins" is set in advance as the Administrator user group. Assign different privileges to the other groups created on the server.
7
Click [Update].
8
Restart the machine. Restarting the Machine
Registering an Application in Microsoft Entra ID
Use the following procedure to register an application in Microsoft Entra ID.
The registration process may change with service updates. For more information, see the Microsoft website.
The registration process may change with service updates. For more information, see the Microsoft website.
1
Log in to Microsoft Entra ID.
2
In the navigation menu, click [Microsoft Entra ID].
3
Register the application.
1 | In the navigation menu, click [App registrations] |
2 | Enter the name of the application. You can enter any name. Input example: Canon <printer name> Login |
3 | Select the type of account, and click [Register]. The application (client) ID is generated. Make a note of the generated ID. |
4
Create a secret or register a certificate.
When Creating a Secret
1 | In the navigation menu, click [Certificates & secrets]. |
2 | Click [New client secret]. |
3 | In the [Add a client secret] dialog box, enter the description and expiry date, and click [Add]. A secret ID and value are created. Make a note of the created secret value. You do not need the secret ID. * The secret value is only displayed once. If you are unable to make a note of the value, create a new client secret. |
When Registering a Certificate
The certificate of the machine needs to be exported in advance. You can export the certificate when configuring the Microsoft Entra ID information. Specifying the Microsoft Entra ID Information
1 | In the navigation menu, click [Certificates & secrets]. |
2 | Click [Upload certificate]. |
3 | Select the file, and click [Add]. After the certificate is uploaded, make a note of the [Thumbprint] value. |
5
In the navigation menu, click [API permissions].
6
Click [Add a permissions].
7
Under [Request API permissions], select [Microsoft Graph].
8
Under the type of permissions, select [Delegated permissions], and grant permissions.
Grant the following permissions:
User.Read.All
Group.Read.All
GroupMember.Read.All
9
Under the type of permissions, select [Application permissions], and grant permissions.
Grant the following permissions:
User.Read.All
User.ReadWrite.All (when registering or deleting an IC card to or from the machine)
Group.Read.All
GroupMember.Read.All
* Use permissions when using IC card authentication or when you cannot log in to the machine due to a multifactor authentication error. This is not required depending on the function and environment used.
10
Click [Grant admin consent confirmation], and click [Yes].
Admin consent is granted to the selected permissions.