Shifting the Image
 | This function enables you to make copies with the entire image shifted towards an edge or the center of the page. Shift the image when you want to make blank space on the page to input or arrange text and images on material. |
 |
Shift Direction Settings Depending on the orientation of the original and the location where it is placed, the direction to which the image will be shifted will differ. When the original is placed on the platen glass Top at Side Edge: Image will shift to the right and/or bottom.  Top at Far Edge: Image will shift to the left and/or bottom.  When the original is placed in the feeder Top at Side Edge: Image will shift to the left or right, and/or bottom.  Top at Far Edge: Image will shift to the top or bottom, and/or right.  If using the By Position function: The image will shift but its position will be adjusted so that the entire image is copied without being cut off. If using the By Numeric Keys function: The copied image may be cut off. |
Shifting the Image to an Edge or the Center
You can make margins around the image by copying to paper larger than the original or by reducing the copied image to a size smaller than the paper size. When these margins are available, the image can be shifted to an edge or the center of the paper.
1
Place the original. Placing Originals
2
Press <Copy>. <Home> Screen
3
Press <Options> on the Copy Basic Features screen. Copy Basic Features Screen
4
Press <Shift>.
5
Press <By Position>  <Next>.
 <Next>.
6
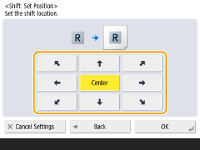
Select the direction to move the image.

Press an arrow button or <Center> to select the direction of movement.
7
Press <OK>  <Close>.
 <Close>.
8
Press  (Start).
 (Start).
Copying starts.
Specifying Moving Distance
If no blank space exists because the original image and the output paper are the same size, or if you want to shift images by a few millimeters, specify the moving distance.
1
Place the original. Placing Originals
2
Press <Copy>. <Home> Screen
3
Press <Options> on the Copy Basic Features screen. Copy Basic Features Screen
4
Press <Shift>.
5
Press <By Numeric Keys>  <Next>.
 <Next>.
6
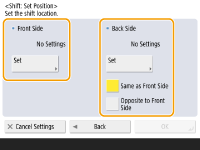
Specify the position to move to.

Press <Set> in <Front Side> and specify the moving distance. Press the up/down/left/right buttons indicating directions and enter the moving distance using the numeric keys.
If you want to move the image on the back side when copying both sides, the <Back Side> setting is needed. To move to the same position as the front side, press <Same as Front Side>. To move symmetrically, press <Opposite to Front Side>. To move to a position different from the front side, press <Set> and enter the moving distance.
7
Press <OK>  <Close>.
 <Close>.
8
Press  (Start).
 (Start).
Copying starts.