Problems with Printing Results
The printed image is displaced or skewed.
 Are the paper guides misaligned?
Match the paper guides with the paper loaded in the paper source.
Streaks Appear/Printing is Uneven

 Are you using appropriate paper?
Check usable paper, and replace with appropriate paper.
 Have you cleaned the fixing unit?
Clean the fixing unit.
 Is the amount remaining in toner cartridge running low?
Check how much toner is left, and replace the toner cartridge as necessary.
 Is it time to replace the toner cartridge?
Materials inside the toner cartridge may have deteriorated. Replace the toner cartridge.
 Are you using the machine in an environment with high humidity?
Change the settings of [Humid Environment Mode]. Setting to [High Humidity] may improve the problem.

Setting to [High Humidity] may cause a printed image or text to be blurred when using in a low humidity environment.
 Has color mismatch correction or hue correction been performed properly?
If the effect of the color mismatches or color streaks (lines) is unacceptably strong, perform calibration.
 Is only the color of the tail end of the printed image dense?
Change the settings of <Corr. Tail End Fix. When Using Plain Ppr>. Setting to <On> may improve the problem.

Setting to <On> decreases the print speed.
Images are not printed on the intended side of the paper.
 Is the orientation of the loaded paper correct?
Check the orientation and side of the paper that is facing up. Load the paper again if it is incorrectly orientated.
Images are not printed in the intended size.
 Do the original size and size of the paper that is loaded match?
Replace the paper that is loaded with paper of the size you want to print on.
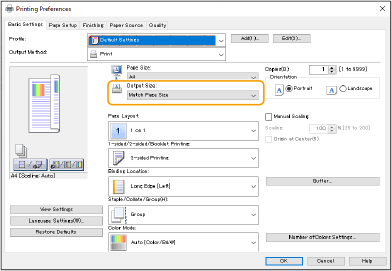
Match [Output Size] in the printer driver with the size of paper to print on.
The orientation does not match on both sides of the paper when using two-sided printing.
 Are the settings for two-sided printing correct?
Follow the procedure below to check the print settings.
1 | Select the orientation of the original on the print settings screen of the application. |
2 | On the [Basic Settings] screen of the driver, set [Orientation] to the same orientation you set in step 1. 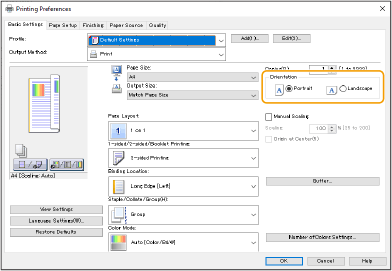 |
3 | While checking the print preview, set [Page Layout]  [Page Order] [Page Order]  [1-sided/2-sided/Booklet Printing] [1-sided/2-sided/Booklet Printing]  [Binding Location]. [Binding Location].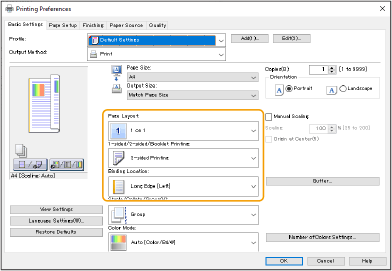 |
 |
[Page Order] is displayed when [Page Layout] is set to [2 on 1] or higher. |
Smudges Appear on Printouts

 Are you using appropriate paper?
Check usable paper, and replace with appropriate paper.
 Do smudges appear on printouts when you use the machine in an environment with low humidity?
Change the setting for [Humid Environment Mode]. Setting this item to [Low Humidity 1] may solve the problem.

If you select [Low Humidity 1] and use the machine in an environment with high humidity, the print density may become lighter or uneven.
 Do smudges appear on printouts depending on the paper type or the operating environment?
Change the setting for <Corr. Tail End Fix. When Using Plain Ppr>. Setting this item to <On> may solve the problem.

If you select <On>, the printing speed will be slower.
Toner Smudges and Splatters Appear

 Are you using appropriate paper?
Check usable paper, and replace with appropriate paper.
 Are you using the machine in a low humidity environment?
Change the settings of [Humid Environment Mode]. Setting to [Low Humidity 2] may improve the problem.
Afterimages Appear in Blank Areas

 Are you using appropriate paper?
Check usable paper, and replace with appropriate paper.
 Is the amount remaining in toner cartridge running low?
Check how much toner is left, and replace the toner cartridge as necessary.
 Is it time to replace the toner cartridge?
Materials inside the toner cartridge may have deteriorated. Replace the toner cartridge.
 Is the fixing temperature appropriate?
Change the settings of <Adjust Fixing Temperature>. Setting to <Low> may improve the problem.
Printouts are faint or streaks appear

 Is the amount remaining in toner cartridge running low?
Check how much toner is left, and replace the toner cartridge as necessary.
 Is it time to replace the toner cartridge?
Materials inside the toner cartridge may have deteriorated. Replace the toner cartridge.
 Are you using appropriate paper?
Check usable paper, and replace with appropriate paper. Also, specify the paper size and type settings properly.
 Are you using paper with a large amount of paper dust?
Change the setting of [Reduce Image Defects Caused by Paper Dust]. Setting to [On] may improve the problem.

Setting to [On] may decrease the print speed.
White Spots Appear

 Are you using paper that has absorbed moisture?
Replace with appropriate paper.
 Are you using appropriate paper?
Check usable paper, and replace with appropriate paper.
 Is the amount remaining in toner cartridge running low?
Check how much toner is left, and replace the toner cartridge as necessary.
 Is it time to replace the toner cartridge?
Materials inside the toner cartridge may have deteriorated. Replace the toner cartridge.
 Are you using the machine in a low humidity environment?
Change the settings of [Humid Environment Mode]. Setting to [Low Humidity 2] may improve the problem.
 When performing 2-sided printing, do white spots appear?
Change the settings of <Waterdrop Pattern Prevention Mode>. Setting to <On> may improve the problem.

Setting to <On> decreases the print speed.
Black Spots Appear

 Have you cleaned the fixing unit?
Clean the fixing unit.
Reverse Side of Paper is Smudged

 Have you loaded paper that is smaller than the size of the print data?
Check to make sure that the paper size matches the size of the print data.
 Have you cleaned the fixing unit?
Clean the fixing unit.
 Have you cleaned the secondary transfer roller?
Change the settings of <Auto Clean Secondary Transfer Roller>. Setting to <On> may improve the problem.

Setting to <On> may decrease the print speed.
Filled areas are not printed fine
 Filled areas are not printed fine
Change the settings of <Plain Paper Fill Area Image Adjust. Mode>. Setting to <On> may improve the problem.

Change to <On> only when you use paper of glossy surface. A printing problem may occur.
 Are you using (heavy) paper of glossy surface?
Change the settings of <Heavy Paper Fill Area Image Adjust. Mode>. Setting to <On> may improve the problem.

Change to <On> only when you use heavy paper of glossy surface. A printing problem may occur.
Spots like Waterdrops or Streaks Appear
 Does the paper get dirty when printing on both sides?
Change the settings of <Waterdrop Pattern Prevention Mode>. Setting to <On> may improve the problem.

Setting to <On> may decrease the print speed.
The Toner of the Printed Image Peels Off
 Are you using appropriate paper?
Check usable paper, and replace with appropriate paper.
 Is the fixing temperature appropriate?
Change the settings of <Adjust Fixing Temperature>. Setting to <High 1> may improve the problem.

If setting to <High 1> does not improve the problem satisfactorily, set to <High 2>. But, the print speed decreases.
Paper Creases

 Is paper loaded correctly?
If paper is not loaded below the load limit line or the load limit guide or is loaded obliquely, it may crease.
 Are you using paper that has absorbed moisture?
Replace with appropriate paper.
 Are you using appropriate paper?
Check usable paper, and replace with appropriate paper.
 Do creases form when you print on thin paper?
Change the setting of [Reduce Thin Paper Waviness]. Selecting [On] may improve the problem.

If you select [On], printouts may be faded.
 Do wrinkles appear when printing on thin or plain paper in an environment of high humidity?
Change the settings of [Reduce Thin/Plain Paper Wrinkles]. Setting to [On] may improve the problem.

Setting to [On] decreases the print speed.
Depending on the environment, paper loaded in a paper drawer may absorb moisture and wrinkles may appear when printing. In that case, reducing the sheets of new paper that will be loaded at the next time may prevent wrinkles.
 Does this occur when you print on envelopes?
Change the settings of [Reduce Envelope Wrinkles]. Setting to [On] may improve the problem.

Setting to [On] may cause a printed image to be faint.
Paper Curls

 Are you using paper that has absorbed moisture?
Replace with appropriate paper.
When the current setting of the paper type is <Plain 1>, change it to <Plain 2>.
 Does this problem occur when printing on some types of paper such as plain paper or thin paper?
Set <Mode 1> to <On> under <Curl Prevention Mode>.

If you select <On>, the print quality may be reduced.
If setting <Mode 1> to <On> does not reduce curling, set <Mode 2> to <On>. If setting both <Mode 1> and <Mode 2> to <On> does not reduce curling, set <Mode 1> and <Mode 2> to <Off>, and set <Switch Paper Feed Method> to <Print Side Priority>.
 Are you using appropriate paper?
Check usable paper, and replace with appropriate paper. Also, specify the paper size and type settings properly.
Turn over the paper (front to back) so that the print side is changed, and then reload the paper.

Rarely, the symptoms may worsen depending on the type of paper you are using. In that case, get the print side back to original.
Paper Is Not Fed/Two or More Sheets Are Fed Together

 Is paper loaded correctly?
Fan the paper stack thoroughly so that paper is not stuck together.
Check whether paper is loaded correctly.
Check whether the number of sheets of paper loaded is appropriate and whether the appropriate paper is used.
Check whether mixed sizes and types of paper are loaded together.
 Does this happen when feeding paper from the MP Tray?
Change the settings of [Adjust Paper Conveyance in Multi-Purpose Tray]. Setting to [On] may improve the problem.

Setting to [On] may decrease the print speed.