Restricting Printing from a Computer
You can restrict printing from a computer (Printing From a Computer) so that only specific types of documents can be printed. You can also configure the machine so that documents are not printed until the user is authorized on the machine (Printing Documents that are Forced to be Held in the Machine). You can also restrict the machine to only print Encrypted Secure Print documents, which can prevent information leakage due to unattended printouts or unprotected print data. Administrator privileges are required in order to configure these settings.
Prohibiting Printing from a Computer
You can prohibit users from printing documents from a computer.

<Set>  <Function Settings>
  <Printer>
  <Restrict Printer Jobs>
  <On>
<On>  Select the restriction exceptions
 <Function Settings>
  <Printer>
  <Restrict Printer Jobs>
  <On>
<On>  Select the restriction exceptions
Configuring the Forced Hold Printing Settings
 | When printing documents from a computer, you can hold print data in the machine and prevent documents from being printed immediately (Printing Documents that are Forced to be Held in the Machine). You can configure settings so that printing cannot be performed until the user is authorized on the machine, which ensures greater security and reduces the risk of other people viewing or inadvertently picking up sensitive documents. Administrator privileges are required in order to configure these settings. |
1
Start the Remote UI. Starting the Remote UI
2
Click [Settings/Registration] on the portal page. Remote UI Screen
3
Click [Printer] [Print].
 [Print].
4
Select [Force Hold], set the necessary conditions, and click [OK].
You can set detailed conditions for holding printer jobs, such as the user or IP address. If no conditions are set, all print jobs are held except for jobs from unidentified users. If no conditions are set and a print job from an unidentified user is received, it is canceled without being held.
 Setting the conditions for holding documents
1 | Click [Register New]. | ||||||
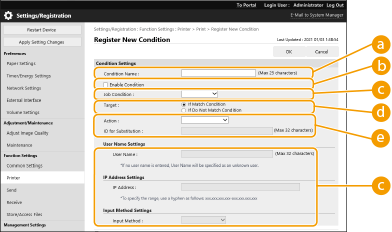
2 | Set the conditions for holding documents, and click [OK].   [Condition Name] [Condition Name]Enter a name for the condition. Use a name that will be easy to identify when displayed in a list.  [Enable Condition] [Enable Condition]Select this check box to enable the condition.  [Job Condition] [Job Condition]The types of conditions listed below can be selected.
 [Target] [Target]You can set either a value specified by the operation target, or one not specified.  [Action] [Action]Select how to handle documents that match the conditions. When [Hold as Shared Job] is selected, you can set [ID for Substitution] to specify the user name output to the log when printing. Select [Cancel] to discard the document. | ||||||
3 | Set the order in which to apply the conditions, and select [OK]. The conditions are applied in the order that they are listed, starting at the top. To change the priority, click [Up] or [Down] in the list. To edit the details of a condition, click the condition name in the list. To disable a condition, click the condition name in the list  deselect [Enable Condition]. deselect [Enable Condition].To delete a condition, select [Delete] for the condition to delete in the list  click [OK]. click [OK]. |
 |
Configuring the detailed settings for forced hold printingYou can configure detailed settings for documents that are held for printing, such as how long to save them and how to display them. <Print> Batch importing/batch exportingThis setting can be imported/exported with models that support batch importing of this setting. Importing/Exporting the Setting Data This setting is included in [Settings/Registration Basic Information] when batch exporting. Importing/Exporting All Settings |
Setting Other Limitations
1
Start the Remote UI. Starting the Remote UI
2
Click [Settings/Registration] on the portal page. Remote UI Screen
3
Click [Printer]  [Print].
 [Print].
4
Set the other limitations.

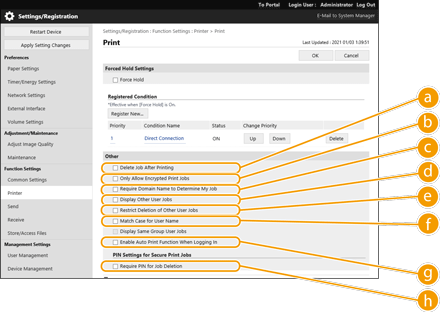
 [Delete Job After Printing]
Select this check box to delete jobs after they are printed.
 [Only Allow Encrypted Print Jobs]
Select this check box to only receive encrypted secured print jobs from computers.
 [Require Domain Name to Determine My Job]
Select this check box to determine the print jobs of login users as "user name + domain name."
 [Display Other User Jobs]
Select this check box to display the jobs of users other than the authenticated user.
 [Restrict Deletion of Other User Jobs]
Select this check box to restrict jobs of users other than the authenticated user to be deleted when the jobs of users other than the authenticated user are displayed.
 [Match Case for User Name]
Select this check box to make user names case-sensitive.
 [Enable Auto Print Function When Logging In]
Select this check box to allow forced hold print jobs to be automatically printed when each user logs in.
 [Require PIN for Job Deletion]
Select this check box to prompt the user to enter a PIN when deleting a secure print job.
 |
Batch importing/batch exportingThis setting can be imported/exported with models that support batch importing of this setting. Importing/Exporting the Setting Data This setting is included in [Settings/Registration Basic Information] when batch exporting. Importing/Exporting All Settings |